
Picture this: your mix sounds enormous on your studio monitors. The synths breathe outward, the guitars sit wide in the field, and the whole thing feels cinematic and professional. Then you press mono on your DAW and the bottom falls out. The centre hollows, the low end loses punch, and what was once a powerful mix sounds thin and broken. This is one of the most common and preventable problems in modern music production, and stereo widening can introduce phase problems that make a mix sound thin or weak in mono. This guide gives you a verified, step-by-step approach to widening safely.
Table of Contents
- What you need before you start
- Step-by-step: Safely widening your mix
- Avoiding common pitfalls and mistakes
- Verifying mono compatibility: Practical tests
- Why subtlety and verification outperform 'magic' widening plugins
- Next steps: Enhance your stereo width with expert feedback
- Frequently asked questions
Key Takeaways
| Point | Details |
|---|---|
| Mono compatibility is essential | Always check your widened mix in mono to spot phase and cancellation issues early on. |
| Widen highs, keep lows mono | Apply stereo width mainly to upper frequencies and keep bass elements centred for a powerful, safe mix. |
| Small changes work best | Subtle, iterative widening with repeated listening delivers the widest safe result without unwanted artefacts. |
| Metering tools are critical | Use visual metering and correlation meters to verify mono safety—not just your ears or plugin marketing. |
What you need before you start
With the risks clear, the next move is to make sure you have everything in place before you touch a single widening control. Rushing into stereo processing without the right tools and monitoring setup is exactly how producers end up with mixes that fall apart outside the studio.
Here is what you need to get started:
- A DAW (Digital Audio Workstation) with routing flexibility, so you can quickly sum your mix to mono for comparison checks
- A stereo imager plugin, either a simple mid-side (M/S) processor or a multiband stereo widener that lets you control width by frequency range
- A correlation meter, which shows you in real time whether your left and right channels are moving in phase or against each other
- A vectorscope, which gives you a visual picture of your stereo field and flags potential cancellation issues
- Reference monitors and headphones, because widening can behave very differently across playback systems
- A mono speaker or phone speaker, for real-world testing at the end of the process
The choice between hardware and software tools matters less than you might think at this stage. Hardware stereo processors can sound excellent, but software plugins give you the visual metering and recall that makes safe widening workflows much more practical. Most modern stereo imager plugins include built-in correlation meters, which is exactly what you want.
| Feature | Hardware stereo processor | Software stereo imager plugin |
|---|---|---|
| Visual metering | Rarely included | Usually built in |
| Mono sum button | Requires external routing | Often a single click |
| Multiband control | Uncommon | Widely available |
| Recall and automation | Manual | Instant and precise |
| Cost | Higher | Wide range, often free |
Before you apply any widening, set up a mono listening option in your DAW. Most DAWs have a built-in mono switch on the master bus, or you can use a utility plugin. Make this a keyboard shortcut. You will be flipping between stereo and mono constantly, and friction in that process leads to fewer checks and more mistakes.
Pro Tip: Always trust your metering over your ears when it comes to phase. Your ears adapt quickly to widened audio and stop registering the problem. A correlation meter stays honest. As iZotope note, visual feedback and a mono-compatibility metric are essential when using stereo imager tools. For a structured approach to checking your mix, the evaluation framework for mono compatibility is a useful reference point.
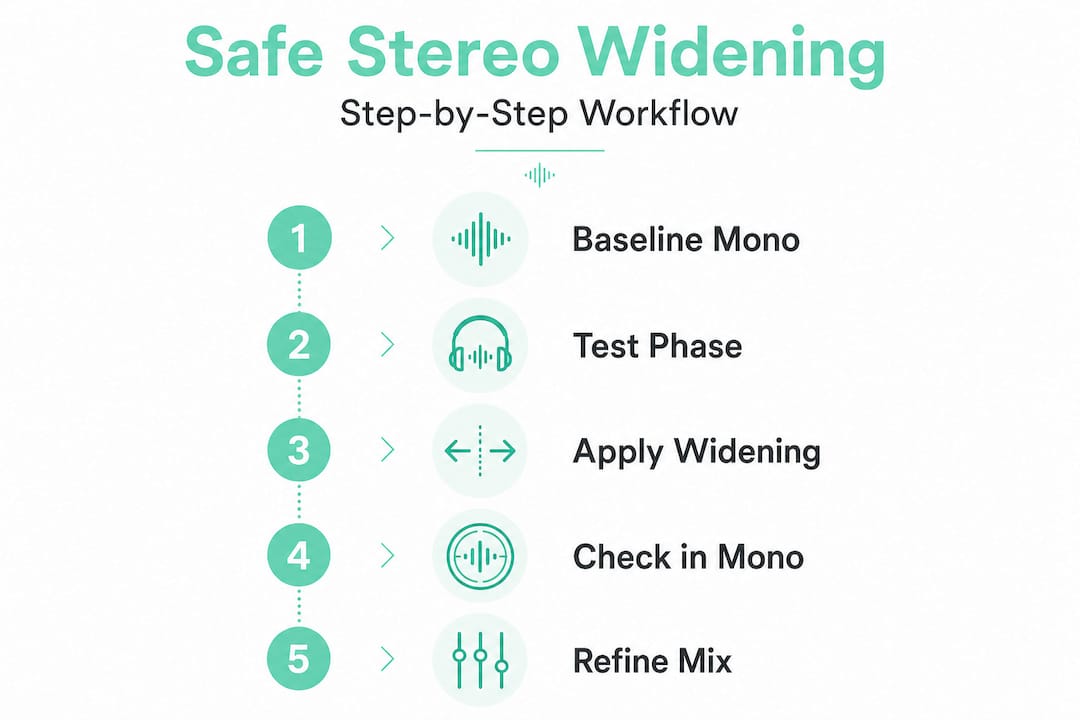
Step-by-step: Safely widening your mix
Once your monitoring and metering are set up, follow this sequence to widen your mix without creating problems you will regret later.
-
Start with a mono reference. Before touching any widening, listen to your mix in mono and note how it sounds. This is your baseline. If anything sounds weak or thin in mono before you start, fix it first. Widening will not solve underlying mix problems.
-
Identify which elements should be wide. Pads, room reverb returns, guitars panned hard, and high-frequency percussion are natural candidates. Lead vocals, kick drum, bass, and sub frequencies should stay centred or very close to it.
-
Apply frequency-banded widening. Rather than widening the entire signal, use a multiband stereo imager to widen only the upper frequencies, typically above 200 Hz or even 500 Hz. This approach, known as frequency-banded widening for pro mixes, keeps your low end tight and mono-compatible while opening up the top of the mix.
-
Make small adjustments. The safest workflow for stereo widening is to make small adjustments, then repeatedly verify mono compatibility. Nudge the width control a small amount, then flip to mono immediately. Do not make large sweeping changes and then check.
-
Check your correlation meter after every adjustment. Aim to keep the correlation value above 0. Anything below 0 indicates out-of-phase content that will cancel in mono. A value between 0.5 and 1 is generally safe territory.
-
Listen in mono on a real speaker. Not just through your DAW's mono switch, but through a phone speaker, a small Bluetooth speaker, or a mono reference monitor. This is where problems that look fine on a vectorscope reveal themselves.
-
Compare against your reference track. Load a professionally mastered reference track into your DAW and check its stereo width and mono behaviour. This gives you a target to aim for rather than widening by feel.
Warning: Never apply extreme widening settings to centred elements like lead vocals, kick, bass, or snare. These elements anchor your mix and are the first to collapse in mono. Stereo widening should be subtle and targeted; extreme settings or widening the wrong material is a common failure pattern.
| Step | Do this | Not that |
|---|---|---|
| Starting point | Establish a mono baseline first | Jump straight into widening |
| Source selection | Widen pads, reverbs, high-frequency content | Widen kick, bass, or lead vocal |
| Adjustment size | Small increments, check after each | Large changes, check at the end |
| Metering | Watch correlation meter constantly | Rely on your ears alone |
| Final check | Test on a phone or mono speaker | Trust only your studio monitors |
Pro Tip: After your session, test your mix on a phone speaker placed face-down on a hard surface. This is one of the most brutal mono playback tests available to you, and it costs nothing.
Avoiding common pitfalls and mistakes
After you have completed each step, it is equally important to understand what not to do. Many producers learn the safe workflow but still make avoidable mistakes because they underestimate how easy it is to go wrong.
The most frequent dangers include:
- Over-widening the master bus. Applying a stereo widener across the entire mix is one of the fastest ways to create phase problems. Even a small amount of master bus widening can interact badly with already-wide elements.
- Trusting plugin "mono-safe" claims without testing. Some plugins market themselves as phase-coherent or mono-safe. This does not mean they are risk-free on every source. Results depend entirely on the source material and how much widening you apply.
- Widening the wrong sources. Mono sources that have been artificially widened using time-based tricks are particularly vulnerable. If a sound was recorded in mono and you widen it heavily, you are essentially creating artificial differences between channels that will cancel in mono.
- Using delay-based widening carelessly. Delay-based widening, sometimes called the Haas effect, adds a short delay to one channel to create a sense of width. It can sound impressive in stereo, but the Haas-effect-style approach can create width but requires mono checking because cancellation can occur when summed.
- Ignoring the low end. Bass frequencies below 200 Hz should almost always be kept mono. Wide low-end content causes phase cancellation, loss of punch, and unpredictable behaviour on club sound systems.
Remember: Stereo widening can introduce phase problems that make a mix sound thin or weak in mono. This is a predictable consequence of manipulating inter-channel phase and time relationships. It is not a plugin bug or a DAW glitch. It is physics, and it requires active management every single time.
One myth worth addressing directly: many producers believe that if a mix sounds wide and exciting in stereo, it must be well-produced. Width is not the same as quality. A mix can be extremely wide and still be poorly balanced, phase-incoherent, or completely broken in mono. Width is a tool, not a goal.
Verifying mono compatibility: Practical tests
With the mix widened, you need to confirm it still holds up in mono before you send it anywhere. Here is how to do that efficiently and thoroughly.
Metering-based checks:
- Set your correlation meter to display in real time during playback. Watch for values dipping below 0 during busy sections of the track.
- Use a vectorscope to check the shape of your stereo field. A healthy mix shows an oval or slightly diagonal shape. A mix that is too wide will show a near-horizontal line, indicating heavy out-of-phase content.
- Check peak levels in mono against your stereo mix. If the mono version is significantly quieter, phase cancellation is occurring.
Listening-based checks:
- Switch to mono at the loudest, busiest section of your track. This is where phase problems are most likely to become audible.
- Listen for a "hole" in the centre of the mix. If the kick, snare, or lead vocal suddenly sounds recessed or thin, you have a phase issue.
- Check whether the low end retains its punch. Bass and kick should feel just as solid in mono as in stereo.
- Listen on at least three different playback systems: your studio monitors, headphones, and a small mono speaker.
Using multiband stereo imaging lets you widen upper bands while leaving lows centred, which significantly reduces the risk of mono collapse during these tests. If you find problems during verification, go back to your widening plugin and reduce the amount of processing rather than trying to fix it downstream.
Pro Tip: Save a snapshot or preset of your mix settings before and after widening. This lets you A/B between the two instantly and gives you a clear picture of exactly how much the widening is affecting the mono behaviour. Use visual feedback tools for mono compatibility to make these comparisons more objective.
Why subtlety and verification outperform 'magic' widening plugins
Stepping back from the technical steps, it is worth addressing something that does not get said enough in production circles: no plugin will save you from bad decisions.
The stereo widening plugin market is full of impressive-sounding claims. Phrases like "transparent widening," "mono-safe processing," and "phase-coherent stereo enhancement" appear on product pages constantly. And to be fair, some of these tools are genuinely excellent. But excellent tools used carelessly still produce bad results.
The uncomfortable truth is that some tools claim "transparency" and mono-safe behaviour, but the general consensus remains that you still must listen and check, because real results depend on your source material and the amount of widening applied. A plugin that works beautifully on a pad or reverb tail can cause serious phase issues when applied to a drum bus or a vocal group.
What consistently separates professional results from amateur ones is not the quality of the tools. It is the discipline of the workflow. Producers who make small adjustments, check in mono constantly, and treat their metering as a guide rather than a guarantee always end up with more solid, translatable mixes. The ones who reach for a widening plugin and push it to 80% because it sounds exciting in the headphone mix are the ones posting in forums asking why their track sounds hollow on Spotify.
There is also a broader creative point here. Overly wide mixes often sound impressive in isolation but exhausting over time. Subtlety in stereo width creates contrast. When a chorus opens up after a narrow verse, the width feels earned and emotional. When everything is already at maximum width from bar one, there is nowhere left to go.
Verification is not a final step. It is a habit that runs through the entire widening process. Build it into your workflow at every stage, not just at the end.
Next steps: Enhance your stereo width with expert feedback
Having learned the safe methods, the next move is to put your mix in front of tools and expertise that can catch what your ears might miss. Knowing the theory is one thing. Getting objective, detailed feedback on your actual mix is where real improvement happens.

AubioMix is an online app built specifically for music producers and mix engineers who want fast, credible analysis of their mixes. You upload your audio file and receive detailed feedback and actionable steps covering stereo width, mono compatibility, low-end balance, and much more. Rather than guessing whether your widening is working, you get clear, specific guidance based on your actual track. Explore the evaluation framework to understand how the analysis works, or check out a sample report to see the level of detail you can expect. When you are ready, get pro-level feedback on your mix today.
Frequently asked questions
What is the safest way to apply stereo widening?
Make gentle adjustments, check in mono as you go, and focus widening on high-frequency content rather than the full mix. The safest widening workflow involves small adjustments followed by repeated mono compatibility checks.
Why does my mix sound hollow in mono after using a stereo widener?
This is almost always caused by phase issues or over-widening, which causes elements to cancel each other out when the stereo signal is summed to mono. Stereo widening introduces phase problems that make a mix sound thin or weak in mono when the processing is too heavy or applied to the wrong sources.
Should I use stereo widening on bass and kick?
No. Keep low frequencies mono to preserve punch and avoid phase cancellation. A common safe practice is to keep low frequencies such as bass and sub effectively mono while applying width mainly to midrange and high-frequency content.
Are mono-safe or 'transparent' widening plugins truly risk-free?
No plugin is foolproof. Always check your mix in mono, because real results depend entirely on your source material and how much widening you apply. Some tools claim mono-safe behaviour, but the consensus among professionals is that critical listening and checking remain essential regardless of the tool.