
Getting the balance levels in a mix wrong is one of the fastest ways to ruin an otherwise great-sounding track. You might have brilliant sounds, inspired arrangement, and even top-shelf plugins, but if your levels are fighting each other, the whole thing collapses into a wall of competing noise. I see this constantly with mixes that come through, and the fix is almost always simpler than expected. This guide walks you through the complete workflow, from understanding the fundamentals right through to verification, so you can build mixes that are clear, impactful, and genuinely professional-sounding.
Table of Contents
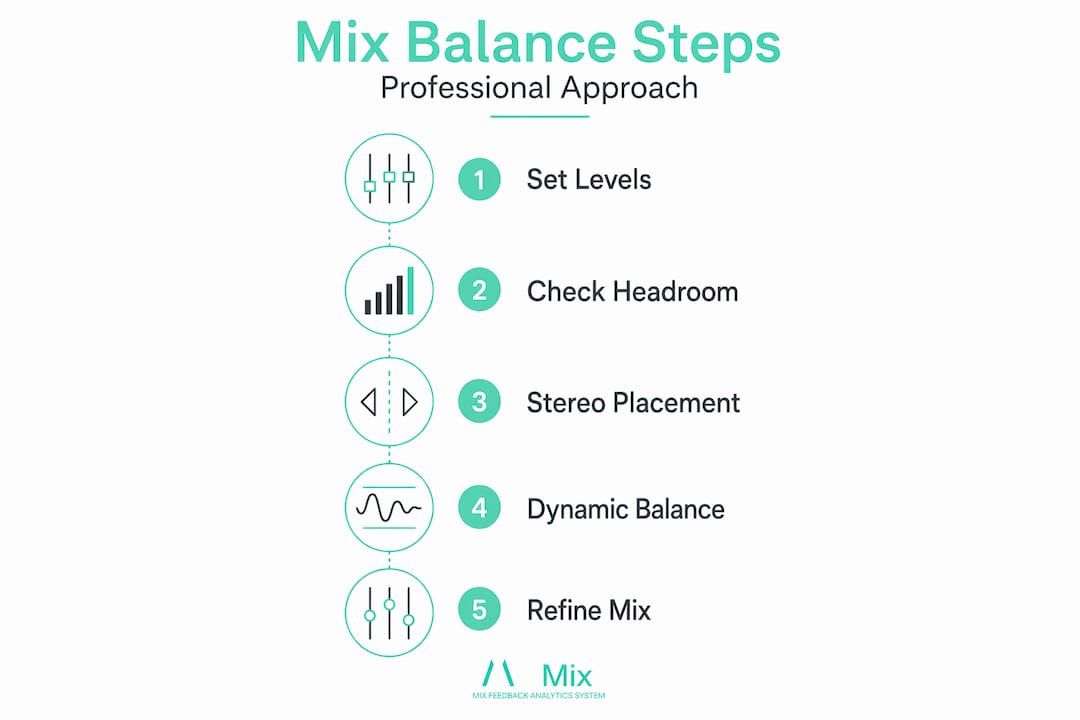
- Understanding the fundamentals of balance in a mix
- Preparing your project for balanced mixing
- Executing effective balance level adjustments
- Verifying and refining your mix balance
- Why balance-first mixing beats plugin obsession every time
- How AubioMix helps you perfect your mix balance quickly
- Frequently asked questions
Key Takeaways
| Point | Details |
|---|---|
| Balance is foundational | Proper balance through levels and panning creates the mix’s core clarity and impact. |
| Use kick as anchor | Set the kick drum level first to establish reliable reference points for other instruments. |
| Maintain headroom | Keep individual track peaks between −18 dBFS and −6 dBFS to avoid clipping and allow processing. |
| Check at different volumes | Mix at moderate volume and verify balance at quiet and loud levels to prevent perception issues. |
| Balance before effects | Adjust fader levels and pan first to avoid masking poor balance with EQ and compression. |
Understanding the fundamentals of balance in a mix
To effectively balance your mix, you first need to thoroughly understand the fundamental controls and their roles. Think of your mix as a conversation at a dinner table. If everyone talks at the same volume simultaneously, nobody can be understood. The same principle applies to your tracks.
Balance is the aggregate relationship among all elements at the full-mix level, controlled by relative fader positions and stereo pan placement. It is not about one track being loud; it is about every track occupying the right amount of space relative to everything else.
Here are the core controls you are working with:
- Fader (amplitude): Controls the volume of a track relative to others. This is your primary tool for mixing audio levels.
- Pan control: Places each element in the stereo field, left to right. Pan is not decoration; it is a crucial dimension of balance.
- Gain staging: The process of setting appropriate input and output levels at every stage of the signal chain before processing begins.
- Headroom: The space between your peak signal and 0 dBFS (digital full scale), which is the ceiling where distortion occurs.
On the topic of headroom, track peaks are commonly kept between −18 dBFS and −6 dBFS to maintain enough space for processing without clipping. Clipping, where the signal exceeds 0 dBFS and gets digitally distorted, is irreversible and ruins your mix before it even reaches the mastering stage.
There is also an important distinction between static balance and dynamic balance. Static balance refers to the fixed fader positions you set for the body of a song. Dynamic balance is managed through automation, where fader levels change over time to reflect the natural ebbs and flows of an arrangement, such as a verse dropping in density before a chorus builds back up. Understanding mixing chain best practices will help you see where balance decisions fit in the bigger picture.
| Element | Primary control | Target range | Common mistake |
|---|---|---|---|
| Kick drum | Fader | −10 dB to −12 dB peak | Too loud, masking bass |
| Bass guitar/synth | Fader + pan (centre) | 3 dB to 6 dB below kick | Competing with kick |
| Snare | Fader | 2 dB to 4 dB below kick | Too thin or buried |
| Lead vocal | Fader | Sits above midrange bed | Lost in dense arrangements |
| Pads/strings | Fader + pan (wide) | 6 dB to 10 dB below kick | Overwhelming the mix |
Pro Tip: Avoid making level decisions on isolated solo tracks. Train yourself to make every fader move in context of the full mix playing back. Soloing is for identifying technical problems, not for setting levels.
Preparing your project for balanced mixing
With your project properly prepared and organised, you are ready to execute the actual balance adjustments. Skipping the preparation phase is where most mixing audio levels problems begin. It's the equivalent of trying to paint a wall before you've prepped the surface.
Here is the step-by-step preparation process I'd recommend:
-
Perform a gain-staging pass first. Before touching a single fader for creative purposes, set track peaks between roughly −18 dBFS and −12 dBFS on every track. This gives your processing headroom and ensures you are mixing audio levels from a stable foundation rather than fighting over-hot or under-hot inputs.
-
Organise your session by role. Group drums, bass, harmonic elements, melodic elements, and vocals into clearly labelled folders or buses. Clarity at this stage speeds up every decision that follows.
-
Mute everything, then rebuild. Start with silence. Bring in the kick drum first, then the rest of the drums, then the bass, then harmonic layers, then leads, then vocals. This additive approach immediately reveals where crowding and masking occur.
-
Set your static pan positions early. Kick, bass, and lead vocal almost always sit centre. Guitars, synth pads, and backing vocals spread left and right. Decide on these positions before you start moving faders up, because pan placement directly affects perceived volume.
-
Use automation from the start, not as an afterthought. Balancing your levels is an ongoing process involving automation and referencing on multiple playback systems. Pre-programme level rides for obvious transitions, like a vocal line that needs to lift slightly in the chorus, before you get deep into processing.
-
Reference early and often. Check your rough balance on at least two different playback systems before moving into detailed work. Earbuds, laptop speakers, and studio monitors will each reveal something different.
Pro Tip: Use a consistent playback volume during preparation. Many engineers reference at around 75 dB SPL (decibels sound pressure level) during the prep stage. This frequency response sweet spot is close to how most people will listen to your finished track.
The evaluation framework for mixing is a useful reference point when you want to assess whether your preparation has covered all the bases.
Executing effective balance level adjustments
Once the preparation is done, this is where the real craft of achieving balance in mixing begins. The goal here is clear: build a hierarchy of levels where every element has a defined role and a corresponding volume.
Follow this step-by-step execution process:
-
Set your kick drum as the anchor. Loop the loudest section and set the kick's fader to peak around −10 dB to −12 dB. Everything else in the mix gets balanced relative to this starting point.
-
Bring up the bass. The bass should sit 3 dB to 6 dB below the kick. These two elements share the low-frequency space and need to complement rather than clash. A common trick is to side-chain compress (a technique where one signal controls the compression of another) the bass to the kick so it briefly ducks when the kick hits.
-
Set the snare and hi-hats. The snare typically lives 2 dB to 4 dB below the kick. Hi-hats should sit noticeably lower still, providing texture without fighting the main rhythmic elements.
-
Build the harmonic bed. Pads, rhythm guitars, and chord synths should sit 6 dB to 10 dB below the kick. These elements fill the stereo field but should support, not dominate.
-
Place your lead and supporting elements. Lead synths and melodic elements need to be clearly audible but not overpowering. Reference them against the vocal or primary lead at every stage.
-
Finalise your lead vocal level. The vocal usually sits at or near the top of the mix hierarchy. It should feel present and natural, not distant or overbearing.
Pro Tip: Working in 3 dB increments prevents micro-tweaking and helps you reach usable balances faster. If you are nudging faders by 0.1 dB, you've fallen into the trap of over-analysing. Bold moves, then listen.
For stereo placement, keep all heavy low-end energy (kick, bass, lead vocal) panned to the centre. Use stereo widening techniques for supporting elements like guitars and pads to fill the left and right channels without stealing low-end focus. Always check your evaluation framework for mixing to confirm your stereo field decisions are translating correctly.
| Instrument | Pan position | Relative level to kick | Notes |
|---|---|---|---|
| Kick drum | Centre | Reference (−10 to −12 dB) | Anchor point |
| Bass | Centre | −3 dB to −6 dB below kick | Side-chain if clashing |
| Snare | Centre (slight off optional) | −2 dB to −4 dB below kick | Presence without domination |
| Hi-hats | Slight L or R | −8 dB to −12 dB below kick | Texture only |
| Rhythm guitars | Wide L and R | −6 dB to −10 dB below kick | Fill stereo field |
| Lead vocal | Centre | Near top of hierarchy | Clear and present |
Verifying and refining your mix balance
This verification process completes your mixing workflow and ensures your balance decisions hold in real-world listening. A mix that sounds great only on studio monitors is a mix that is not finished yet.
Here is what a solid verification routine looks like:
- Monitor at moderate levels. Mixing at moderate levels around 75 to 85 dB SPL and referencing at quieter and louder levels prevents common balance and harshness problems. Your ears are most reliable in this range.
- The whisper test. Drop your monitor volume to barely audible. If you can still hear the kick, snare, bass, and vocal clearly in their correct hierarchy, your balance is working. If elements vanish or suddenly compete, those are the problem areas.
- The loud check. Push the volume briefly above your normal mixing level. Harsh or unbalanced elements become painfully obvious at high SPL.
- Mono compatibility check. Collapse your mix to mono using a utility plugin or your DAW's mono button. Phase issues and stereo-dependent balance problems show up immediately. If the mix sounds dramatically thinner or if certain elements disappear in mono, you have pan or phase problems to address.
- Reference on consumer playback. Check on earbuds, phone speakers, and a Bluetooth speaker. These systems will expose balance problems that your studio monitors flatter away.
"Automation and frequent referencing across different loudness levels and speakers keep balance consistent as arrangement density changes."
Pro Tip: Export a rough bounce after every major balance session and listen back in a different room or on a walk with earphones. Distance from the session resets your ears and makes obvious what hours of monitoring will hide.
For a structured way to assess where your mix stands, pro-level mix feedback can give you a clear, objective view of what the balance is actually doing across the full frequency spectrum.
Why balance-first mixing beats plugin obsession every time
Here is the honest truth that took me a while to internalise: no plugin in the world fixes a poorly balanced mix. EQ does not fix level problems. Compression does not fix level problems. Saturation, reverb, and stereo imaging certainly do not fix level problems. They can sometimes disguise level problems temporarily, but the mix will still feel muddy, cluttered, or lifeless.
Most balance problems come from mixing at the wrong stage, specifically from reaching for tonal tools before establishing solid relative levels and pan positions. I see this constantly. A producer spends an hour shaping the EQ on a bass, adding presence and cutting muddiness, when the real issue is that the bass fader is simply 4 dB too loud.
There is also a psychological trap called analysis paralysis, and it is particularly vicious in mixing. Large gain moves prevent analysis paralysis and help you converge on a usable mix balance faster. When you commit to a bold 3 dB move and then listen critically, you learn something real. When you nudge a fader by 0.3 dB and wonder if it made a difference, you learn nothing except how to waste an afternoon.
Dynamic level changes in an arrangement absolutely require automation rather than static fader fixes. A verse with just acoustic guitar and voice needs different relative balances than a full-band chorus. Trying to find one static position that works for both is a compromise that satisfies neither. Automation, explored thoughtfully through dynamic contrast techniques, is how professional mixes maintain the sense of lift and energy through arrangement changes.
Start with balance. Commit to it. Then let your plugins do the refined work they were designed for on a foundation that is already structurally sound.
How AubioMix helps you perfect your mix balance quickly
Knowing the theory is one thing. Hearing exactly where your mix is losing balance in practice is another. That is precisely what AubioMix is built for. Upload your track and receive detailed, actionable feedback on your mix levels, stereo placement, and overall balance quality, all evaluated against industry-standard criteria.

Whether you are refining your first serious mix or looking to sharpen a professional workflow, AubioMix pinpoints the exact moments where your balance breaks down and tells you how to fix them. Think of it as having an experienced mix engineer sitting beside you, pointing at the problem areas and giving you clear next steps. The AubioMix evaluation framework covers everything from level distribution to stereo field integrity, so you know your mix is being assessed comprehensively. Stop guessing. Start improving.
Frequently asked questions
What is the ideal peak level for individual tracks during mixing?
Individual tracks should peak between −18 dBFS and −6 dBFS to maintain headroom for processing and avoid digital clipping. Staying within this range keeps your signal chain healthy before any compression or EQ is applied.
Why is the kick drum often used as the reference point for balancing other instruments?
The kick drum provides a rhythmic and dynamic anchor because it is typically the loudest transient in a mix. Setting the kick's fader to peak around −10 dB to −12 dB gives every other instrument a stable reference point to balance against.
How does mixing volume affect perception of balance?
Mixing at moderate levels around 75 to 85 dB SPL aligns with the ear's most even frequency response range, giving you an accurate picture of true balance. At extreme volumes, bass and treble perception shifts significantly, leading to misleading balance decisions.
What role does automation play in maintaining mix balance?
Automation adjusts levels dynamically throughout the arrangement so that balance remains consistent as density changes between sparse verses and full choruses. A single static fader position rarely serves every section of a song equally well.
Should I rely on EQ and compression before balancing levels?
No. Start with relative levels and pan before applying any tonal tools. EQ and compression applied on top of poor balance simply mask the underlying problem without solving it, creating extra work and often making the mix feel stiff or unnatural.