
For almost every music mix, work at 44.1 kHz or 48 kHz and stay at 24-bit. Reserve 88.2 or 96 kHz for sessions with heavy pitch-shifting, time-stretching, or immersive formats like Dolby Atmos. Higher rates rarely change what you hear inside a normal mix, but they do change your CPU load, file size, and plugin compatibility, so pick the rate that matches your delivery target, not the biggest number your interface offers.
TL;DR:
- Use 44.1 kHz or 48 kHz for most music mixes, aligning with final delivery formats to avoid unnecessary conversions and CPU strain.
- Higher rates like 88.2 or 96 kHz are beneficial only for heavy pitch-shifting, immersive formats, or future-proof archival, not as default.
- Sample rate defines the maximum audible frequency; higher rates improve anti-aliasing and plugin processing but do not enhance auditable resolution.
- Always set your interface's sample rate first and match your DAW session to prevent pitch errors and glitches caused by mismatched rates.
- Converting between sample rates should be done offline once with high-quality algorithms to prevent cumulative artifacts and audio dullness.
Table of Contents
- What sample rate should you use for mixing?
- Why does sample rate matter for mixing quality?
- When should you mix at 88.2, 96, or 176.4/192 kHz?
- How do you set up your session's sample rate correctly?
- How do you convert sample rates without introducing artefacts?
- What does a higher sample rate cost you in CPU and plugin support?
- What sample rate should you deliver for mastering and release?
- Common sample-rate problems and how to fix them
- What can genre benchmarks teach you about sample-rate choices?
- What we actually do in pro mixes
- Let AubioMix check your sample-rate choices before you commit
- Sources
What sample rate should you use for mixing?
Here's the shortlist I hand to anyone who asks me this in the studio, because the honest answer is "it depends on where the track is going," not "always use the highest number."
- Music heading to streaming or CD: 44.1 kHz / 24-bit. This matches the final delivery format exactly, so there's no conversion needed at the mastering stage.
- Music or audio for picture, TV, or broadcast: 48 kHz / 24-bit. Video workflows are built around 48 kHz, and matching it avoids a sample-rate conversion headache when you hand off to a video editor.
- Sessions with heavy pitch or time manipulation: 88.2 kHz for music-only projects, or 96 kHz if the project involves Atmos or video. According to practical guidance from MusicProductionWiki, 88.2 and 96 kHz earn their place when delivery genuinely demands hi-res or heavy processing, not as a default.
- Field recording or archival capture: 96 to 192 kHz, sometimes paired with 32-bit float, because you're preserving raw material for future use, not committing to a final mix.
- Internal processing and bus summing: 32-bit float is worth using inside your DAW regardless of your session sample rate. It gives you enormous headroom against clipping during gain staging, which matters more than most people realise when you're stacking dozens of tracks.
If you're ever stuck deciding, here's my rule of thumb: pick the lowest sample rate that meets your actual delivery requirement. Not the lowest rate your gear supports, the lowest rate your finished product needs. A pop single going to Spotify doesn't need 96 kHz any more than a postcard needs first-class postage that costs more than the item inside it.
One nuance worth flagging: if you're working on a project that's music-only and will eventually be delivered at 44.1 kHz, 88.2 kHz converts down cleanly because it's an exact 2:1 multiple. That clean mathematical relationship makes 88.2 kHz the more sensible high-rate choice for music, while 96 kHz remains the standard for anything touching video or Atmos deliverables. It's a small detail, but it saves you from an unnecessarily awkward conversion later.
Why does sample rate matter for mixing quality?
The short version: sample rate defines the highest frequency your system can represent, and that ceiling is set by something called the Nyquist frequency, which is exactly half your sample rate. At 44.1 kHz, the Nyquist frequency sits at 22.05 kHz, comfortably above the upper limit of human hearing for almost everyone. That's not a coincidence. It's why 44.1 kHz was chosen for CD audio in the first place.
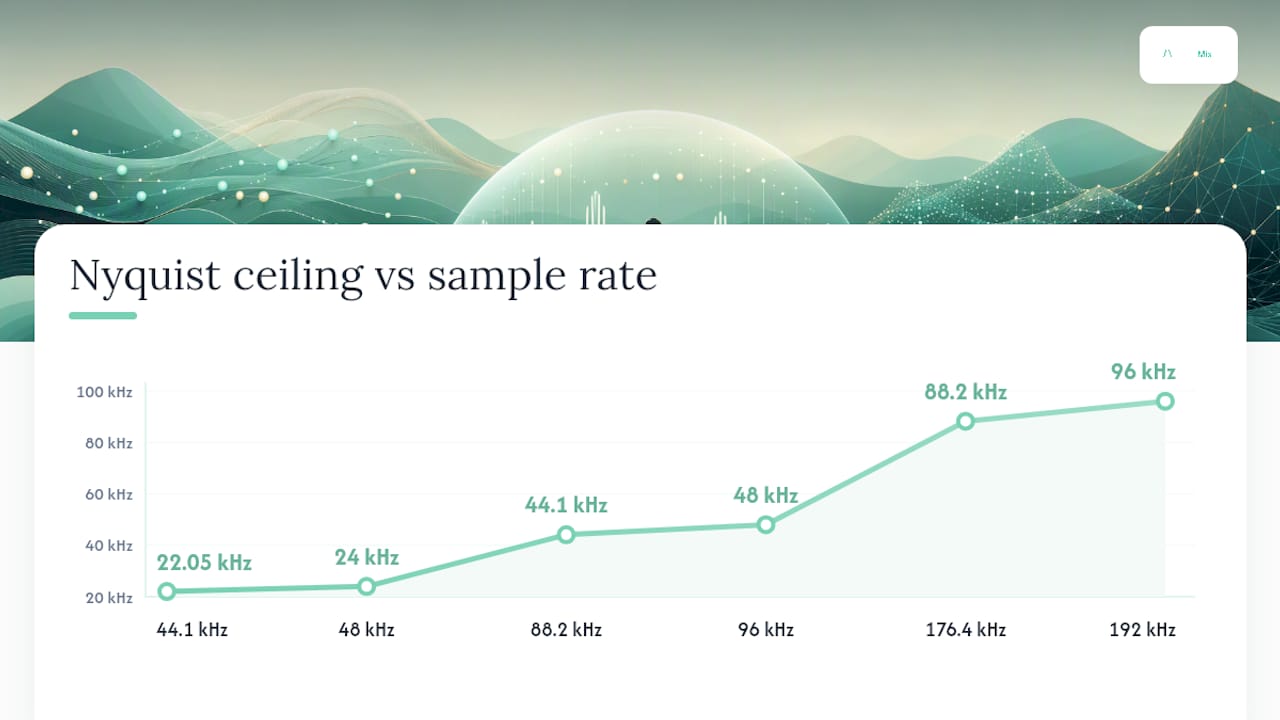
Here's where it gets interesting for mixing specifically. Frequencies above the Nyquist limit don't just disappear, they fold back down into the audible range as aliasing, a distortion that shows up as strange, unmusical artefacts rather than the clean harmonic content you'd expect from analogue gear. Anti-aliasing filters exist precisely to catch that content before it folds back, and this is where higher sample rates genuinely help: they push the Nyquist ceiling further away from the audible range, giving those filters more room to work gently rather than aggressively right at the edge of what you can hear.
Plugin oversampling works on a similar principle. Distortion, saturation, and clipping plugins generate harmonics above the fundamental frequency, and oversampling temporarily raises the internal sample rate to catch those harmonics before they alias back into your mix. Some plugins do this automatically regardless of your session rate.
What higher rates don't do is add audible detail below the Nyquist limit. According to iZotope's explainer on digital audio fundamentals, a higher sample rate mainly buys headroom for anti-aliasing and resampling, not extra resolution within the range you can actually hear. This is worth sitting with, because it cuts against a lot of forum folklore about "hearing the difference" at 96 kHz.
It's also worth knowing you're not alone if you stick with the defaults. A survey of nearly 2,000 audio professionals found the majority work at 44.1 or 48 kHz, with only around one in five working above those rates. The pros aren't leaving quality on the table. They're matching their tools to the job.
When should you mix at 88.2, 96, or 176.4/192 kHz?
Higher rates earn their place in specific, identifiable situations rather than as a blanket upgrade. Here's when I'd actually reach for them:
- Heavy pitch-shifting or time-stretching: algorithms that stretch or transpose audio work with more precision when there's more data to sample from, reducing the smearing and artefacts you'd hear at lower rates during extreme processing.
- Hi-res or immersive deliverables: if a client or distributor specifically requests a 96kHz Atmos mix or a hi-res streaming master, that's your rate, full stop. Check the actual delivery specification rather than guessing.
- Archival or field capture: when you're recording material you might reuse in ways you haven't decided yet, capturing at 96 to 192 kHz gives future flexibility that's expensive to recreate later.
- Sound design and heavy resampling chains: granular synthesis, extreme formant shifting, and similarly aggressive manipulation benefit from the extra frequency headroom during intermediate processing stages.
For music-only projects that will land on streaming or CD, 88.2 kHz is the smarter high-rate choice over 96 kHz, purely because of that clean 2:1 relationship to 44.1 kHz mentioned earlier. Anything destined for video or Atmos should use 96 kHz instead, matching the industry standard those formats are built around.
The practical threshold I use before committing a whole session to a higher rate: does this specific task actually need it? If you're doing a handful of pitch-corrected vocal takes, process just those files at a higher rate and bring them back into your main session. If the entire project revolves around extreme manipulation, like a dense electronic production built on granular textures and heavy resampling, committing the whole session to 88.2 or 96 kHz from the start makes more sense than fighting piecemeal conversions throughout.
How do you set up your session's sample rate correctly?
Getting this wrong at the start of a session causes more headaches than almost any other technical decision, so it's worth doing in the right order.
- Set your audio interface's sample rate first, before you open your DAW. Most interfaces have their own control panel or hardware switch, and your DAW should follow whatever rate the interface reports rather than fighting it.
- Match your DAW's session sample rate to the interface. Creating a new session at 48 kHz while your interface runs at 44.1 kHz is a classic source of glitches and pitch errors that seem to appear from nowhere.
- Set buffer size according to the task at hand. Use a low buffer, around 64 to 128 samples, when tracking to minimise latency for the performer. Raise it to a higher buffer size when mixing, since latency doesn't matter once you're not playing an instrument in real time, and a bigger buffer reduces the load on your CPU.
- Check incoming file sample rates before importing them. Most DAWs display file metadata, or you can check it in a file browser. A stray 48kHz vocal stem dropped into a 44.1kHz session will play back at the wrong pitch and speed unless your DAW converts it automatically, and not all of them do this cleanly.
- Convert mismatched files offline, using high-quality sample-rate conversion, rather than letting your DAW convert on the fly during playback. Offline conversion gives the algorithm more time to work and avoids the real-time compromises baked into on-the-fly resampling.
- Agree a single working rate before collaborating on stems. If you're receiving stems from another engineer or sending them out, confirm the sample rate and bit depth in advance. A quick message beats a mystery pitch shift discovered three days into mixing.
Pro Tip: Keep a simple text note inside your session folder listing the sample rate, bit depth, and buffer size you used. It takes ten seconds to write and saves an enormous amount of guesswork when you reopen a project six months later.
How do you convert sample rates without introducing artefacts?
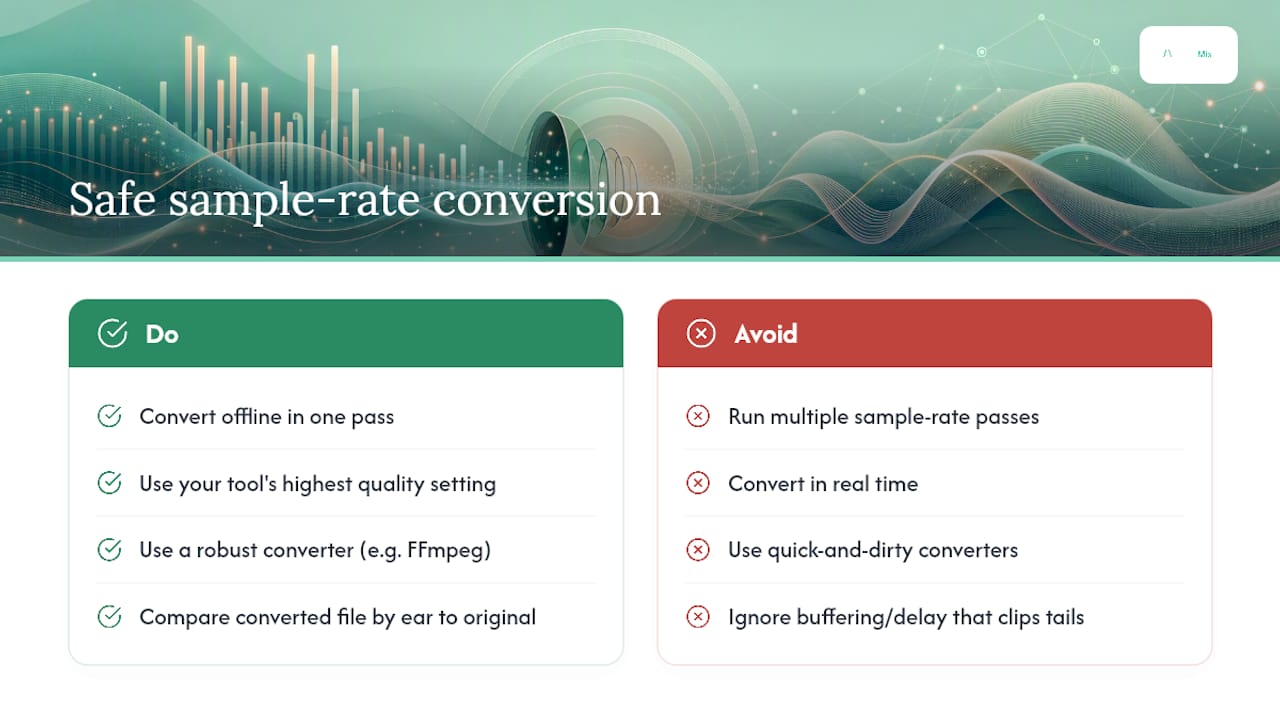
The single biggest mistake I see is running audio through multiple sample-rate conversions instead of one clean pass. Every conversion involves interpolation, essentially the algorithm calculating new sample points between the old ones, and each additional pass compounds any rounding errors and filtering imperfections from the last one. Do the maths once, at the highest quality setting your tool offers, and you'll avoid the cumulative smearing that repeated conversions cause.
Common sample-rate conversion artefacts include a subtle loss of high-frequency detail, phase smearing that softens transients, and in badly implemented converters, actual aliasing distortion folding back into the audible range. You'll often hear it as a mix that sounds slightly "underwater" or less punchy than the source, even though nothing else changed. If a bounced file sounds noticeably duller or smeared compared to your session, sample-rate conversion quality is one of the first things worth checking.
For programmatic or batch conversion, FFmpeg's libswresample library is a robust, well-documented option that a lot of professional tools quietly use under the hood. Its documentation is useful even if you never touch a command line, because it explains something every mixer should understand conceptually: resampling can introduce buffering and delay, and that delay has to be flushed correctly at the end of the process or you lose samples off the tail of your audio. This is exactly why some quick-and-dirty conversions clip the very end of a file, and why trusting a well-built converter over a rushed one matters more than people assume.
Whatever tool you use, always convert offline rather than in real time, run it once, and check the result by ear against the original before you commit.
What does a higher sample rate cost you in CPU and plugin support?
The trade-off is straightforward maths: doubling your sample rate roughly doubles the number of samples your CPU has to process every second, which translates directly into higher CPU load and larger file sizes on disk. A session that runs comfortably at 44.1 kHz with sixty tracks and a dozen plugins per channel can start crackling and dropping out at 96 kHz on the exact same computer, because audio interface and session sample rate directly affects plugin and track capacity.
Plugin compatibility is the quieter problem. Not every plugin supports every sample rate, and some older or more specialised plugins simply refuse to load, or worse, load silently and process incorrectly, above certain thresholds. Before committing a session to 88.2 or 96 kHz, check the manufacturer's specifications for anything essential in your chain, particularly convolution reverbs, vintage-modelled emulations, and anything doing heavy oversampling internally.
If you do need the higher rate but your session is starting to choke, a few practical moves keep things stable:
- Freeze CPU-heavy tracks once their processing is locked in, rendering them to audio and disabling the live plugin chain.
- Bounce submixes for groups of tracks that don't need further individual tweaking, consolidating dozens of channels into a handful of stems.
- Raise your buffer size during mixing, since you're not tracking live and the extra latency costs you nothing.
- Print effects-heavy elements early, particularly anything using multiple instances of the same demanding plugin.
These same workflow habits speed up mixing generally, and they matter even more once you're running at a higher rate than usual.
What sample rate should you deliver for mastering and release?
Delivery formats are less flexible than session formats, because the destination dictates the spec, not your preference. For music heading to streaming platforms or CD manufacturing, deliver a 24-bit / 44.1 kHz master. If the release is physical CD, remember that the Red Book standard requires 16-bit audio, so your mastering engineer needs to apply proper dither when converting down from 24-bit, rather than simply truncating the bit depth.
For anything paired with video or broadcast, 24-bit / 48 kHz is the standard delivery target, matching the sample rate that video editing systems expect.
Stems are a slightly different question. Deliver stems at 32-bit float only when the receiving engineer or platform specifically requests it, typically for further heavy processing or archival storage, since it preserves maximum headroom. For a standard mastering handoff, deliver 24-bit stems matching your session's working sample rate and avoid unnecessarily large file transfers.
Before you export anything, check the specific acceptance requirements of your distributor or mastering engineer. Some accept hi-res masters for premium tiers; plenty still expect a standard 44.1kHz/24-bit file and will simply convert anything else on their end, sometimes with results you have no control over.
Common sample-rate problems and how to fix them
A handful of issues show up again and again, and nearly all of them trace back to a mismatch somewhere in the chain.
- Clicks or pops on import: usually a sample-rate mismatch between an imported file and your session. Check the file's metadata and convert it offline before dropping it in again.
- Audio drifting out of sync with video over time: a classic symptom of a session running at the wrong rate relative to the video's frame rate. Confirm you're at 48 kHz for anything picture-locked.
- A plugin reports an "unsupported sample rate" error: check the manufacturer's spec sheet. Some plugins simply don't run above 48 or 96 kHz, and no amount of troubleshooting will change that.
- A bounced master sounds duller than the mix inside the session: test your sample-rate conversion settings, and always render a test bounce and compare it by ear before finalising anything.
What can genre benchmarks teach you about sample-rate choices?
Theory only gets you so far. What actually changes engineer-to-engineer is how a given genre's density, transients, and processing style interact with your chosen rate, and that's exactly where measured benchmarks earn their keep.
- Dense electronic productions stacked with layered synths, heavy sidechain compression, and aggressive saturation tend to reveal aliasing and inter-sample peaks faster than sparser material, which is one reason AubioMix's benchmark data treats techno and deep house sessions differently from acoustic material when flagging problem frequencies.
- Acoustic singer-songwriter sessions, by contrast, rarely stress a system's headroom the same way. The priority shifts toward preserving transient detail on vocals and acoustic instruments rather than managing harmonic buildup from distortion-heavy processing.
- Reports built around genre-specific benchmarks can flag when a mix shows frequency masking or clipping patterns consistent with an undersized sample rate for the processing being applied, giving you a concrete reason to test a higher rate rather than guessing.
If you want to see how this plays out on your own material, comparing a mix against genre-specific data through the evaluation framework shows you exactly which frequency ranges or dynamic issues are worth chasing before you decide whether a sample-rate change would even help.
What we actually do in pro mixes
Our default in almost every session is 44.1 or 48 kHz at 24-bit, and honestly, that covers the overwhelming majority of work that crosses our desks. It's not a compromise. It's the rate that matches where the music is actually going, and it keeps CPU headroom free for the plugins that genuinely earn their place in a mix.
We only reach for 88.2 or 96 kHz when there's a measurable reason: a vocal comp riddled with pitch correction, a sound design pass built on granular stretching, or a client delivery spec that explicitly demands it. Test that plugin compatibility before you commit a whole session to a higher rate. Nothing kills momentum faster than discovering your favourite convolution reverb refuses to load an hour before a deadline.
— AubioMix
Let AubioMix check your sample-rate choices before you commit
An online mix analysis app gives you a second, objective set of eyes on exactly the issues this article has been describing, aliasing, inter-sample peaks, and frequency masking that can quietly signal a sample-rate or processing mismatch before you ever hear it clearly yourself.

Upload a mix and the automated analysis flags these issues against genre-specific benchmarks, so you're comparing your track against measured data from real releases in your genre rather than guessing whether that 96kHz session was worth the CPU hit. If you're working in electronic music, the techno benchmark page shows exactly what measured, competitive mixes in that genre look like against the metrics AubioMix tracks. Run your next mix through it before you export a final master, and you'll know within minutes whether your sample-rate and processing decisions actually held up.
Sources
- What Sample Rate Should You Record And Mix At? | Production-Expert
- Digital audio basics: audio sample rate and bit depth | iZotope
- libswresample (FFmpeg) documentation
- Sample rate bit depth explained | MusicProductionWiki
- Nyquist frequency — Wikipedia