
Most producers assume mixing is simply pushing faders up and down until things sound loud enough. It isn't. The role of the mix engineer workflow is a structured, multi-stage discipline that blends technical rigour with genuine artistry, and understanding it is what separates a mix that translates beautifully on every speaker from one that sounds great only in the studio. Whether you're producing your own music or preparing stems for a professional engineer, getting to grips with how this process actually unfolds will save you time, reduce costly revisions, and genuinely improve your results.
Table of Contents
- Key takeaways
- The role of the mix engineer workflow, stage by stage
- Technical best practices that actually matter
- Automation: the final layer of expression
- Modern workflows: stereo, Atmos, and beyond
- My honest take on building an effective workflow
- Improve your mix with Aubiomix
- FAQ
Key takeaways
| Point | Details |
|---|---|
| Workflow follows a clear sequence | Moving from session organisation through gain staging, static balance, processing, automation, and export prevents costly mistakes. |
| Gain staging is non-negotiable | Maintaining proper levels throughout the signal chain preserves clarity and prevents the distortion that ruins translation. |
| Session organisation saves hours | Colour coding, naming conventions, and track groupings let you navigate complex sessions efficiently from the start. |
| Automation is the final polish | Apply volume rides, panning shifts, and effects automation only after your static mix and processing are locked in. |
| Dolby Atmos is a distinct stage | Immersive mixing begins after stereo approval and requires careful stem separation, not a simple effects pass. |
The role of the mix engineer workflow, stage by stage
Professional mix engineers call this process "the mix workflow," and it follows a logical sequence that prevents you from solving problems in the wrong order. Think of it like building a house: you don't paint the walls before the foundations are set.
1. Session organisation
Before a single fader moves, every track gets a proper name, a colour, and a logical group. Colour coding and track groupings by instrument families speed up navigation dramatically in complex sessions. Drums in one colour, bass in another, vocals in a third. Bus routing is also set up here, with subgroups created for drums, instruments, and vocals so you have macro control from the very beginning.
2. Gain staging
This is where most beginners trip up. Gain staging means setting the input level of every track so the signal is healthy but not clipping, typically aiming for peaks around negative 18 dBFS on individual channels. Templates with gain staging and routing conventions are exactly what experienced engineers use to start mixing within minutes rather than hours.
3. The static mix
Before touching a single plugin, you build a static mix, which means balancing relative levels with faders alone. This gives you an honest picture of the arrangement and reveals whether any elements need fixing at the source before processing begins.

4. Processing (clip gain, plugins, faders)
The recommended order of operations is: clip gain first to correct any problematic peaks at the region level, then plugins for tonal shaping and dynamics, then fader adjustments for balance. A clear mix hierarchy prevents misusing complex tools and keeps the signal chain clean.
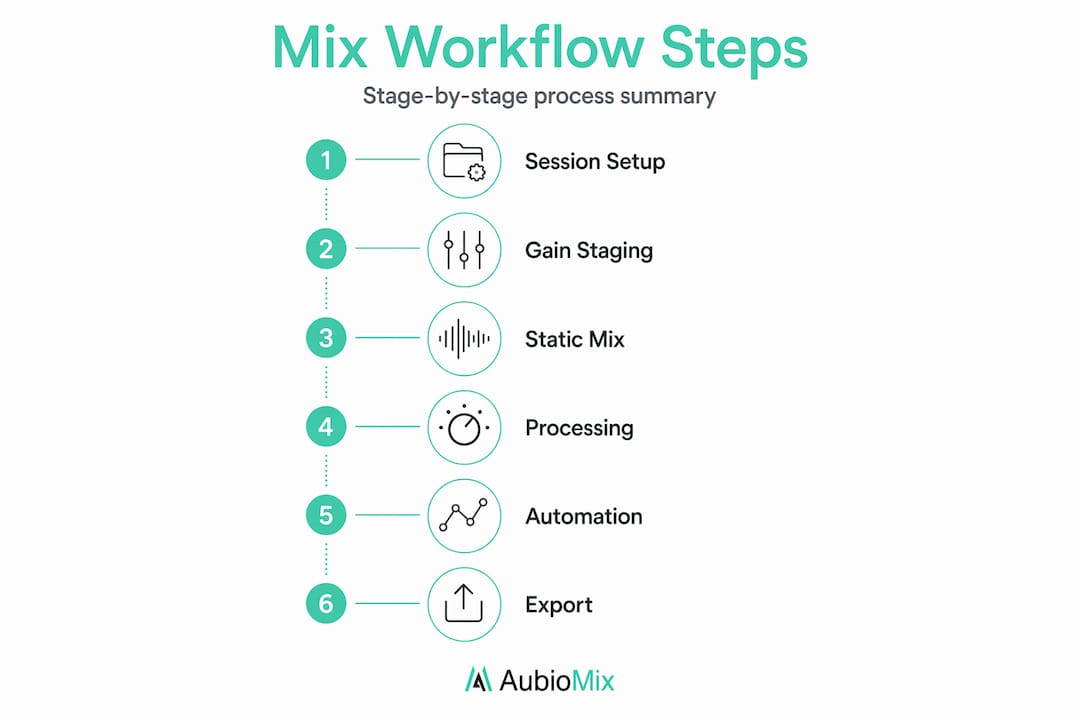
5. Automation
Volume rides, panning moves, and effects parameter changes come last, after the static mix and processing are settled. Automation is the refinement layer, not a foundation.
6. Export and handoff
When delivering stems, start at bar one, use 24-bit 48 kHz WAV files, maintain mono/stereo integrity, and label everything clearly. Include project tempo and versioning notes to reduce confusion.
Pro Tip: Build a session template in your DAW right now with colour coded track groups, bus routing, and gain staging targets already in place. You'll reclaim at least thirty minutes on every project.
Technical best practices that actually matter
Getting the technical side right is not about perfectionism. It's about protecting your creative decisions so they survive the entire signal chain.
Keep gain staging honest
Gain staging is continuous: every time you add a plugin or change routing, re-check your levels at that point in the chain. Beginners often crank faders to compensate for thin-sounding tracks, which masks level problems rather than fixing them and destroys mix translation across different playback systems.
Route through busses, not direct outputs
Sending all drum channels through a single drum bus gives you one fader to control the drum level in the context of the full mix, which is far more powerful than adjusting each channel individually. The same logic applies to your vocal bus, your instrument bus, and your parallel compression returns.
Handle effects with insert vs. return channels
Time-based effects like reverb and delay belong on aux return channels, not inserts, unless you have a specific creative reason. This keeps your session flexible and your CPU usage under control. Using returns also means multiple tracks can share a single reverb space, which glues elements together and creates a more cohesive sonic picture.
Here is a quick comparison of the two approaches:
| Approach | Best used for | Advantage |
|---|---|---|
| Insert (directly on channel) | EQ, compression, saturation | Precise, source-specific processing |
| Aux return channel | Reverb, delay, chorus | Shared space, flexible blending, CPU efficient |
Pro Tip: Never print master bus processing into your stems. Keep your master bus chain separate so the engineer has full control over the unprocessed raw material.
File delivery done properly
Clear labelling and delivery notes including project tempo, track names, and version numbers are what separate professional file handoffs from the chaotic ones that waste everyone's time. When working remotely, a well-prepared session is genuinely one of the most respectful things you can offer a mix engineer.
Automation: the final layer of expression
Once your static balance is locked and your processing is settled, automation is what transforms a technically correct mix into something that feels alive. This is where the mix engineer's interpretive skill really shines.
Here's how professionals typically approach it:
- Volume rides: The most common type. These involve gently riding vocal levels so every lyric sits consistently in the mix without the listener noticing the movement. A well-ridden vocal feels effortless.
- Panning shifts: Moving elements subtly in the stereo field during transitions or key moments creates a sense of space and momentum that static panning simply cannot achieve.
- Effects parameter changes: Automating reverb send levels, delay feedback, or filter cutoffs at specific moments adds drama and texture without permanently altering the processing on the channel.
- Plugin bypass: Automating a compressor or distortion plugin on or off at specific sections is a powerful technique for adding contrast between verse and chorus energy.
The golden rule is to keep automation purposeful. Over-automation sounds mechanical and restless, pulling the listener's attention in the wrong direction. You want the movement to feel natural, like the track is breathing. Read more about types of automation if you want to go deeper on this stage.
A useful habit is to listen through the full mix once without touching anything, noting every moment where the energy feels flat or a sound gets lost. Those are your automation targets. Work through them one by one rather than riding controls in real time throughout, which tends to create erratic results.
Modern workflows: stereo, Atmos, and beyond
The mixing process has expanded significantly over the past few years, largely because Dolby Atmos delivery is now expected on major streaming platforms. Understanding how this fits into the broader workflow saves a lot of confusion.
Dolby Atmos mixing begins after the stereo mix is finalised and approved. It is a distinct, intensive phase that adds spatial depth by placing sound objects in three-dimensional space rather than simply panning within a stereo field. It is not a shortcut or an effects pass. Think of the stereo mix as the blueprint and the Atmos mix as the expanded, spatially immersive version built from that same blueprint.
Key considerations for modern immersive workflows:
- Stem separation is critical: Atmos requires granular stems so each element can be placed independently in the spatial field. A single "music" stem will not give the engineer what they need.
- Binaural monitoring: Headphone binaural rendering makes Atmos mixing accessible without a dedicated speaker array, which is useful for smaller studios working with this format for the first time.
- Preserve the stereo intent: The emotional and sonic character of the stereo mix should remain intact. Atmos is not a reinterpretation but an extension that deepens the original mix's impact.
- Routing discipline is more demanding: Every routing decision made during the stereo mix has consequences in the Atmos stage, which is another reason why organised, well-labelled sessions are so valuable from the very beginning.
My honest take on building an effective workflow
From where I sit, the single biggest mistake producers make is treating workflow as a constraint rather than a creative tool. I've seen sessions where the producer jumps straight to processing a snare with five plugins before even checking whether the gain staging is healthy, and the result is always the same: a mix that sounds exciting in the moment but falls apart on a phone speaker.
The truth I keep coming back to is this: preparation is not the unglamorous part of mixing. It is the part that makes everything else possible. When your session is organised, your gain staging is set, and your static mix is honest, your creative decisions actually land the way you intended them to.
I'd also say that switching between macro and micro listening is a skill worth practising deliberately. Spend two minutes listening to the full mix at a comfortable level, then zoom in and address one specific problem, then zoom back out and listen again. Beginners tend to stay in zoom-in mode for too long, which is how you end up with a beautifully processed kick drum and a mix that has no sense of space or energy.
My advice for aspiring engineers: don't just copy someone else's workflow step by step. Understand the reason behind each stage, then build a workflow that suits the way your mind works. That's when the process becomes genuinely yours.
— AubioMix
Improve your mix with Aubiomix
Understanding the theory is one thing. Hearing exactly what's working and what isn't in your mix is something else entirely.

Aubiomix is built for producers and mix engineers who want professional-grade feedback without waiting weeks for a response. Upload your audio file and get detailed, actionable mix feedback covering levels, dynamics, frequency balance, and more, delivered in minutes. You can also explore how professional engineers approach mix quality evaluation using Aubiomix's framework, or see how famous tracks score against professional benchmarks. Whether you're refining your workflow or troubleshooting a specific mix, Aubiomix gives you the clarity to move forward with confidence.
FAQ
What does a mix engineer actually do?
A mix engineer balances, processes, and refines all recorded elements of a track into a cohesive, polished final mix, handling everything from gain staging and EQ to automation and stem delivery.
What is the correct order of operations in a mixing workflow?
The recommended sequence is session organisation, gain staging, static mix, clip gain adjustments, plugin processing, fader balance, and finally automation to refine dynamics and energy.
Why is gain staging so important in mixing?
Proper gain staging prevents distortion and preserves audio clarity throughout the signal chain, meaning your mix translates consistently across different speakers and playback systems.
When does Dolby Atmos mixing happen in the workflow?
Atmos work begins after the stereo mix is approved, requiring detailed stem separation so each element can be placed independently in a three-dimensional spatial field.
How can I speed up my mixing sessions?
Using session templates with pre-built colour coding, bus routing, and gain staging targets lets you start mixing faster and focus your energy on the creative decisions that actually shape the sound.