Wanting to mix and master in one session is completely understandable. Time is tight, inspiration is fresh, and the idea of finishing a track from raw stems to release-ready master in a single sitting feels incredibly satisfying. But there's a real tension here. Mixing and mastering are distinct processes that demand very different mindsets, and forcing them together without the right preparation often leads to compromised results. This guide gives you a structured, honest approach so you can attempt single session mixing with confidence and protect the quality of your work.
Table of Contents
- Key takeaways
- Getting ready to mix and master in one session
- The step-by-step single session workflow
- Common pitfalls to watch for
- Verifying your results after the session
- My honest take on mixing and mastering together
- Take your mixes further with Aubiomix
- FAQ
Key takeaways
| Point | Details |
|---|---|
| Preparation is non-negotiable | Organise your session, set headroom correctly, and remove master bus limiting before you start. |
| Ear fatigue is your biggest enemy | Take short breaks every hour and vary your listening volume to preserve accurate judgement throughout. |
| Leave proper headroom | Your mix should peak between -6 dBFS and -3 dBFS to give mastering room to breathe. |
| Follow a clear workflow order | Complete mixing fundamentals fully before switching your mindset to mastering. |
| Verify before you export | Check for clipping, phase issues, and tonal balance against a reference track before your final export. |
Getting ready to mix and master in one session
Before you press play on track one, your environment and session need to be set up properly. Attempting one session audio production without solid preparation is the fastest route to a frustrating result.
Start with your technical setup. Your monitoring environment matters enormously here. You need accurate, well-positioned speakers or headphones you genuinely trust, because you will be making both microscopic mix decisions and broad, holistic mastering calls in the same sitting. A room with even basic acoustic treatment will serve you far better than a reflective, untreated space.
Here is what to have ready before you begin:
- Session organisation. Colour-code and label every track. Group elements into stems (drums, bass, synths, vocals) and use bus channels for cleaner control. Clutter costs you mental energy you cannot afford in a long session.
- Headroom. This is the single most overlooked preparation step. Your mix should peak between -6 dBFS and -3 dBFS before mastering. This is not about making things quiet. It preserves the dynamic range that your mastering chain needs to function correctly.
- No master bus limiting. Remove any limiter or heavy compressor sitting on your master bus before you begin mastering. Mix bus limiting flattens dynamics and actively prevents mastering from doing its job. It is a surprisingly common mistake.
- Reference tracks. Load two or three commercially released tracks in a similar genre into a reference track player. You will use these to calibrate tonal balance and loudness throughout the session, keeping your ears grounded in real-world standards.
- Plugin readiness. Have your go-to mastering chain (EQ, compressor, limiter, stereo widener) saved as a preset and ready to load. Do not waste your freshest listening hours hunting for plugins.
- Time allocation. A standard mix session takes 4+ hours, with detailed automation adding another one to three hours on top. Be honest with yourself about the time you have available and block it out properly.
Pro Tip: Schedule your session at a time when your ears are genuinely fresh. Morning sessions after a good night's sleep consistently produce better decisions than late-night attempts after a full day of listening.
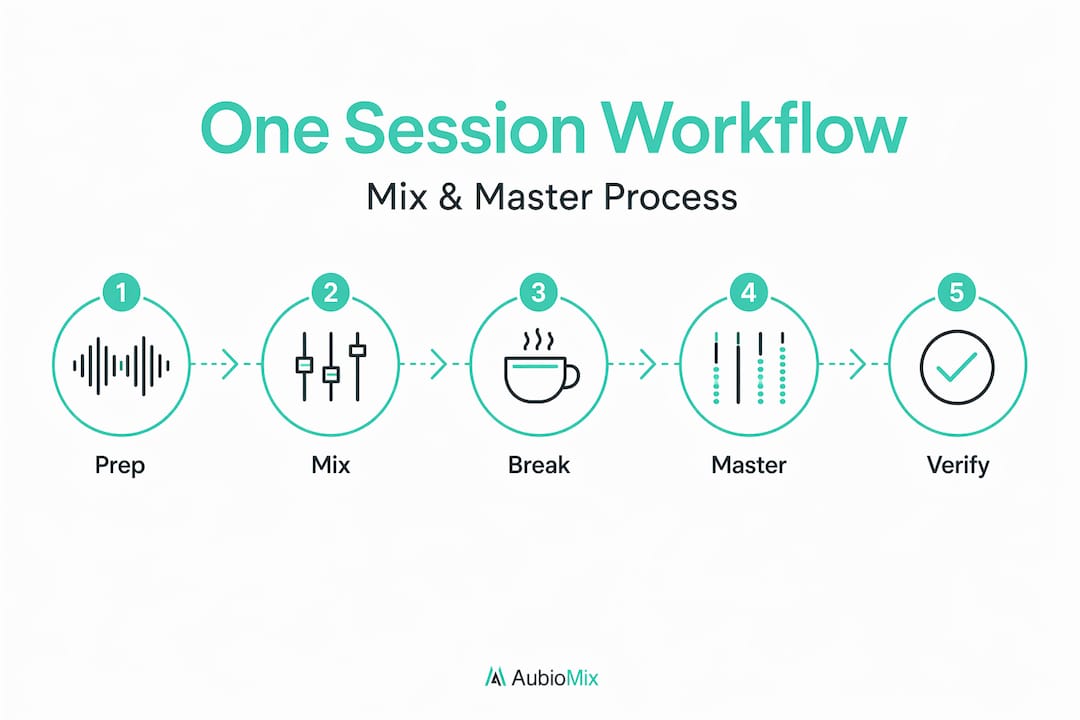
The step-by-step single session workflow
With preparation done, here is how to move through the session in a way that protects both quality and your sanity.
-
Start with a rough balance. Before any processing, bring up your faders and get everything sitting at a workable level. Think of this as sketching before you paint. Understanding the shape of the track early guides every decision that follows. Use pro-level balance techniques to work through each element methodically.
-
EQ and compression per element. Work through your tracks in groups. Drums first, then bass, then melodic elements, then vocals. Apply subtractive EQ to clean up muddiness and low-end build-up, then additive EQ only where genuinely needed. Use compression to control dynamics and glue elements together, not to squash the life out of them.
-
Effects and spatial placement. Reverb, delay, and panning give your mix depth and width. Be intentional here. Every effect should serve the track, not just fill space. If you want to avoid the classic errors that affect stereo image further down the line, read up on mid-side mixing mistakes before this stage.
-
Take a proper break. After roughly sixty minutes of focused mixing, step away for ten to fifteen minutes. Ear fatigue impairs frequency and dynamics perception, and the damage compounds quietly. Come back to the mix louder than you left it in your head because you have been away from it. That fresh perspective is genuinely priceless.
-
Final mix pass and bus processing. Revisit your group buses and apply gentle bus compression and EQ to glue stems together. Keep your master fader at 0 dB, check your peak levels, and confirm headroom is correct. Do not reach for the limiter yet.
-
Mental reset before mastering. This is the step most people skip, and it is the most important transition in the entire session. Step away from your monitors for at least fifteen minutes. Make a coffee. Listen to something you love that is not your own track. You need to shift from the detail-focused mindset of mixing into the broader, more objective perspective that mastering demands.
-
Mastering phase: tonal balance and dynamics. Load your mastering chain. Start with a linear phase EQ to address any remaining broad tonal imbalances you can now hear across the full stereo image. Apply gentle dynamic compression, targeting a ratio of 1.5:1 to 2:1 with a slow attack. Listen against your reference tracks frequently.
-
Stereo enhancement and loudness. Apply subtle stereo widening to add air and dimension to the mix. For loudness, bring your limiter in last and aim for a ceiling of -1 dBFS or -0.1 dBFS for streaming. Target an integrated loudness of around -14 LUFS for most streaming platforms, though -9 to -10 LUFS works well for more aggressive genres.
-
Export for delivery. Export as a 24-bit WAV or AIFF at your session's native sample rate. Check the file plays back correctly before closing the session.
Pro Tip: During the mastering phase, flip your mix to mono briefly every few minutes. If it sounds thin or instruments disappear, you have a phase or stereo-width problem that needs addressing before you push loudness any further.
Common pitfalls to watch for
Even with the best preparation, single session mixing throws up specific challenges. Knowing these in advance lets you catch them before they derail your work.
- Ignoring ear fatigue symptoms. Dull, muffled high frequencies and a sense that everything sounds "fine" are classic signs your ears are tired, not that your mix is finished. If you notice either, stop and rest before making further decisions.
- Over-processing to compensate for mix problems. Mastering cannot fix a poorly balanced mix. Combining both stages without resolving mix issues first leads to compromised final results every single time. If something sounds wrong during mastering, go back into the mix rather than reaching for a harder mastering fix.
- Forgetting to properly prepare your mix with technical checks. Missing basic steps like phase alignment, low-end mono checking, and headroom verification wastes your mastering time and creates problems that compound at higher volumes.
- Tunnel vision. Mixing requires intense focus on individual elements. Mastering requires pulling back to hear the full picture. Without a proper mental break between phases, you will apply mastering with a mixing mindset, and the two approaches actively work against each other.
"Mixing and mastering require fundamentally different listening perspectives. Attempting to merge both without a reset between them is like trying to edit your own writing immediately after you finish the first draft. You will miss what is actually there."
When should you consider splitting sessions despite time pressure? If your mix is not sitting right after two honest passes, do not push through to mastering. A poorly mastered track on top of a shaky mix is not a deliverable. Come back the next day. The cognitive load of live mixing alone is substantial enough that professionals charge a significant premium for it, and that cost reflects the real mental demand involved.
Verifying your results after the session

You have exported your file. The work is not quite done yet. A proper quality check at this stage saves you from sending out something that sounds great in your studio and falls apart everywhere else.
Here is what to verify before calling the track finished:
- Multi-system listening test. Play your master through speakers, headphones, earbuds, a phone speaker, and ideally a car stereo. Each system will reveal different imbalances. A track that translates cleanly across all of them is genuinely well mixed and mastered.
- Volume calibration against reference. Match the loudness of your master to your reference tracks using a loudness meter, not your ears alone. If your track sounds significantly quieter or duller side by side, revisit your mastering.
- Clipping and distortion check. Open your exported file in your DAW and look for any red clipping indicators. Zoom in on transient peaks. Even a single clipped sample is audible on high-quality playback systems.
- Phase integrity. Sum the exported file to mono and listen. Do any elements disappear or thin out dramatically? If so, you have phase cancellation that needs addressing. Listening in mono checks spatial and balance accuracy in ways stereo listening simply cannot.
- File integrity and metadata. Check your export settings match your intended delivery format. Confirm fades are clean at the start and end of the file, with no DC offset and no clipped tail.
| Check | What to listen or look for |
|---|---|
| Multi-system playback | Frequency balance and clarity across speakers, headphones, and phone |
| Loudness match | -14 LUFS integrated for streaming, compared to reference |
| Clipping | Zero red indicators in the DAW, no digital distortion on transients |
| Mono compatibility | No significant element loss or thinning when summed to mono |
| File export settings | 24-bit WAV or AIFF, correct sample rate, clean fades, embedded metadata |
My honest take on mixing and mastering together
I have seen producers treat the quick mix and master as a badge of efficiency, something to celebrate as proof of their workflow speed. I understand the appeal, but I have also seen how often that attitude produces results that disappoint on release day.
Here is what I have learnt from working closely with producers at every skill level. The mental shift between mixing and mastering is not a small thing. Mixing asks you to scrutinise every individual element with a kind of forensic focus. Mastering asks you to forget all of that and hear the track as a listener hears it. Those two modes of listening are almost opposites, and switching between them in the same sitting, without rest, is genuinely difficult even for experienced engineers.
That said, I do think mixing and mastering together can be viable. When the track is relatively simple, when you have prepared the session properly, and when you build in genuine breaks between phases, the results can be genuinely professional. The AI tools available in 2026) can help flag obvious technical problems, but they cannot replace the human ear making artistic calls in context. The session structure matters far more than the tools you use.
My personal advice is this: treat the two phases as mentally separate events, even if they happen in the same day. If you respect that boundary, one session audio production becomes not just possible but genuinely productive.
— AubioMix
Take your mixes further with Aubiomix
If you are serious about making single session mixing work consistently, you need objective feedback on your mix before you ever reach the mastering stage.

Aubiomix is an online platform where you upload your track and receive detailed, professional feedback with specific, practical steps to improve your mix and master. It works fast, it is built for producers and engineers at every level, and it uses a clear evaluation framework to pinpoint exactly what your track needs. Think of it as having an experienced engineer listen critically to your work and tell you honestly what to fix, before you commit to a final export. Visit Aubiomix and see how much sharper your next session can sound.
FAQ
Can I mix and master in the same session?
Yes, you can mix and master in one session, but it requires solid preparation, genuine breaks between phases, and correct headroom. Skipping these steps significantly increases the risk of compromised results.
What headroom should my mix have before mastering?
Your final mix should peak between -6 dBFS and -3 dBFS, exported as a 24-bit WAV or AIFF without any master bus limiting applied.
How do I avoid ear fatigue in a long session?
Take five to ten minute breaks every hour, vary your listening volume throughout the session, and step away from your monitors entirely for at least fifteen minutes before switching from mixing to mastering.
Why does mastering sound worse after a long mix session?
After an extended mix, your ears lose accuracy in perceiving frequency and dynamics. This means mastering decisions made immediately after mixing are often misjudged, leading to over-processing or tonal imbalance in the final master.
When should I split mixing and mastering into separate sessions?
If your mix is not sitting well after two full passes, split the sessions. Mastering over an unresolved mix only compounds the problems and rarely produces a result worth delivering.