
Intentional clipping is a legitimate mixing tool when it's aimed at fast transients in genres that reward aggression, but unintentional clipping is almost always destructive. The safest workflow is clip first, limit second: shave a little off the sharpest peaks with a clipper, then let a limiter handle what's left. Watch true peak throughout, not just your sample meter.
TL;DR:
- Clipping in digital audio causes harsh distortion and should be detected using true peak meters and analysis of consecutive full-scale samples before exporting.
- Soft clipping rounds peaks for a more musical effect, while hard clipping creates noticeable artifacts, especially on sustained tones like pads or vocals.
- Applying a clipper typically at 0.5 to 2 dB on transients before limiting can increase loudness without sacrificing clarity, but over-clipping leads to irreversible damage.
- Prevent unintentional clipping by maintaining moderate levels during mixing and checking true peaks prior to final export, especially when using lossy codecs.
- Clipping is best used sparingly on fast transients in genres like techno or hip hop, not on vocals or delicate instruments, and should complement a proper gain staging workflow.
Table of Contents
- What clipping in a mix actually is
- How hard and soft clipping sound on different instruments
- How do you detect clipping reliably?
- When does clipping actually help a mix?
- How to apply clipping step by step
- Clipping vs limiting: what's the real difference?
- How to prevent unintentional clipping before it happens
- Can you fix clipping after it's already baked in?
- Quick reference: clipping and limiting settings at a glance
- How AubioMix reads clipping in your mix
- Why clipping deserves more respect (and more caution) than it gets
- Get clipping and true-peak feedback on your actual mix
- Sources
What clipping in a mix actually is
Clipping happens when a signal tries to exceed the maximum level a system can represent, and that system simply chops the top off the waveform instead of reproducing it. Look at a clipped waveform and you'll see it immediately: instead of a smooth curved peak, you get a flat, squared-off top, like someone took scissors to the crest of every wave.
The behaviour splits sharply between analogue and digital domains, and that difference matters enormously for how you approach it in a mix. Analogue circuits (valve preamps, tape, transformers) clip gradually. As the signal pushes into the ceiling, harmonic distortion creeps in progressively, rounding the peak rather than slicing it flat. That's why "driving" a tape machine sounds musical rather than broken.
Digital systems don't have that grace period. Once a sample hits 0 dBFS, there's no more headroom to give, full stop. The waveform gets flattened abruptly, generating harsh odd-order harmonics that our ears register as grit, buzz, or outright distortion depending on severity. This is why iZotope's breakdown of clipping treats digital clipping as a distinct creative and technical tool, not just an error state to avoid.
How hard and soft clipping sound on different instruments
Not all clipping sounds the same, and knowing which type you're dealing with tells you a lot about whether it's a problem or an opportunity.
Hard clipping produces those flat-topped waveforms mentioned above. On percussive material, it often reads as a click or a crack riding on top of the transient. On sustained tones (a held synth note, a vocal belt), it becomes a buzzy, fizzy artefact that sits uncomfortably in the mix because it's constant, not fleeting.
Soft clipping rounds the peak instead of squaring it off, which generates gentler, more musical harmonic content. It's closer to what a saturating analogue stage does, and it's why many clippers include a soft or "analogue" mode for use on basslines or mix bus material where you want density without harshness.
The material itself decides how forgiving clipping will be. Transient-heavy sources like drums recover well because the ear only catches the artefact for a few milliseconds. Sustained, tonal sources are far less forgiving; clip a held pad or a legato bassline too hard and the distortion becomes a permanent texture, not a passing flavour. That's the core reason experienced engineers reach for clipping on kicks and snares long before they'd try it on a lead vocal.
How do you detect clipping reliably?
Your ears catch obvious clipping, but subtle clipping and the clipping that only appears after export slip past casual listening every time. You need meters that look at the actual sample data.
Sample run detection scans the waveform for consecutive samples sitting at or near full scale. A handful of adjacent full-scale samples is a strong indicator of clipping, since genuine musical peaks rarely sit dead flat at maximum level for multiple samples in a row. Some declipping tools build entire detection engines around this, using amplitude histograms to spot the tell-tale spike at 0 dBFS that shows up even after a file has been normalised.
True peak, or inter-sample, overs are the sneakier problem. A file can measure perfectly clean on a standard sample peak meter and still clip when converted to MP3, AAC, or streamed through a lossy codec. That's because the reconstructed analogue waveform between samples can overshoot the digital ceiling even when no individual sample does. AudioUtils' clipping guide recommends checking true peak specifically before any export, not just sample peak, because encoders reintroduce overshoot that your DAW's stock meter never shows you.
For tools, lean on a true-peak-capable metering plugin for final checks, and consider a batch scanning utility like clipdetect if you're screening large numbers of stems or masters for clipping before they go further down the chain.
When does clipping actually help a mix?
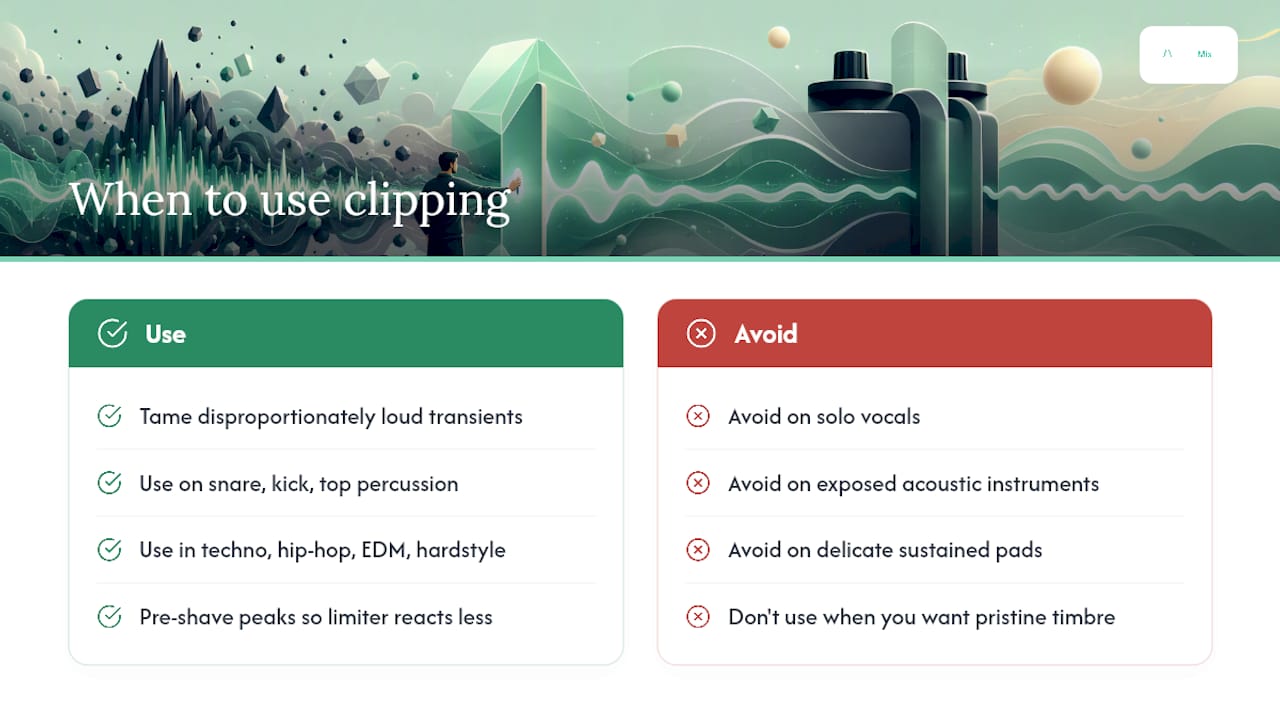
Clipping earns its place when you need to tame a transient that's disproportionately loud compared to the rest of the hit, without squashing the body of the sound the way a compressor or limiter would. Snare cracks, kick clicks, and aggressive top-end percussion in electronic genres are the classic candidates. Genres built around density and loudness, techno, hip hop, EDM, hardstyle, lean on clipping constantly because a bit of harmonic grit reads as energy rather than error.
The technical case for clipping is relief. A single hot transient forces a limiter to react hard for a few milliseconds, and that reaction is what causes audible pumping or a dulled top end across the whole mix. Shave that transient with a clipper first and the limiter barely has to work, which keeps the rest of the material sounding open. Newfangled Audio's comparison of clipping and limiting frames this exact relationship: clipping and limiting are complementary tools, not competitors.
Avoid clipping altogether on solo vocals, exposed acoustic instruments, or anything where pitch and timbre need to stay pristine. It's also worth being cautious on delicate sustained pads, where even a soft clip can turn a smooth tone into something faintly buzzy. If you're chasing creative distortion rather than transient control, a dedicated distortion or saturation plugin usually gives you more shaping control than a clipper designed for peak management. The sound design workflow at Iguanify is a good example of clipping used deliberately as a texture rather than a fix.
How to apply clipping step by step
Clipping can sit at almost any stage of your signal path, and where you place it changes what it's actually doing for you.
- Track level: best for individual transient offenders, a snare with one wildly hot hit, a bass note that spikes. Shave 0.5 to 2 dB off the sharpest peaks, nothing more aggressive at this stage.
- Sub-bus level: useful on a drum bus where multiple transients stack and create combined peaks bigger than any single track produces. Keep the same conservative range and check the group still punches the way it did unprocessed.
- Mix bus: a light clip here can glue transient energy across the whole mix before mastering, but this is the stage where mistakes are most audible, so use it sparingly.
- Master/print stage: typically the final safety net before a limiter, catching anything that slipped through earlier stages.
For monitoring, use Delta or difference listening wherever your clipper offers it. Flip that switch and you hear only what the clipper removed, isolated from the rest of the signal. If that difference sounds like a clean transient shave, you're fine. If it sounds like a chunk of musical information, you've gone too far. This single habit, recommended repeatedly in iZotope's clipping guide, catches more mistakes than any numeric target ever will.
A practical starting chain: clipper first (0.5 to 2 dB of shaving on transients), then a multiband clipper or saturator if you want frequency-specific control (soft clipping the low band for warmth, leaving highs untouched), then your limiter doing the final loudness work. This mirrors the workflow Newfangled Audio recommends for engineers who want loudness without crushing the transients that give a mix its punch. For a broader look at how this fits into the full signal path, see this guide to mastering the mixing chain.
Automate your clipper's threshold down by a decibel or two on the loudest chorus hit only, rather than setting one static value for the whole song. This approach keeps quieter verses untouched while still catching the moment your mix needs it.
Clipping vs limiting: what's the real difference?
Clipping and limiting solve overlapping problems in fundamentally different ways, and mixing them up is where a lot of engineers go wrong.
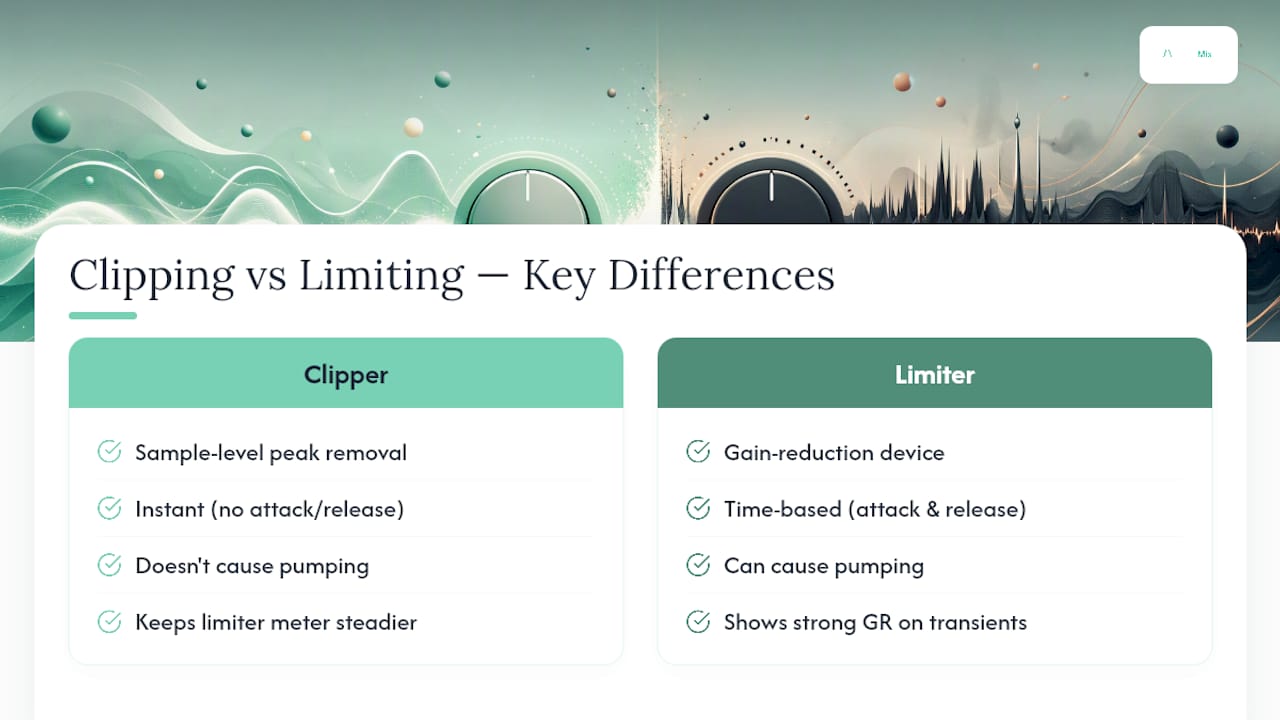
A clipper acts instantaneously, at the sample level, with no attack or release time to speak of. It simply removes whatever crosses the threshold, the instant it crosses it. A limiter, by contrast, is a gain reduction device working over time, with attack and release settings that shape how it reacts to a transient and how quickly it recovers afterwards. That time-based behaviour is exactly what causes pumping: a limiter reacting hard to a spike, then audibly releasing as the spike passes.
Run a quick test to feel this difference for yourself: bypass your clipper and observe your limiter's gain reduction meter respond strongly to transient-heavy sections. Re-engage the clipper and observe that the meter maintains steadier, smaller movements. That smoother behaviour is the clipper doing its job upstream.
For numeric targets, engineers commonly shave 0.5 to 2 dB with the clipper on the hottest transients, then let the limiter handle 1 to 3 dB of average gain reduction across the mix, with a true-peak ceiling set around −1.0 dBTP for safe delivery.
How to prevent unintentional clipping before it happens
Most clipping disasters happen because of a misunderstanding about how your DAW actually works internally. Your mix bus is almost certainly running at 32-bit floating point, which has effectively no practical ceiling, numbers can go well above 0 dBFS internally without anything breaking. The danger arrives the moment you export or bounce down to a fixed bit depth, where that generous headroom disappears and anything over 0 dBFS gets clipped for real.
Keep your mix bus peaking at a moderate level below 0 dBFS during tracking and mixing, giving yourself real working headroom rather than mixing hot and hoping. Individual tracks benefit from the same discipline. Clip gain adjustments applied before any plugin sees the signal keep your whole chain working in a sane range, and they solve peak problems without ever touching a fader.
Export is where the real risk hides. Lossy encoders (MP3, AAC, streaming codecs) reconstruct the waveform between samples, and that reconstruction can overshoot your sample peak reading. Leave roughly 1 dB of true-peak headroom, somewhere between −1.0 and −1.1 dBTP, before you commit to a final bounce, and confirm with a true-peak meter rather than trusting the standard peak reading in your DAW.
Can you fix clipping after it's already baked in?
Declipping tools work in two stages, and understanding both tells you what to expect from the result. First, detection: the algorithm scans for clipped intervals, often using amplitude histograms to spot the tell-tale spike at full scale that marks where the waveform has been squared off. Detection accuracy in published research on this approach reaches an f‑measure of roughly 0.92, which is genuinely strong for an automated process.
Second, reconstruction: short clipped runs get rebuilt using time-domain interpolation, essentially estimating what the missing peak shape probably looked like. Longer runs need frequency-domain reconstruction instead, a heavier computational approach because there's more missing information to infer.
The honest limitation is that heavy, sustained clipping simply destroys information that no algorithm can fully recover. Audacity's Clip Fix tool works reasonably well on brief clipped moments but explicitly warns that its assumptions break down on longer or asymmetric clipping. Your realistic workflow: audition the repair critically, accept partial fixes on short runs, and re-export from an unclipped source whenever one still exists rather than relying entirely on repair.
Quick reference: clipping and limiting settings at a glance
| Stage | Recommended target |
|---|---|
| Clip shaving on transients | 0.5–2 dB |
| Limiter gain reduction (average) | 1–3 dB |
| True-peak ceiling for export | around −1.0 dBTP |
| Mix bus working headroom | −6 to −3 dBFS |
Before you call a mix finished, run through this: check your true-peak meter (not just sample peak), listen on Delta to confirm the clipper is only removing transient spikes, and re-export a test file through your actual delivery codec to catch any inter-sample overs the encoder introduces. Catching a problem at this stage is far cheaper than trying to declip a finished master later.
How AubioMix reads clipping in your mix
Automated detection only tells half the story, which is why AubioMix pairs clipping analysis with feedback written the way a mixing engineer would explain it to you. Upload a mix and the report flags sample-run clipping with timestamps, calls out true-peak overs that a standard meter would miss, and suggests specific clip-gain adjustments on the tracks causing the problem, rather than leaving you to guess which element is the culprit.
That combination matters because clipping rarely shows up as a single obvious fault. It's usually one hot snare hit or a bass note nudging a bus over the edge, buried in a 40-track session. Genre-specific benchmarking, checking a techno mix against other tracks in that genre, for instance, helps you judge whether your loudness and clipping decisions actually match what listeners expect from that style, rather than an arbitrary universal standard.
Why clipping deserves more respect (and more caution) than it gets
Most mixing advice treats clipping as either a forbidden mistake or a magic loudness trick, and both framings miss what's actually going on. Clipping is a blunt tool with a narrow, specific job: removing fast transient energy that a limiter would otherwise struggle with. It's not a mastering shortcut, and it's definitely not a substitute for proper gain staging earlier in your session.
The engineers who get real value from clipping tend to be the ones who use it the least, in the sense that they reach for tiny amounts (that 0.5 to 2 dB range keeps coming up for good reason) rather than leaning on it to fix problems that started somewhere else in the chain. If you find yourself clipping 6 or 8 dB to hit a loudness target, the actual fault usually lives upstream, in arrangement density, in compression choices, in a kick and bass fighting for the same frequency space, not in the clipper's settings.
The industry's obsession with loudness has probably done more to normalise reckless clipping than any genuine creative need for it. Streaming platforms normalise playback loudness anyway, which means chasing extra loudness through aggressive clipping buys you distortion with almost no practical benefit. Use clipping the way it was actually designed to be used: surgically, on transients, with your ears checking the Delta signal every single time. That discipline, more than any specific numeric setting, is what separates a mix that sounds loud and alive from one that just sounds squashed.
— AubioMix
Get clipping and true-peak feedback on your actual mix
AubioMix gives you what a DIY declip pass or a blind mastering chain can't: a direct read on exactly where your clipping is happening, timestamped, with true-peak warnings and specific clip-gain suggestions attached to the tracks causing them. Upload your mix and skip the guesswork of hunting through 40 tracks by ear.

Instead of running a generic loudness plugin and hoping for the best, you get feedback benchmarked against real mixes in your genre. A jazz mix and a deep house mix have completely different tolerances for peak behaviour and density, and AubioMix's reports reflect that rather than applying one universal loudness rule to everything. You'll also see how real hit records handle transient control, tracks like Seventeen Going Under show what disciplined peak management sounds like on a finished commercial mix.
If your mix is close to done and you want to know exactly where clipping is costing you clarity, upload it and get the specific fixes rather than another round of guessing.
Sources
For deeper reading, Newfangled Audio's clip-versus-limit breakdown explains the ordering logic in more technical depth than most plugin manuals bother to. The Laguna and Lerch declipping paper is worth a skim if you want to understand how automated repair actually works under the hood. For a free first pass on a suspect file, Darwin's Cat's online declipper gives a quick sense of how recoverable your clipping actually is before you commit more time to it.
- When to Clip VS. When to Limit (And Why Order Matters)
- An efficient algorithm for clipping detection and declipping audio
- How to Fix Audio Clipping — Detect, Prevent, and Repair | AudioUtils
- Clipping in mixing explained, and how to use it