

Clip gain matters before mixing because it corrects input-level problems at the source, before any plugin ever sees the signal. Every compressor, saturator, and EQ in your chain responds to the level it receives, so if that level is inconsistent or wrong, the processor behaves unpredictably. Fix it upstream with clip gain and everything downstream sounds more musical, more transparent, and far easier to control.
- What clip gain does: applies a pre-fader, pre-plugin amplitude trim directly to the audio region, so the raw signal is corrected before it reaches any insert.
- The main benefit: compressors receive a consistent input, which means less pumping, more transparent gain reduction, and preserved transients.
- Your next step: run a dedicated clip-gain pass on every track before inserting a single dynamic processor.
Key takeaways
A dedicated clip-gain pass before mixing is the single most effective way to make every downstream processor behave predictably and musically.
| Point | Details |
|---|---|
| Fix levels at the source | Apply clip gain before any plugin so compressors and saturators receive a consistent, predictable input. |
| Target -18 dBFS average | Aim for around -18 dBFS average as a starting point for analogue-modelled plugins, adjusting by ear. |
| Keep clip gain and faders separate | Use clip gain for source correction and faders for mix balance; never conflate the two. |
| Preserve musical dynamics | Narrow the dynamic range without flattening it — a good performance should still breathe. |
| Verify with Aubiomix | Upload your mix to Aubiomix for objective analysis of dynamics, true peak, and loudness consistency. |
Table of Contents
- Why clip gain matters before mixing: the signal chain explained
- How clip gain changes the way your compressors behave
- Step-by-step workflow: applying clip gain before you mix
- DAW-agnostic techniques for applying clip gain quickly
- Common clip-gain mistakes and how to avoid them
- When clip gain is not the right tool
- Practical A/B tests to hear the difference clip gain makes
- Why experienced mixers always do a clip-gain pass first
- Validate your clip-gain work with independent mix analysis
- Sources
Why clip gain matters before mixing: the signal chain explained
Clip gain is a pre-fader, pre-plugin level adjustment applied directly to the audio clip or region in your DAW. According to Sound On Sound's gain staging guide, adjustments can range from -144 dB to +48 dB in some DAWs, and many analogue-modelled plugins perform best when fed at a moderate average input level. That single number tells you a lot: these plugins were designed with an expected input range, and clip gain is how you honour it.
The signal chain order is what makes this so powerful. Raw audio flows through clip gain first, then into your insert plugins (EQ, compressor, saturator), then through the channel fader, and finally to the mix bus. The fader sits after the plugins. So if a vocal has peaks at -6 dBFS and whispered passages dropping to -30 dBFS, your compressor is chasing a 24 dB swing before it even starts doing its creative job. A clip-gain pass narrows that swing at the source, and the compressor suddenly sounds like a different, better piece of gear.
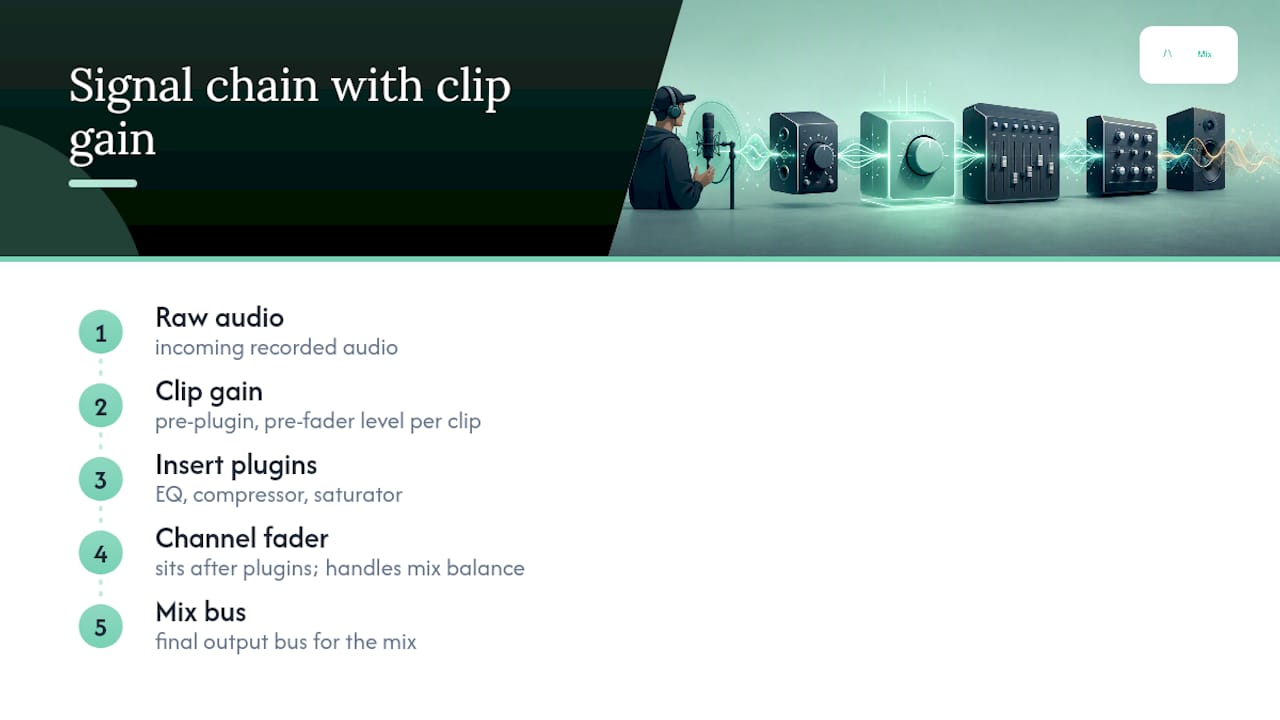
Clip gain is also mathematically decoupled from your fader and automation. As the Avid Pro Tools user guide confirms, clip gain adjusts per-clip or per-region volume without touching the track's overall output, which means you can fix source levels without disturbing a single automation node. That separation is the whole point: clip gain sets the foundation, faders handle the mix balance, and automation handles the creative moves.
How clip gain changes the way your compressors behave
Compressors are threshold-dependent devices. Feed them a wildly inconsistent input and they either over-compress the loud moments, under-compress the quiet ones, or both at once. The result is pumping, lost transients, and a mix that never quite settles. Sound On Sound's vocal mix prep guide makes this clear: normalising dynamics with clip gain lets compressors work more transparently, because they no longer need to compensate for large within-performance level swings.
The same principle applies to saturation and analogue-modelled EQ. These processors are level-sensitive by design; their harmonic character changes with input level. Feed a transformer-style EQ too hot and you get grit you didn't ask for. Feed it too quietly and you lose the warmth that made you choose it. Correct upstream levelling is what makes tonal outcomes predictable.
What to listen for in an A/B test: with clip gain applied, gain reduction on your compressor's meter should move steadily rather than lurching. Consonants and transients should be clearer. Breaths and room noise should sit at a consistent level rather than jumping forward on quiet phrases.
Step-by-step workflow: applying clip gain before you mix
A clip-gain pass works best as a dedicated stage, not something you do while also adjusting EQ or compression. Here is the sequence we recommend for every session:
- Import and organise. Consolidate all regions to the session start, label tracks clearly, and confirm sample rates match.
- Solo and scan. Listen through each track individually at unity gain. Note where peaks are clipping, where passages are too quiet, and where the performance has large dynamic swings.
- Gross levelling. Apply broad clip-gain adjustments to bring average levels into a consistent range, targeting around -18 dBFS average for analogue-modelled chains.
- Micro-levelling. Split regions at phrase boundaries and adjust individual words, syllables, or drum hits. This is where experienced engineers shape breaths and consonants as a musical control rather than a corrective chore.
- Add micro fades. After every region split, apply short fades (2–10 ms) to prevent clicks. This is non-negotiable.
- Consolidate or render where needed. If your session is heavy on processing or you are working with many small clips, render the clip-gained regions to new audio files to reduce latency and keep things tidy.
- A/B test before inserting plugins. Play back the clip-gained track against the original and confirm the level is consistent. Only then insert your compressor.
Pro Tip: Treat clip gain as micro-dynamics control, not a normaliser. The goal is a consistent input for your plugins, not a flat waveform. Preserve the musical phrasing — a well-performed crescendo should still crescendo, just within a tighter overall range.
According to Dave Johnston's Sonic Toolkit guide, preparing audio with clip gain can also reduce CPU load by lessening the need for aggressive plugin chains later. Fewer plugins doing heavy lifting means a more stable session and a cleaner mix.
DAW-agnostic techniques for applying clip gain quickly
The method you use depends on the size and precision of the adjustment needed. These approaches work across most major DAWs:
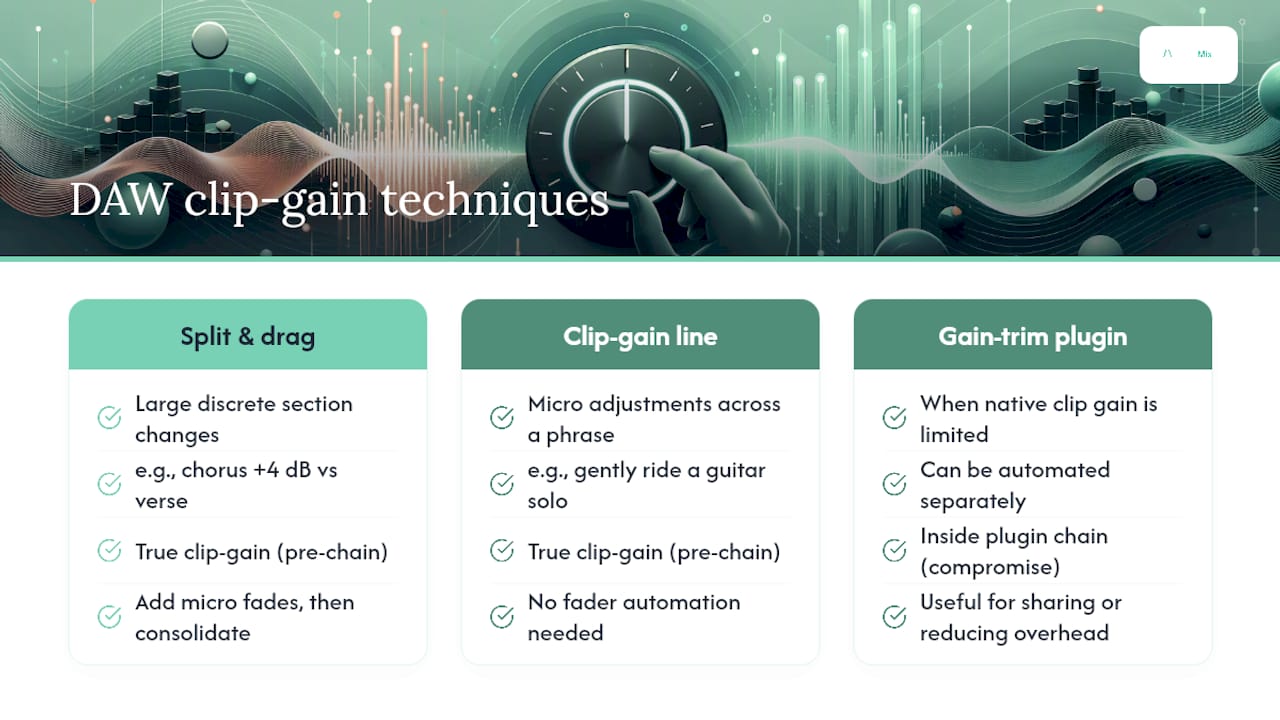
Split and drag (region gain handles). Divide a region at a phrase boundary and drag the gain handle up or down. Best for large, discrete changes between sections, such as a chorus vocal that is consistently 4 dB louder than the verse.
Clip-gain line with nodes. Draw a gain envelope directly on the clip, adding nodes to ramp between levels. This is ideal for micro-adjustments across a phrase, such as gently riding a guitar solo without touching fader automation.
Gain-trim plugin. Insert a simple utility or trim plugin as the first insert on a channel. Useful when your DAW's native clip gain is limited, or when you want to automate the trim separately. Note that this approach sits inside the plugin chain rather than before it, so it is a compromise, not a true clip-gain solution.
Pro Tip: After making many region splits, always add micro fades and then consolidate the edited clips into a single new file. This prevents clicks at edit boundaries, reduces visual clutter, and gives you a clean, single region to work from going forward. The Sound On Sound clip gain guide recommends this as standard practice.
One distinction worth knowing: some DAWs store clip gain as non-destructive metadata (readable but not baked into the audio file), while others write it permanently. Non-destructive is preferable during editing; baking or rendering is useful when sharing sessions or reducing processing overhead.
Common clip-gain mistakes and how to avoid them
Most of these errors come from skipping the clip-gain pass entirely and expecting downstream processors to compensate.
- Relying on the compressor to fix level problems. A compressor can mask inconsistent input, but it cannot fix it. The result is over-compression, pumping, and a mix that sounds processed rather than controlled.
- Over-levelling and removing musical dynamics. Clip gain should narrow the dynamic range, not flatten it. If every word of a vocal sits at exactly the same level, the performance loses its life.
- Forgetting fades after region splits. Every split without a micro fade is a potential click. It takes two seconds to add one; skipping it costs you minutes of debugging later.
- Adjusting the fader instead of fixing the source. If a track is consistently too loud, lower its clip gain, not its fader. The fader is for mix balance; clip gain is for source correction.
Red flags that suggest clip gain was skipped:
- Compressor gain reduction meter lurching rather than moving steadily
- Inconsistent vocal intelligibility across phrases
- Breaths and room noise jumping forward on quiet lines
- Saturation sounding harsh on loud notes and absent on quiet ones
- Noise floor that rises and falls audibly between phrases
For a broader diagnostic checklist, the Aubiomix red flags guide covers ten mix problems that often trace back to poor gain staging at the source.
When clip gain is not the right tool
Clip gain is surgical and manual. There are situations where another approach serves you better.
| Situation | Better tool | Why |
|---|---|---|
| Long-form level moves across a full song section | Channel fader automation | Smoother, tempo-synced, and non-destructive to source audio |
| Frequency-dependent dynamics (sibilance, low-end build) | De-esser or multiband compressor | Targets specific frequency bands rather than broadband level |
| Systemic level errors from recording (gain too low at source) | Input gain adjustment at re-recording | Clip gain can boost, but boosting a noisy recording amplifies the noise floor |
| Real-time performance riding | Fader automation | Clip gain is not designed for real-time creative moves |
The short version: use fader automation for macro level moves, clip gain for source-level correction, and detection-based tools for frequency-specific problems. They complement each other rather than compete.
Practical A/B tests to hear the difference clip gain makes
These three short exercises will make the benefit audible in under ten minutes each.
- Vocal micro-levelling test. Take a raw vocal take and duplicate the track. Apply a clip-gain pass to one copy, targeting consistent phrase levels. Insert the same compressor with identical settings on both. Compare gain reduction metering and listen for pumping, breath prominence, and consonant clarity.
- Drum overhead transient test. Duplicate your overhead bus. Apply clip gain to tame the loudest cymbal hits on one copy. Run both through the same limiter. Listen for transient smearing and cymbal wash on the unprocessed version versus the tighter, more controlled result on the clip-gained copy.
- Distorted guitar into saturator. Take a single guitar region with varying pick attack. Clip-gain the quieter notes up and the louder ones down by 2–3 dB. Run both versions through the same saturation plugin. The clip-gained version should produce more consistent harmonic drive across the phrase.
Listening checklist for all three tests:
- Gain reduction meter: steady movement vs. lurching
- Transient clarity: attack preserved or smeared
- Noise and breath level: consistent or variable
- Saturation character: even harmonic texture or spiky and inconsistent
Save short before/after stems from each test and document the clip-gain values that worked. These become your personal reference points for future sessions.
Why experienced mixers always do a clip-gain pass first
There is a perspective shift that happens once you start treating clip gain as a musical tool rather than a corrective one. The Sound On Sound clip gain guide describes experienced engineers using it as an extension of the performance itself, shaping individual breaths and syllables to control how audio feeds into effects. That framing changes everything.
When we think of clip gain as performance editing, the pass stops feeling like a chore and starts feeling like the first creative decision of the mix. You are deciding how the compressor hears the singer. You are deciding how the saturator responds to the guitar. Every downstream processor is shaped by what you do here.
The single habit to adopt immediately: before inserting any plugin on your lead vocal or main rhythmic element, do one clip-gain pass. Just that track, just that pass. The improvement in compressor behaviour alone will make the rest of the mix easier. And as Sound On Sound's vocal mix prep guide notes, treating clip gain as optional is one of the most common and costly mistakes in a mixing session.
Validate your clip-gain work with independent mix analysis
Once your clip-gain pass is done, how do you know it actually worked? Listening is essential, but a second set of objective eyes on the data tells you things your ears can miss, especially after hours in the session.

Aubiomix analyses your uploaded mix across 15+ areas, including dynamics consistency, true peak levels, loudness, clipping, and noise behaviour — exactly the parameters that reveal whether your clip-gain pass did its job. You get a detailed written report with specific, actionable steps, visual analysis, and progress tracking across sessions. Upload a short stem or a full mix and see precisely where your gain staging holds up and where it needs attention. Get pro-level feedback on your mix in minutes, with no guesswork and no waiting.
Sources
- Gain staging your DAW software | Sound On Sound
- Clip Gain in Pro Tools — Avid user guide
- Sonic toolkit: Prepping your audio with clip gain for better mixes