
Equalization (EQ) is defined as the precise, frequency-dependent adjustment of gain across specific bands to shape tonal character, resolve frequency conflicts, and achieve clarity in a mix. Every professional mix you have ever admired was shaped by deliberate EQ decisions, from the warmth of a kick drum to the presence of a lead vocal. Understanding EQ at a technical and creative level is the single most transferable skill a producer or mix engineer can develop. This guide covers the core parameters, corrective and creative applications, common pitfalls, and workflow strategies that separate competent mixes from genuinely great ones.
What are the core EQ parameters and filter types?
EQ is defined as adjusting gain across specific frequency bands using parametric bells, high-pass, low-pass, and shelving filters to shape tonal character and reduce masking. That definition contains the entire technical foundation of the subject. Before you touch a plugin, you need to understand the three parameters that govern every EQ move you make.
The three fundamental parameters:
- Centre frequency: The specific Hz value you are targeting. Every instrument occupies a range, and your centre frequency determines precisely where your filter acts.
- Gain (dB): The amount you boost or cut at that frequency. Even modest moves of 1 to 3 dB can have a significant audible effect, particularly in the midrange.
- Bandwidth (Q): The width of the filter curve. A high Q value produces a narrow, surgical cut or boost. A low Q value produces a wide, gentle, musical curve.
The relationship between Q and gain is where most producers go wrong. High Q boosts cause ringing and phase issues that accumulate across a mix, making the result feel harsh and fatiguing. Wide Q settings, by contrast, feel more natural to the ear because they mimic the gentle curves of acoustic resonance.
The filter types you will use most often are parametric bells for targeted boosts and cuts, high-pass filters (HPF) to remove low-end rumble below a set frequency, low-pass filters (LPF) to tame harshness above a set frequency, and shelving filters to gently lift or reduce entire frequency regions. Each has a specific job, and using the wrong filter type for a task is like using a scalpel when you need a paintbrush, or vice versa.

Pro Tip: Use the gain-sweep technique to locate problem frequencies before cutting. Boost a narrow band and sweep it slowly across the spectrum until you hear the offending resonance become exaggerated, then switch to a cut at that precise point. This preserves musical character while removing what is unpleasant.
How is EQ used for corrective and creative purposes?
EQ serves two distinct roles: corrective EQ removes problematic resonances and mud, while creative EQ sculpts the tonal identity of a track. Treating these as separate stages in your thinking, even if you apply them simultaneously, will make your decisions more intentional and your results more consistent.
Corrective EQ in practice:
- Remove low-end build-up first. Apply a high-pass filter to every track that does not need sub-bass energy. Guitars, pianos, and vocals all accumulate low-frequency content that competes with the kick and bass without adding anything useful.
- Target the mud range (200 to 500 Hz). This region is where most mixes become cloudy. A gentle cut of 2 to 4 dB with a moderate Q on competing instruments clears space without thinning the sound.
- Identify and remove resonances. Use the gain-sweep technique to find the specific frequency where a snare rings unpleasantly or a vocal sounds nasal, then apply a narrow cut.
- Check phase relationships. Corrective EQ on close-miked sources can introduce phase shift. Listen for comb filtering when multiple microphones are involved.
Creative EQ is where the personality of your mix comes from. Boosting the upper midrange of a guitar around 2 to 4 kHz adds bite and presence. Lifting the air frequencies of a vocal above 10 kHz adds shimmer and openness. Adding low-shelf warmth to a piano at 80 to 100 Hz makes it feel grounded and full.
"EQ is technical frequency real estate management, not just artistic choice. Instruments must not compete for the same frequency space at the same intensity." — MusicProductionWiki.com
The practical consequence of this is significant. Resolving foundational EQ issues early reduces the need for aggressive compression by 50 to 70% in dense mixes. That is not a small efficiency gain. It means your compressors behave more musically, your faders sit more naturally, and your mix translates better across playback systems.
What EQ mistakes should producers avoid?
The most damaging EQ habit is solo-listening bias. EQ settings that sound good in solo can ruin mix balance when every track is playing together. A vocal that sounds full and rich in isolation may be masking the lead guitar and muddying the piano when the full arrangement is running. Always make your EQ decisions with the full mix playing.
Here are the most common mistakes and how to correct them:
- Boosting before subtracting. Many producers reach for boosts instinctively, but a subtractive-first approach preserves phase integrity and headroom. Remove what is wrong before adding what you want.
- Overusing narrow Q settings. High Q boosts sound unnatural and create ringing. Reserve narrow Q for surgical cuts, and use wider Q for any additive work.
- Excessive shelving. Excessive shelving boosts shift tonal balance across the entire mix. A +6 dB high shelf on every track adds up to a mix that sounds brittle and fatiguing.
- Ignoring the relationship between EQ and compression. Applying EQ before compression stabilises vocal presence and prevents the compressor from overreacting to problematic frequencies. Putting a compressor before EQ means the compressor is responding to resonances you have not yet addressed.
- Memorising fixed frequency points. Knowing that "presence lives at 3 kHz" is a starting point, not a rule. Effective EQ learning depends on developing your ear to recognise curve geometry rather than applying the same settings to every session.
Pro Tip: Try mixing at low volumes when making EQ decisions. At lower playback levels, frequency imbalances become more obvious because the ear's sensitivity to bass and treble decreases. If your EQ choices hold up at low volume, they will translate everywhere.
How to integrate EQ into a professional mixing workflow
EQ is most effective when it is applied at the right point in the signal chain and in the right sequence relative to other processing. The mixing chain follows a logical order: gain staging and fader balance first, then EQ, then compression, then time-based effects like reverb and delay. Deviating from this sequence without a specific reason creates problems that compound as the mix develops.
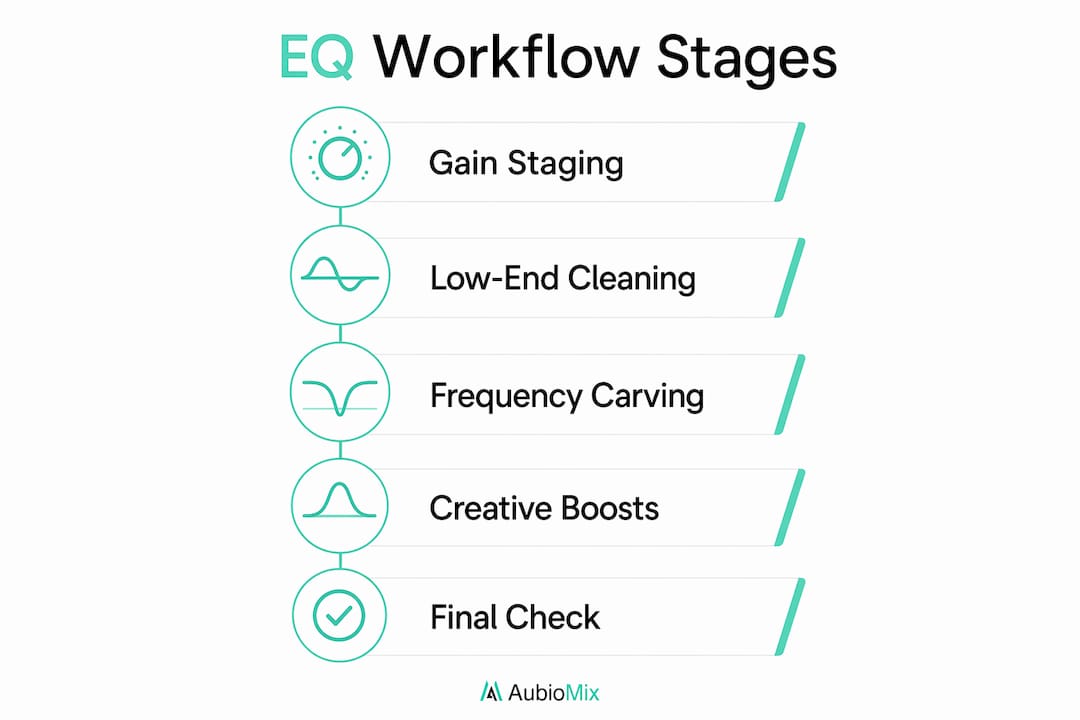
| Stage | Task | EQ role |
|---|---|---|
| Gain staging | Set input levels before any processing | None. Establish headroom first. |
| Corrective EQ | Remove mud, resonances, low-end build-up | High-pass filters, narrow cuts, mud reduction |
| Compression | Control dynamics after EQ has cleaned the signal | EQ feeds a stable signal to the compressor |
| Creative EQ | Shape tonal character and add presence | Gentle boosts, shelving, air frequencies |
| Reverb and delay | Add space and depth | EQ on return channels to control muddiness |
Cleaning the low end early is the single highest-impact habit you can build. Every track that does not need sub-bass energy below 80 Hz should have a high-pass filter applied as a default. This alone frees up enormous headroom and makes the kick and bass relationship clearer without any further processing.
Creating frequency space among competing instruments is the other core discipline. A kick drum and a bass guitar both occupy the 60 to 120 Hz range. Rather than boosting both, you choose which instrument owns each sub-region. The kick might own 60 to 80 Hz, while the bass owns 100 to 120 Hz. You then apply gentle cuts on each instrument in the region the other owns. This is the frequency real estate principle in practice.
For evaluating your EQ decisions against professional standards, Aubiomix's evaluation framework provides a structured way to assess frequency balance and identify where your mix needs attention. Pairing that kind of structured feedback with the mix engineer workflow gives you both the diagnostic tool and the process to act on what you find.
Key takeaways
Effective EQ requires applying corrective moves before creative ones, always listening in full mix context, and treating frequency space as a shared resource that instruments must not compete for.
| Point | Details |
|---|---|
| Master the three parameters | Centre frequency, gain, and Q determine every EQ move's shape and transparency. |
| Corrective before creative | Remove resonances and mud before boosting tonal character to preserve headroom. |
| Avoid solo-listening bias | Always EQ with the full mix playing to prevent tonal imbalance across tracks. |
| EQ before compression | Cleaning the signal before compression prevents compressor overreaction to problem frequencies. |
| Subtractive-first approach | Cutting unwanted frequencies before boosting preserves phase integrity and mix clarity. |
Why EQ is the skill worth obsessing over
There is a tendency among newer producers to treat EQ as a corrective afterthought, something you reach for when a track sounds wrong. I think that framing holds a lot of people back. The producers and engineers whose mixes genuinely stand out are the ones who use EQ as a primary compositional tool, not a repair kit.
What I have noticed, working with mixes across a wide range of genres, is that the most common source of a mix feeling "not quite professional" is not the plugins, the samples, or even the arrangement. It is frequency competition. Two instruments sitting in the same range at the same intensity create a kind of sonic blur that no amount of reverb or saturation will fix. EQ is the only tool that resolves it directly.
The other thing worth saying plainly: presets are a starting point, not a destination. Every source sounds different, every room sounds different, and every arrangement creates different frequency interactions. The engineers who develop their ears to hear curve geometry, to recognise what a 3 dB boost at 800 Hz with a Q of 2.0 actually sounds like, are the ones who work faster and make better decisions. That skill only comes from deliberate, attentive practice. No preset library shortcuts it.
My honest encouragement is to spend time with a single track, a vocal or a snare, and practise the gain-sweep technique until you can identify resonances by ear before you see them on a spectrum analyser. That single habit will accelerate your EQ development more than any course or tutorial.
— Aubiomix
Get expert feedback on your EQ and mix decisions
Knowing the theory is one thing. Hearing how your specific mix holds up against professional standards is another entirely.

Aubiomix is an online app where you can upload your track and receive detailed, AI-assisted feedback on your mixing and mastering decisions, including frequency balance, EQ effectiveness, and where your mix needs attention. Rather than guessing whether your low-end is clean or your vocal is sitting correctly in the mix, you get pro-level mix feedback with specific, actionable steps to improve. It is the fastest way to close the gap between where your mixes are now and where you want them to be.
FAQ
What does EQ stand for in music production?
EQ stands for equalization, the process of adjusting the gain of specific frequency bands to shape the tonal character of audio. It is applied using filter types including parametric bells, high-pass filters, low-pass filters, and shelving filters.
Should EQ come before or after compression in the signal chain?
EQ should generally come before compression. Applying EQ first removes problematic resonances and stabilises the signal, which prevents the compressor from overreacting to frequencies you have not yet addressed.
What is the gain-sweep technique?
The gain-sweep technique involves boosting a narrow EQ band and sweeping it slowly across the frequency spectrum until an unpleasant resonance is exaggerated. You then switch the boost to a cut at that precise frequency, removing the problem while preserving the musical character of the source.
What is the difference between corrective and creative EQ?
Corrective EQ removes problems such as mud in the 200 to 500 Hz range, low-end rumble, and harsh resonances. Creative EQ adds tonal character, such as presence boosts on vocals or air frequency lifts, to shape the identity of a track.
Why should I avoid EQing in solo?
EQ settings that sound balanced in solo frequently cause frequency conflicts when the full mix is playing. Always make EQ decisions with all tracks running to hear how each instrument interacts with the others in the shared frequency space.