
Misused high pass filters usually do one thing: they trade real low end for phase shifts, ringing, and false peaks that trick your ears into thinking a mix has improved. The rule that keeps you safe is simple. Treat the HPF as a last resort, not a reflex, and when you do reach for one, keep the slope shallow and the cutoff conservative.
TL;DR:
- Excessive use of steep high pass filters across multiple tracks can create phase shifts, ringing artifacts, and false peaks that thin out the low end of a mix.
- Filters with steep slopes above 12 dB per octave tend to introduce more ringing and phase distortion, especially on transients like kick drums and vocals.
- Always verify filter effects at low volume, use mono checks, waveform inspection, and spectrum analysis before permanently applying high pass filters.
- Conservative cutoff points and gentle slopes (6 to 12 dB per octave) are safer, with recommended starting points around 60-120 Hz for vocals and guitars.
- Alternatives such as manual editing, volume automation, and source separation can preserve phase and clarity without risking artefacts caused by filtering.
Table of Contents
- Common high pass filter misuse and the audible consequences in a mix
- Why HPFs cause ringing and phase problems
- Practical rules for safe HPF settings in real mixes
- Alternatives to aggressive filtering that preserve phase and clarity
- Diagnosing filter problems: tests, meters and listening checks
- Our perspective: why objective checks matter as much as good ears
- Check your own mix for high pass filter misuse
- Sources
- FAQ
Common high pass filter misuse and the audible consequences in a mix
Most engineers don't set out to damage their low end. It happens gradually, one track at a time, until the whole mix feels thin without an obvious culprit. Here's where things usually go wrong:
- Filtering every channel by habit. A 100 Hz cut on the kick, another on the bass, another on the vocal, and suddenly the mix has lost the weight that made the reference track feel alive.
- Cutting too high. Pulling the cutoff above a vocal's or guitar's fundamental strips the note itself, not just the mud around it, leaving a voice that sounds thin and disconnected from the body of the track.
- Stacking filters through the chain. A high pass on the channel, another on the bus, another in the mastering EQ. Each one rotates phase a little further, and the cumulative shift can smear timing and stereo image without any single filter looking extreme on its own.
- Steep slopes chasing "clarity." A 24 dB/octave cut often sounds punchier in isolation, but that apparent clarity frequently comes from artefactual peaking near the cutoff rather than a genuine improvement, as technical analysis of filtering artefacts has documented.
- Mistaking artefacts for fixes. A filter that seems to add punch or separation may just be reshaping transients in a way that flatters headphones but falls apart on a full-range system.
Each of these looks harmless in isolation. Stacked across twenty or thirty tracks, they explain a surprising number of mixes that sound "produced" but never quite hit.
Why HPFs cause ringing and phase problems
A high pass filter doesn't just remove frequencies below its cutoff. It reshapes the timing information around that cutoff, and the steeper the slope, the more aggressive that reshaping becomes.
When a filter meets a sharp transient, such as a kick drum's attack or a plosive consonant in a vocal, its impulse response can overshoot and settle in oscillations rather than a clean step. That's ringing, and it's most audible on percussive material with fast attacks. The mechanism is well documented: research into filtering artefacts shows that steeper slopes, 24 dB/octave and beyond, are considerably more prone to producing these oscillatory side effects than gentler ones.
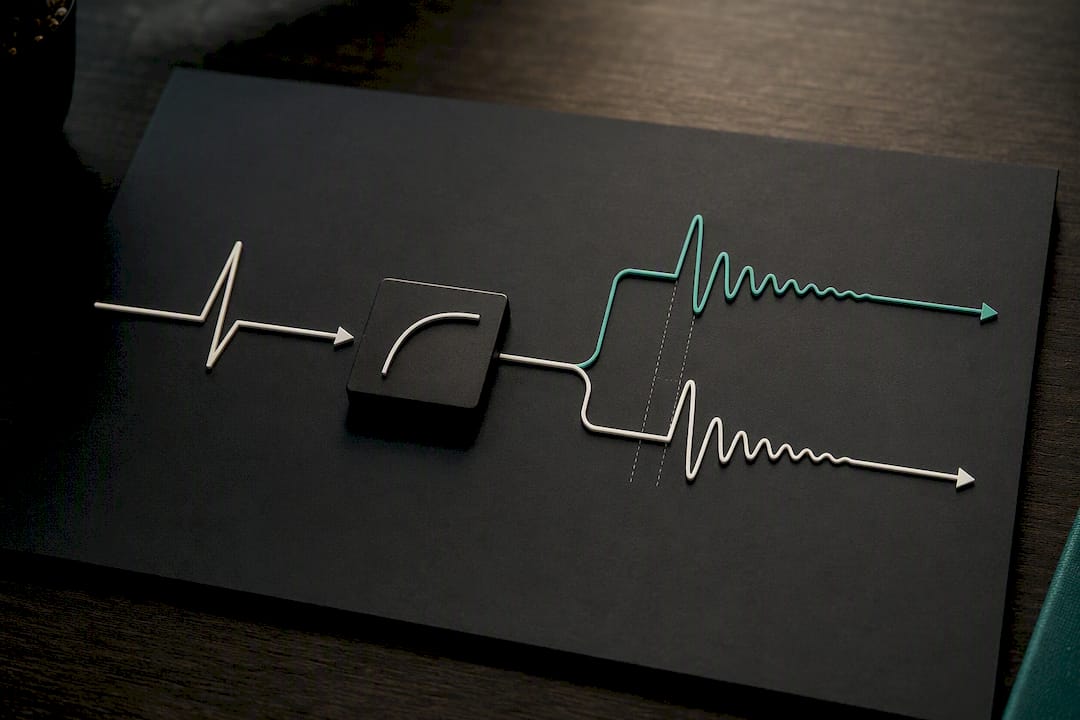
Pro Tip: If a sound seems to "click" or "pop" oddly right after you steepen a filter slope, that's very likely ringing, not a coincidence. Back the slope off before you touch anything else.
Phase response compounds the problem. Every filter introduces group delay around its cutoff, meaning different frequencies arrive at slightly different times. On a stereo bus or a drum group, that delay can misalign transients between channels, softening stereo coherence in ways that are hard to trace back to their source.
Minimum-phase filters (the standard in most plugins) cause this delay but stay efficient and low-latency; linear-phase alternatives fix the timing issue but introduce pre-ringing of their own, trading one artefact for another. Peer-reviewed work on ERP filtering found that cutoffs set too aggressively can generate artifactual peaks and opposite-polarity deflections that weren't in the original signal at all, which is precisely why conservative cutoffs, sometimes recommended at 0.1 Hz or lower in that research context, matter more than most engineers assume.
Practical rules for safe HPF settings in real mixes
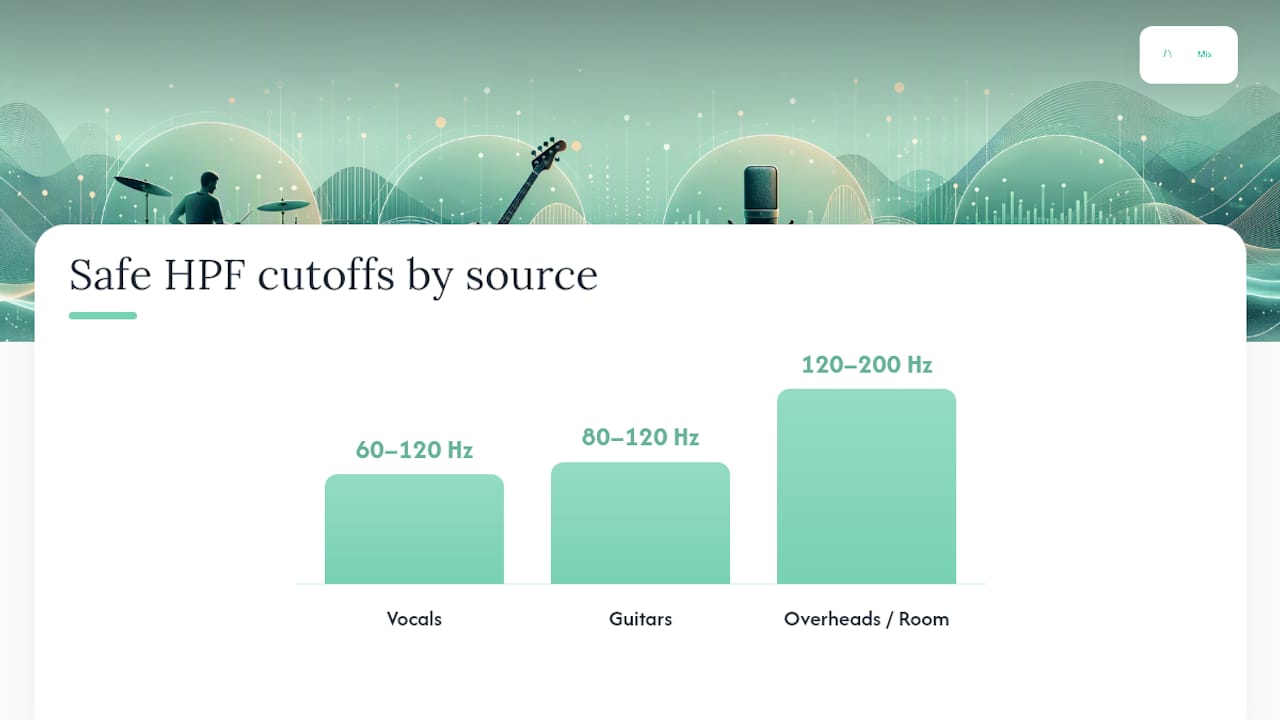
Start conservative and only move the cutoff higher if your ears, not your eyes, tell you it's needed. Rough starting points by source:
- Vocals: 60 to 120 Hz, depending on the singer's range and mic proximity.
- Guitars (acoustic and electric): 80 to 120 Hz, leaving room for body and warmth.
- Overheads and room mics: 120 to 200 Hz, since these rarely carry usable fundamental information that low.
- Sub-bass and low synths: avoid high cutoffs entirely. This is where the track's actual foundation lives, and even a moderate cut can gut the low end you're trying to preserve.
Favour 6 to 12 dB per octave for anything musical. Reserve 24 dB/octave for genuine problems like DC offset or extreme rumble, and verify the result by ear every time rather than trusting the meter alone.
If you need to remove rumble before heavy compression, that's a legitimate use, but check how the filtered signal behaves once it hits a group bus or submix. A cut that sounds fine solo can interact badly with parallel processing further down the chain.
Before committing to any HPF move, run this checklist:
Bypass → solo → check the group sum → inspect the spectrum and waveform → accept or revert.
Always compare the filtered version against the bypassed one at a genuinely low monitoring level. Ringing and phase smear often hide at loud volumes and become obvious the moment you turn things down. A quick mono sum and phase-invert check will also expose cancellation you might otherwise miss entirely.
Alternatives to aggressive filtering that preserve phase and clarity
A filter is rarely the only tool for the job, and it's often not the best one.
- Manual editing and fades. Trimming a stray mic thump or an accidental low-frequency spike by hand avoids touching the spectrum of the rest of the take.
- Volume automation. Riding down excess bass energy on specific notes keeps the tonal character intact instead of permanently removing part of the spectrum.
- Detrending or mean subtraction. For DC offset or ultra-slow drift, subtracting the trend directly is often cleaner than filtering, a technique borrowed from signal-processing research on filtering pitfalls.
- Source separation for contamination. If bleed from another instrument is the real problem, isolating that source, rather than filtering everything, solves it without side effects.
A filter still earns its place when the goal is genuinely just rumble or DC removal at the start of a chain, applied minimally and checked against the sources listed above for frequency masking issues before you assume the low end is the culprit.
Diagnosing filter problems: tests, meters and listening checks
Suspect a filter is causing trouble? Work through this sequence before touching anything else:
- A/B at low volume. Ringing and thinness often only reveal themselves once you turn the monitors down, so don't trust a loud, exciting playback.
- Mono-sum and phase-invert checks. If elements vanish or thin out in mono, filter-induced phase rotation is a likely cause, and a closer look at how phase problems build across a mix will help pin it down.
- Waveform inspection. Zoom into transients and look for oscillations before or after the attack; that pattern is a signature of filter ringing rather than natural decay.
- Spectral comparison. Overlay filtered and unfiltered versions to check whether fundamentals have actually disappeared, a method supported by research on distinguishing real oscillations from filtering artefacts.
- Try multiple slopes and log the results. Snapshot each setting so you can revert instantly if a "fix" turns out to be an artefact in disguise.
If a change sounds better in isolation but the waveform shows ringing or the mono sum reveals thinning, trust the meters over the momentary excitement. Retune the filter or reach for one of the alternatives above instead.
Our perspective: why objective checks matter as much as good ears
Some automated mix analysis tools regularly flag the same three patterns across uploaded mixes: cutoffs set higher than the source needs, filters stacked across a signal chain without anyone noticing the cumulative effect, and steep slopes chosen for a "clean" sound that's actually artefactual peaking. None of these are visible in a single listening pass, which is exactly the problem.
Automated checks won't replace critical listening, and they're not meant to. What they do well is catch the cumulative drift that builds silently across dozens of tracks, and give you an objective snapshot to compare against once you've made a change. Treat a report as a second opinion, not a verdict.
— AubioMix
Check your own mix for high pass filter misuse
You upload a mix, and the analysis runs it through automated checks across compression, EQ, phase, stereo width, and more, then provides specific, actionable steps rather than a vague score. On the filtering side, that means flagging cutoffs set higher than the source calls for, stacked filters that have quietly rotated phase through the chain, and steep slopes doing more harm than good.

If you've read this far wondering whether your own low end has taken a hit from one too many filters, the fastest way to know is to check it directly rather than guess. See how analysis of hit records reveals what separates a professional low end from an amateur one, then run your own mix through Aubiomix and get a clear list of what to fix next.
Sources
- UC Davis technical report on filtering artifacts
- Review of filtering pitfalls and alternatives (UCL discovery paper)
- Pitfalls of filtering: false ripples and detection strategies (INSERM study)
FAQ
What are the disadvantages of high pass filters?
Used carelessly, they introduce phase shift, group delay, and, at steep slopes, ringing artefacts that can create false peaks or thin out a source's fundamental tone.
What can a high pass filter be used for?
It's genuinely useful for removing rumble, DC offset, and mic handling noise below the musical content of a track, ideally with a gentle slope and a conservative cutoff.
Should I enable a high pass filter?
Only when there's a specific problem, like rumble or DC drift, rather than as a default on every channel; check your mix's red flags before reaching for it automatically.
Should speakers be on LPF or HPF?
That depends on the speaker's role in the system. Subwoofers typically run a low pass filter to exclude frequencies they can't reproduce cleanly, while mains often run a high pass filter to protect drivers from unusable sub-bass energy, and the crossover point should match the actual capability of each speaker rather than a generic default.