
The low end supplies your mix's foundation, groove, and emotional weight — and the single first action is to decide which instrument owns the deepest sub-frequencies before touching a single fader. Get that decision wrong and no amount of EQ or compression will rescue the mud. Get it right and the rest of the mix almost organises itself.
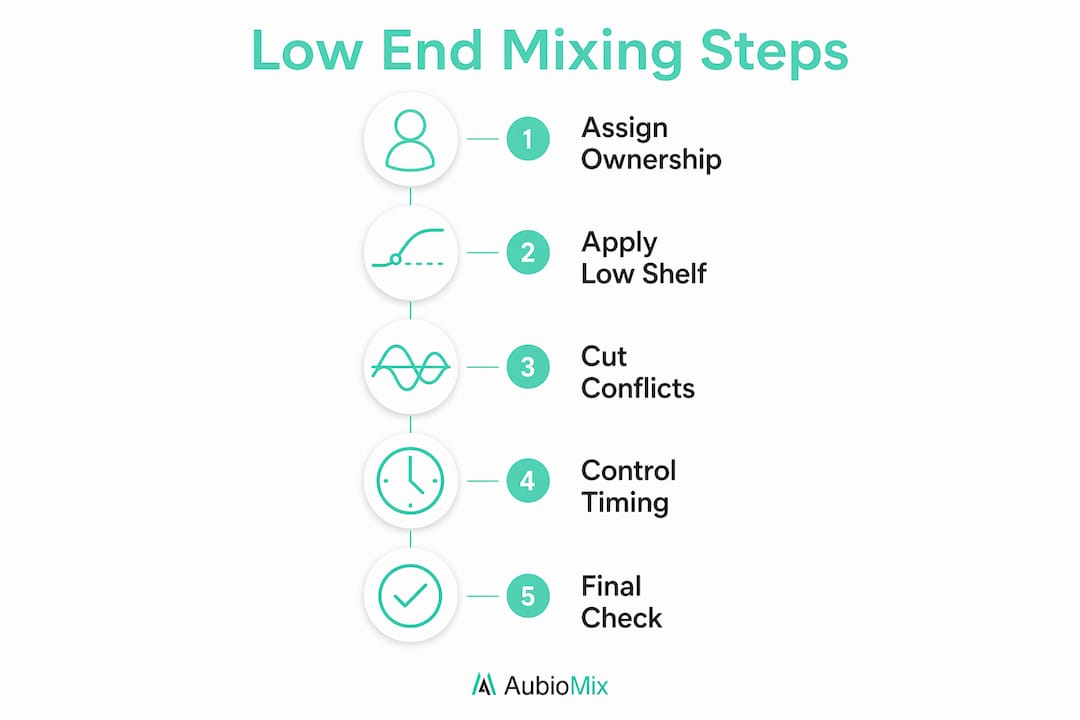
Here is the three-step roadmap this guide follows:
- Set the weight. Use a broad low-frequency shelf to establish the overall size and warmth of the low end before reaching for any corrective filters.
- Redistribute energy. Carve and boost across the first three octaves so kick, bass, and low mids each occupy distinct frequency territory.
- Control timing and space. Use sidechain compression, transient shaping, or multiband dynamics so kick and bass breathe together rather than collide.
Want a quick win right now? Open your DAW, solo your kick and bass together, and check whether they reinforce or cancel each other in mono. That single test will tell you more about your low end in thirty seconds than an hour of solo listening.
Table of Contents
- What does 'low end' actually mean? Frequency ranges explained
- Why is the low end so hard to get right?
- A 3-step workflow to balance and define your low end
- Which tools and analysers should you use for the low end?
- How to check that your low end will translate across systems
- Quick fixes for the most common low-end problems
- Why the low end matters to listeners: the science behind bass and groove
- Pre-bounce low-end checklist: five minutes before you export
- Key takeaways
- The low end deserves more respect than it usually gets
- Aubiomix gives your low end a professional second opinion
- Useful sources and further reading
What does 'low end' actually mean? Frequency ranges explained
The term "low end" gets thrown around loosely, so let's pin it down with practical ranges you can map directly to your session.
| Region | Approximate range | What lives here |
|---|---|---|
| Sub-bass | 20–60 Hz | Kick sub-thump, bass fundamentals on low notes, felt more than heard |
| Bass | 60–250 Hz | Bass guitar body, kick punch, lower piano octaves, warmth |
| Low mids | 250–500 Hz | Instrument body and thickness, vocal chest tone, guitar warmth |
Sub-bass is physical. On a good system you feel it in your chest; on laptop speakers it is almost entirely absent. That invisibility is exactly why it causes so many translation problems. The bass band (60–250 Hz) is where most of the low end frequency range action happens: it is audible on almost every playback system and is the primary zone where kick and bass compete for space. The low-mid band (250–500 Hz) is where muddiness most often accumulates, because instruments from guitars to synths to vocals all have energy here that can pile up without anyone noticing until the mix sounds congested.
Understanding which instruments belong in each region lets you make intentional ownership decisions rather than reactive ones. For a deeper look at how the 250–500 Hz zone behaves, the low mids guide on the Aubiomix blog is worth bookmarking.
Why is the low end so hard to get right?
Three forces conspire against you: masking, monitoring, and phase. Understanding all three is what separates reactive EQ moves from deliberate ones.

Masking is the core problem. When kick and bass share the same frequency territory, their energy blurs together into what engineers call sonic real estate congestion. Neither instrument sounds distinct; the mix just sounds heavy and undefined. The fix is not to turn things down but to separate them spatially within the frequency spectrum.
Monitoring is the silent saboteur. Nearfield monitors without accurate sub-bass extension will mislead you about what is actually happening below 60 Hz. Small rooms create standing waves and bass build-up at specific frequencies, so what sounds balanced at your desk can sound boomy or thin everywhere else. Mixing at lower volumes reduces the room's influence and gives you a truer read on the low end — a habit worth building if you mix at low volumes consistently.
Phase cancellation is the sneakiest trap. When a kick drum is captured with a close mic and a room mic, or when a bass is recorded both DI and through an amp, the two signals can partially cancel each other at low frequencies. The result is a kick or bass that sounds thin in the mix but enormous when soloed. A quick mono sum check will expose this immediately.
Research note: EEG studies show that low-frequency rhythms selectively enhance neural tracking of the beat and boost motor entrainment, meaning listeners physically engage more with music when the low end is present and clear. A muddy low end does not just sound bad — it actively undermines the groove.
A 3-step workflow to balance and define your low end
This is the practical core of the guide. Follow these steps in order and you will move from muddy to defined on almost any mix.
Step 1: Set the overall weight with a low-frequency shelf
Before you cut anything, decide how big you want the low end to feel. A broad low-shelf boost or cut (typically centred around 80–100 Hz, with a gentle slope) sets the perceived size of the mix's foundation. This is the preferred first step for experienced engineers because it shapes the whole low-end character before you start carving individual instruments.
Pro Tip: Resist the urge to high-pass everything first. Aggressive high-pass filters on multiple tracks strip weight before you have even assessed whether that weight is useful. Set the shelf, audition the result on multiple systems, then use high-pass filters only to remove genuine rumble or non-musical content.
Step 2: Redistribute energy across the first three octaves
Once the overall weight is set, carve space for each element. Here are practical starting points:
- Identify who owns the sub (20–60 Hz). In most genres this is the bass instrument or the kick's sub-thump, not both. Use a narrow bell cut on whichever element does not own this region.
- Give the kick its punch frequency. Kick punch typically lives at 60–100 Hz. If the bass is bloated in this range, try a 2–3 dB cut on the bass at the kick's fundamental frequency.
- Boost bass clarity at 700 Hz–1.2 kHz. This is the "click" or "growl" zone that lets the bass cut through on small speakers. A gentle boost here compensates for any sub-region cuts and keeps the bass audible on phones and laptops.
- Tame the low-mid build-up at 200–350 Hz. This is where muddiness accumulates. A narrow 2–4 dB cut on the bass, kick, or both can open up the mix dramatically.
- Check guitars, keys, and synths. Roll off anything below 100–120 Hz on instruments that do not need low-end weight. This prevents low-end congestion without thinning the overall mix.
Step 3: Control timing and space
EQ separates instruments by frequency; dynamics and timing separate them by time. This step is where the low end goes from defined to tight.
- Sidechain compression: Route the kick to trigger a compressor on the bass. When the kick hits, the bass ducks briefly, creating rhythmic interplay and preventing the two from masking each other in real time.
- Transient shaping: Use a transient shaper on the bass to control note length. Shortening the sustain of each bass note reduces the overlap between notes and between bass and kick, which is especially useful on legato bass lines.
- Multiband compression: Apply a multiband compressor to the bass's sub region (20–80 Hz) to tame inconsistent note-to-note level variation without affecting the mid-bass body.
Before/after recipe: If the kick booms at 60 Hz and the bass sounds indistinct, try a 2–3 dB cut on the bass at 60 Hz, a 2 dB boost on the kick at 80 Hz for punch, and a 2 dB boost on the bass at 900 Hz for presence. Then add a sidechain compressor on the bass triggered by the kick, with a fast attack (5–10 ms) and a moderate release (80–120 ms). The result is a kick and bass that feel like one rhythmic unit rather than two competing elements.
Which tools and analysers should you use for the low end?
Ears alone are not enough, especially in an untreated room. Visual tools tell you what your monitoring environment is hiding.
| Tool category | What it shows / does | Free options |
|---|---|---|
| Spectrum analyser | Frequency distribution across the full spectrum; exposes build-up and gaps | SPAN (Voxengo), Melda MAnalyzer |
| Correlation metre | Mono compatibility; values near +1 are safe, near -1 signal cancellation | Often built into DAW meters |
| Phase metre | Phase relationship between channels; catches polarity issues | Built into most DAWs |
| Spectrogram | Time-frequency view; shows how low-end energy evolves over time | iZotope Insight (paid), SPAN Plus |
| Dynamic EQ | Frequency-specific compression; tames transient low-mid build-up | TDR Nova (free) |
| Transient shaper | Controls attack and sustain of low-end elements | Transient Master (Native Instruments, paid), FLUX Bitter (free) |
Pro Tip: A minimal free toolset that covers most problems: SPAN for spectrum analysis, your DAW's built-in correlation metre for mono checks, and TDR Nova as a dynamic EQ for taming low-mid congestion. You do not need to spend anything to diagnose the most common low-end issues.
For sub-heavy genres like trap, where 808s and kick elements need precise frequency separation, trap beat mixing practices offer useful genre-specific context on managing those relationships.
How to check that your low end will translate across systems
A low end that sounds perfect on your studio monitors can fall apart on a phone speaker, a car stereo, or a club system. A repeatable listening routine prevents that surprise.
- Low-volume check: Turn your monitors down to a conversational level. If the low end disappears entirely, it is too sub-heavy and will not translate on small speakers.
- Mono check: Sum to mono and listen for level drops or tonal changes. Significant loss in mono usually points to phase cancellation between kick and bass.
- Sub on/off check: If you have a subwoofer, switch it off and listen on the mains alone. The kick and bass should still feel present and punchy. If they disappear, you are relying too heavily on sub frequencies that most listeners will never hear.
- Headphone cross-check: Mixing on headphones has caveats, but headphones are genuinely useful for verifying low-end balance when level-matched to a reference. Use closed-back headphones and compare directly with a commercial reference at the same perceived loudness.
- Reference track match: Pick a commercial track in the same genre and level-match it to your mix. Focus on the perceived weight and punch of the low end, not the absolute level. If your mix sounds thin or boomy by comparison, you have a clear target to move towards.
- Car or phone spot-check: A quick listen on a phone speaker or in a car will immediately reveal whether your low end is over-emphasised in the sub region or lacking in the 80–150 Hz punch zone.
For guidance on level matching and gain staging that supports these checks, the Aubiomix blog has a dedicated walkthrough.
Quick fixes for the most common low-end problems
Sometimes you need a fast answer, not a full workflow. Here are the most common complaints and their direct remedies.
Boomy low mids (200–350 Hz build-up) Use a narrow bell cut (Q of 2–4) and sweep slowly through 200–350 Hz until you find the offending frequency. A 2–4 dB cut is usually enough. Check on multiple instruments, not just the bass.
Masking between kick and bass
- Identify which element owns the sub (20–60 Hz) and cut the other in that region.
- Boost the non-owner's clarity frequency instead (bass at 700–1.2 kHz, or kick at 3–5 kHz for attack).
- Add sidechain compression to create rhythmic separation in time.
Phase cancellation (multi-mic or DI + amp tracks)
- Solo the two tracks and sum to mono.
- Flip the polarity on one track and listen for the version that sounds fuller and louder.
- Use a phase alignment tool (such as Little Labs IBP or your DAW's built-in polarity flip) to fine-tune if needed.
- Always fix phase before adding EQ or compression — phase corrections are often the fastest and most dramatic improvement you can make.
Inconsistent bass note levels Apply a multiband compressor to the sub region (20–80 Hz) with a moderate ratio (3:1 to 4:1) and a slow attack to preserve the note's initial transient. Alternatively, use a transient shaper to control sustain and reduce note-to-note variation.
Lack of presence on small speakers The bass is probably too sub-heavy. Boost the 700 Hz–1.2 kHz range on the bass by 2–3 dB and check whether it now cuts through on a phone speaker. This is the single most effective fix for bass that disappears on consumer devices.
Genre considerations: Electronic and club music typically prioritises sub-heavy choices, with the bass fundamental sitting at 40–60 Hz and the kick punch at 60–80 Hz. Rock and acoustic genres tend to favour a tighter, mid-present bass where the fundamental sits higher (80–120 Hz) and the sub region is kept lean. For electronic music mixing, the sub relationship between kick and bass is especially critical to get right before mastering.
Why the low end matters to listeners: the science behind bass and groove
The impact of bass in mixes goes well beyond volume. There is compelling research showing that low frequencies have a privileged role in how listeners experience rhythm and emotion.
EEG studies demonstrate that low-frequency sounds selectively enhance neural tracking of the beat and boost motor entrainment. In plain terms: when the rhythm is carried by low tones, listeners physically lock onto the groove more strongly than when the same rhythm is presented at higher frequencies. This is why a well-controlled kick and bass feel like they make you move, while a muddy low end just feels heavy and fatiguing.
The emotional dimension is equally significant. Research published by L-Acoustics shows that bass amplification raises listener arousal and interacts with measurable physiological responses, including electrodermal activity, in both laboratory and live settings. Amplified bass does not just sound louder — it changes how listeners feel.
Low frequencies below roughly 450 Hz are also fundamental to timbre and naturalness in how we perceive sound. Strip them out and audio feels thin, detached, and artificial. The practical implication: use the low end deliberately to drive groove and emotional engagement, but control it tightly to avoid listener fatigue. A tight, intentional low end is more powerful than a loud, uncontrolled one.
Pre-bounce low-end checklist: five minutes before you export
Run through this before every bounce. Screenshot it, print it, or paste it into your session notes.
| Check | Action |
|---|---|
| Sub ownership confirmed | One instrument owns 20–60 Hz; the other is cut in that region |
| Phase/polarity verified | Mono sum test passed; no significant level loss when summed |
| Mono compatibility | Kick and bass remain present and punchy in mono |
| Sub on/off comparison | Mix still has punch and warmth with subwoofer switched off |
| Reference match | Perceived low-end weight matches a level-matched commercial reference |
| Limiter headroom | Peak level leaves at least 1 dBTP of headroom for mastering |
| Low-mid mud check | No boomy build-up at 200–350 Hz on the full mix bus |
A clean low end before mastering is not optional. Mastering limiters and loudness processing will amplify any low-end inconsistencies, turning a slightly boomy mix into an uncontrollably pumping one. Sorting the low end at mix stage protects the mastering engineer and gives your track the best possible chance of translating at commercial loudness levels.
Key takeaways
The single most important action you can take is to decide intentionally who owns the sub-frequencies, then set the low end's overall weight with a shelf before making any corrective cuts.
| Point | Details |
|---|---|
| Decide sub ownership first | Assign the 20–60 Hz region to one instrument before any EQ or compression. |
| Shelf before high-pass | Set perceived weight with a broad low-shelf; use high-pass filters only for rumble removal. |
| Control timing, not just frequency | Sidechain compression and transient shaping keep kick and bass rhythmically distinct. |
| Always cross-check on multiple systems | Mono, sub on/off, and headphone checks reveal translation problems your monitors hide. |
| Aubiomix for pre-release verification | Upload your mix to Aubiomix for detailed frequency masking, phase, and device-translation feedback before bouncing. |
The low end deserves more respect than it usually gets
Here is an opinion worth sitting with: most low-end problems are not EQ problems. They are arrangement and decision problems that engineers try to solve with processing. When a mix sounds muddy, the instinct is to reach for a high-pass filter or a compressor. But the root cause is almost always that two instruments are competing for the same frequency territory because nobody decided upfront who owns what.
The research on neural entrainment makes this concrete. Low frequencies are not just the foundation of a mix in a structural sense — they are the primary driver of physical and emotional engagement. When the low end is tight and intentional, listeners feel it. When it is muddy and uncontrolled, they disengage, often without knowing why. That is a significant creative and commercial cost.
What Aubiomix sees consistently in uploaded mixes is that frequency masking between kick and bass, and phase issues from multi-mic recordings, account for a disproportionate share of low-end complaints. These are not subtle problems — they are structural ones that show up clearly in a spectrum analyser and a correlation metre. The checklist in this guide maps directly to the diagnostic areas Aubiomix analyses: frequency masking, phase coherence, and device translation. Running the checklist before uploading means the feedback you receive will be about refinement, not fundamentals.
The most underrated habit in low-end mixing is the sub on/off check. Switching off the subwoofer and listening on mains alone is the fastest way to know whether your low end is genuinely present across systems or whether it is living entirely in a frequency range that most listeners will never hear. Do it on every mix, every time.
Aubiomix gives your low end a professional second opinion
Getting the low end right is one of the hardest skills to develop in isolation, because your monitoring environment is always working against you. Aubiomix is built for exactly this situation: upload your mix and receive detailed, written feedback with specific steps across 15+ areas of mixing and mastering, including frequency masking, phase coherence, EQ balance, and device translation.

Here is how Aubiomix maps to the three-step workflow in this guide:
- Step 1 (set weight): Aubiomix's frequency analysis identifies whether your low-end shelf is set appropriately and flags any sub-region imbalance.
- Step 2 (redistribute energy): The frequency masking diagnostic shows exactly where kick, bass, and low mids are competing, with specific EQ suggestions to resolve each conflict.
- Step 3 (control timing and space): Phase and correlation analysis catches cancellation issues that your monitors may be hiding, and the device-translation check confirms whether your low end survives on consumer playback systems.
You also receive a downloadable PDF report and progress tracking so you can see how your low-end decisions improve across mixes. No long-term subscription is required — credit packs let you upload a mix for analysis whenever you need a professional second opinion. If you are serious about getting your low end to translate, that is the most direct next step available to you.
Useful sources and further reading
These are the primary sources cited in this guide, along with a note on what each one offers.
- Neural tracking of the musical beat is enhanced by low-frequency sounds — Peer-reviewed EEG research on how low frequencies drive beat perception and motor entrainment; the scientific foundation for why bass matters to groove.
- Bass amplification impacts emotional, neural and physiological responses to music — L-Acoustics research on how amplified bass affects arousal and emotional engagement in listeners.
- Low-end control: how to get tight bass and kick without mud — Practical guide on arrangement discipline, phase checks, and the ownership approach to low-end clarity.
- 7 tips for mixing the low end — iZotope's overview of masking, sonic real estate, and EQ strategies for kick and bass.
- Low end EQ workflow and techniques — Detailed workflow covering the shelf-first approach, corrective filtering, and dynamic control techniques.
- The importance of nailing your mix's low end — Practical notes on subwoofer setup, crossover alignment, and the sub on/off diagnostic.
- Mixing on headphones — LEWITT's guide to using headphones as a valid low-end verification tool, with caveats and level-matching advice.
- Low frequencies are underappreciated in cochlear-implant hearing — MED-EL perspective on the perceptual importance of low-frequency content to timbre and naturalness.
- Aubiomix blog: low mids explained — Deep dive into the 250–500 Hz band and how to manage low-mid masking with corrective EQ.
- Aubiomix blog: signs your mix needs work — Useful companion for identifying whether low-end imbalance is part of a broader mix problem.
Combine these sources with the pre-bounce checklist and an Aubiomix review for a complete low-end verification workflow that covers both the technical and perceptual dimensions of bass in your mixes.