
Low mids are defined as the frequency range spanning 200–500 Hz, and they are the single most contested zone in any mix. This band carries the body, chest, and warmth of nearly every instrument you record, from male vocals to acoustic guitars to snare drums. Get it right and your mix sounds full, present, and emotionally engaging. Get it wrong and you end up with the two most common complaints in mixing: mud and boxiness. Understanding the low-mid range and learning to manage it with EQ is the difference between a mix that translates across speakers and one that sounds thick and indistinct on everything except your studio monitors.
What are low mids and why do they cause muddiness?
Low-mid frequencies sit between 200 and 500 Hz, with the most problematic energy concentrated around 250–400 Hz. This is where mud lives. Mud is that thick, cloudy quality that makes individual instruments hard to distinguish, and it is almost always the result of too many sources competing for the same frequency space.
The core problem is frequency congestion. Multiple instruments stack in this range simultaneously: rhythm guitars, synths, bass, piano, and vocals all have significant fundamental energy between 200 and 500 Hz. When none of those tracks are treated, they pile on top of each other and create a thick, indistinct wall of sound.

Boxiness is a related but slightly different problem. It describes a hollow, cardboard quality that typically peaks around 300–400 Hz. Unlike mud, which comes from too many instruments overlapping, boxiness often originates from the recording environment itself rather than the instruments. An untreated room with parallel walls produces resonances in exactly this range, colouring every recording made inside it.
Here is what typically causes low-mid problems in a mix:
- Frequency overlap: Bass, rhythm guitar, and keys all share energy in 200–500 Hz, creating build-up when left unmanaged.
- Room resonances: Small rooms with parallel walls produce standing waves between 300–400 Hz that add artificial thickness to recordings.
- Over-processing: Applying heavy compression or saturation to multiple tracks simultaneously can amplify low-mid energy across the board.
- No high-pass filtering: Tracks that do not need low-end information, such as overheads or acoustic guitars, still carry low-mid rumble if you have not applied a high-pass filter.
"The misconception that clearing all low mids improves mixes can result in thin, lifeless productions. Boxiness often originates from untreated room acoustics rather than instruments themselves." — Mixsense
The most important thing to understand is that the low-mid range is not your enemy. It is the source of warmth and body in your music. The goal is not to remove it. The goal is to manage it.
How to manage low mids with EQ
Surgical EQ is the most effective approach to controlling the low-mid range. The word "surgical" matters here. You are not reaching for a broad shelf or a wide bell curve. You are making small, targeted cuts on specific tracks that are contributing the most congestion.
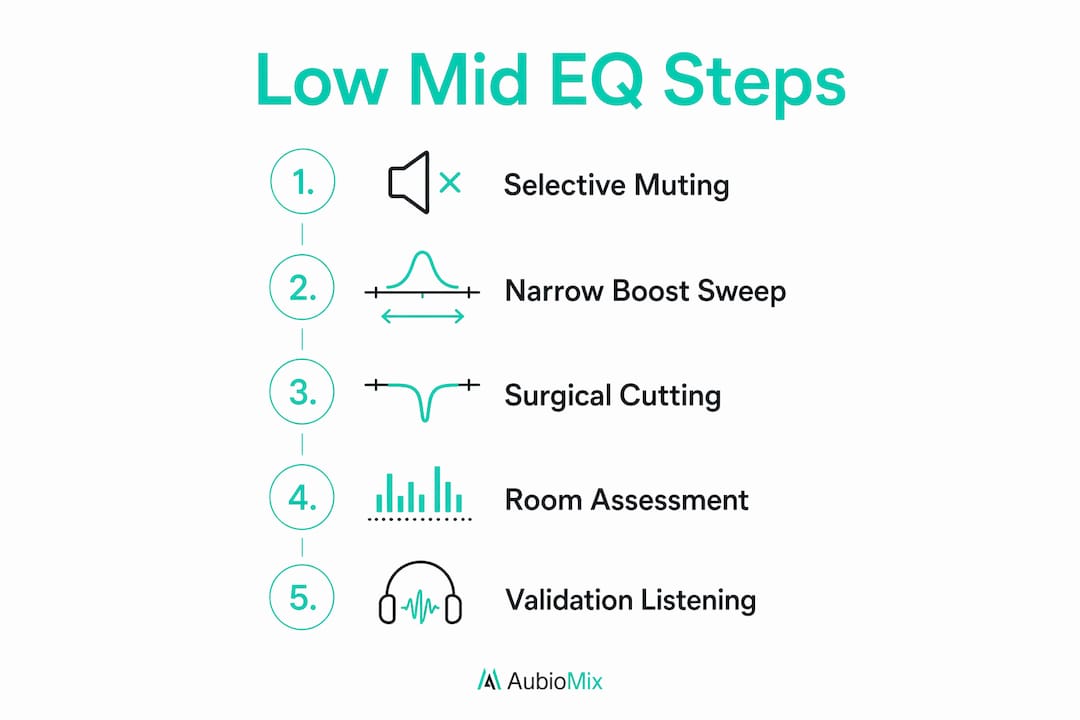
Start with selective muting, not EQ
Before you touch a single EQ knob, mute tracks one by one while listening to the 200–500 Hz region. This tells you which tracks are the primary contributors to muddiness. Identifying offending tracks with selective muting before reaching for EQ is the approach recommended by experienced mix engineers, and it saves you from making unnecessary cuts on tracks that are not the problem.
Use the narrow boost sweep technique
Once you have identified the problem tracks, use a narrow boost sweep to find the exact frequency causing the issue. Temporarily boost a narrow band by around 6 dB and sweep it slowly through the 200–500 Hz range. When the sound becomes noticeably muddy or boxy, you have found the offending frequency. Boosting 300 Hz by 6 dB is a practical test to hear what muddy low-mid energy actually sounds like, which trains your ear for future sessions.
Apply surgical cuts on the right tracks
- Identify the two or three tracks contributing most to low-mid congestion. Rhythm guitars and backing keyboards are the most common culprits.
- Apply a narrow 2–3 dB cut at the offending frequency on each problem track. Use a Q value of around 2–4 to keep the cut focused.
- Leave lead vocals, lead instruments, and any track that carries the emotional core of the song untouched. These elements need their low-mid warmth to feel present and alive.
- Check your cuts in context. Solo the track, make the cut, then bring everything back up and listen to the full mix. The change should feel like clarity, not thinness.
- Avoid applying the same cut globally across all tracks. Aggressive global cuts in the 250–400 Hz range degrade mix quality. Targeted cuts on primary masking tracks are far more effective.
Pro Tip: If your mix still sounds muddy after surgical cuts, check whether you have applied high-pass filters to tracks that do not need low-end information. Overheads, room mics, and acoustic guitars often carry unnecessary low-mid energy that a high-pass filter at 100–150 Hz will remove cleanly.
For more on frequency masking and how overlapping frequencies affect clarity, that is a subject worth studying in depth alongside your EQ work.
How does your room affect low-mid perception?
Your mixing environment shapes every EQ decision you make. Small rooms with parallel walls produce resonances between 300–400 Hz that colour your monitoring and mislead your ears. You might cut the low mids heavily because your room makes them sound excessive, only to find the mix sounds thin and hollow on other playback systems.
Acoustic treatment significantly improves your perception of low-mid muddiness and prevents mix decisions that overly cut important frequency content. The key treatment tools for this range are bass traps and broadband absorbers placed at first reflection points and room corners.
Here are practical steps for improving low-mid monitoring accuracy:
- Place bass traps in corners: Floor-to-ceiling corner placement addresses the low-frequency and low-mid resonances that parallel walls create.
- Add broadband absorbers at first reflection points: Side walls, ceiling, and the wall behind you all reflect low-mid energy back at your listening position.
- Use reference tracks: Compare your mix to commercially released tracks in the same genre. If your low mids sound excessive compared to the reference, trust the reference.
- Check on multiple playback systems: Laptop speakers, earbuds, and car stereos all reveal low-mid problems that studio monitors can mask.
Pro Tip: Mix at lower volumes when assessing the low-mid range. At high volumes, your ears naturally perceive more bass and low-mid energy due to the Fletcher-Munson curve. Mixing at low volumes gives you a more accurate picture of how the 200–500 Hz region is actually behaving.
Low-mid frequency characteristics by instrument
Each instrument presents unique low-mid characteristics that shape how it contributes to warmth and body in a mix. Understanding these differences tells you where to cut and, just as importantly, where to preserve.
| Instrument | Key low-mid energy | Role in the mix | EQ approach |
|---|---|---|---|
| Male vocals | 200–350 Hz | Chest and body of the voice | Preserve warmth; cut only if masking other elements |
| Acoustic guitar | 200–400 Hz | Body and fullness of the instrument | Narrow cut around 300–350 Hz if boxy |
| Snare drum | 200–300 Hz | Body and punch of the snare | Cut around 250 Hz to reduce boxiness; preserve 200 Hz for body |
| Piano | 250–500 Hz | Warmth and harmonic richness | High-pass filter below 100 Hz; gentle cut around 300–400 Hz if muddy |
| Electric bass | 200–400 Hz | Fundamental tone and warmth | Careful cuts to avoid losing body; focus on 250–300 Hz for mud |
| Rhythm guitar | 250–400 Hz | Harmonic body and presence | Most common culprit for mud; targeted cuts of 2–3 dB |
The table reveals something producers often miss: the instruments that contribute most to low-mid warmth are the same ones most likely to cause congestion. Male vocals and acoustic guitar both need their 200–350 Hz energy to sound full and natural. Cutting that range too aggressively on these elements to solve a muddiness problem is the wrong approach. Instead, target the rhythm guitar and piano, which can afford small cuts without losing their character.
Key takeaways
The low-mid range (200–500 Hz) is the most congested zone in most mixes, and managing it with surgical EQ on the right tracks is the most effective path to clarity without sacrificing warmth.
| Point | Details |
|---|---|
| Define the problem zone | Mud and boxiness concentrate between 250–400 Hz across most instrument types. |
| Mute before you cut | Identify the primary offending tracks by muting before applying any EQ. |
| Use surgical cuts | Apply narrow 2–3 dB cuts on rhythm guitars and backing keys, not lead elements. |
| Treat your room | Acoustic treatment prevents misleading EQ decisions caused by room resonances. |
| Preserve warmth | Lead vocals and key instruments need their low-mid energy to sound full and present. |
The low-mid range: what years of mixing taught me
Honestly, the low-mid range is where I see producers make the most costly mistakes, and I include my earlier self in that. The instinct when a mix sounds muddy is to reach for a broad cut across everything. It feels logical. The mud is everywhere, so the fix should be everywhere too. That instinct is almost always wrong.
What I have found through working on mixes across genres is that muddiness is almost never a global problem. It is a local one. Two or three tracks are doing the heavy lifting in the 250–400 Hz range, and everything else is just caught in the crossfire. When you identify those tracks and make small, focused cuts, the whole mix opens up without losing its body.
The other thing I have learned is to respect the room. I spent years making EQ decisions in an untreated space and wondering why my mixes sounded thin on other systems. The room was lying to me. Once I added proper treatment and started referencing on multiple playback systems, my low-mid decisions became far more reliable. The mix started translating the way I intended.
My advice: treat the low-mid range like a conversation between instruments, not a problem to be eliminated. Give each element its own space through careful, targeted EQ, and you will find that warmth and clarity are not opposites. They coexist when you manage the range with patience and precision.
— Aubiomix
Get expert feedback on your low-mid balance
Getting the low-mid range right is one of the most challenging parts of mixing, and it is much easier when you have detailed, specific feedback on exactly where your mix is struggling.

Aubiomix is an online platform where you can upload your audio file and receive detailed feedback on your mix, including your low-mid frequency balance, muddiness, and overall clarity. The feedback is specific to your track, not generic advice, so you know exactly which elements need attention and what to do about them. Whether you are dealing with a boxy vocal, a muddy guitar arrangement, or a mix that simply does not translate, get pro-level feedback on your mix and hear the difference that targeted, expert analysis makes.
FAQ
What frequency range are low mids?
Low mids cover 200–500 Hz. The most problematic sub-zone is 250–400 Hz, where mud and boxiness typically concentrate.
Why do my low mids sound muddy?
Muddiness in the low-mid range is caused by multiple instruments stacking energy in 200–500 Hz without EQ management. Rhythm guitars, synths, bass, and piano all share this range and create congestion when left untreated.
Should I cut low mids on every track?
No. Cutting low mids globally degrades mix quality and removes warmth from lead elements. Apply targeted cuts of 2–3 dB only on the tracks contributing most to congestion, typically rhythm guitars and backing keyboards.
How do I know if my room is affecting my low-mid decisions?
If your mixes consistently sound thin or hollow on other playback systems after you have cut the low mids, your room is likely exaggerating the muddiness you hear. Acoustic treatment and referencing on multiple systems will correct this.
What is the difference between mud and boxiness?
Mud is a thick, indistinct quality caused by frequency overlap across multiple tracks in 200–500 Hz. Boxiness is a hollow, cardboard quality that peaks around 300–400 Hz and often originates from room resonances rather than the instruments themselves.