Mix balance is the process of setting relative track levels and stereo positions so every element in a song occupies its own space, serves the arrangement, and translates clearly across all playback systems. It is the single most important skill a mixing engineer develops, sitting beneath every EQ curve, compressor setting, and reverb tail you will ever apply. Without a solid balance, no amount of processing will save a mix. Tools like Pro Tools, Ableton Live, and Logic Pro all provide the faders and pan controls to do this work, but the decisions behind those controls are what separate a professional mix from an amateur one. Get the balance right first, and everything else falls into place.
What is mix balance and why does it define your mix?
Mix balance is defined as the controlled relationship between the loudness and spatial position of every track in a session, adjusted so the listener's attention lands where the producer intends. It governs clarity, cohesion, and emotional impact. The four core parameters are level (fader position), pan (left/right placement), overall balance (the aggregate loudness relationship across the full mix), and headroom (the space between your loudest peak and 0 dBFS).
A mix balance first approach organises the workflow as gain staging, then static balance, then plugins, and automation last. This order matters because every processing decision you make downstream is only as good as the foundation beneath it. If your kick is 6 dB too loud before you reach for a compressor, the compressor is compensating for a balance problem, not shaping dynamics.

Headroom is the practical expression of balance at the mix bus level. Mastering engineers recommend mix files peak near -6 dBFS with integrated loudness around -18 to -23 LUFS for optimal mastering flexibility. That space is not wasted silence. It is the room your mastering engineer needs to shape the final sound without distortion or limiting artefacts.
How to build a solid mix balance from scratch
The most reliable path to a balanced mix follows a clear order of operations. Skipping steps, particularly gain staging, is the most common reason mixes feel congested or lack punch.
- Set your gain staging. Before touching a fader, set input gain on each track so signals average around -18 dBFS RMS. Proper gain staging through the mixing chain prevents compressors and limiters from working too hard, preserving dynamic range throughout the session.
- Build a static mix. A static mix means setting fader levels and pan positions with no automation and no plugins active. This is your diagnostic phase. The static mix concept is the bedrock of all subsequent processing decisions.
- Work in mono first. Collapse your mix to mono and balance levels there before opening the stereo field. Balancing in mono helps avoid relying on stereo width as a level balancing shortcut, improving mix translation.
- Apply processing. Only after your static mono balance is solid should you reach for EQ, compression, and effects. Processing now refines the sound rather than compensating for level problems.
- Add automation last. Volume riding, panning moves, and effect send adjustments come at the end, once the static foundation is locked.
Fader level targets for core elements
These targets from current mixing practice give you a starting point for rhythm-driven genres. They are not rules, but they are a reliable compass.
| Element | Suggested peak level | Notes |
|---|---|---|
| Kick drum | -10 to -12 dBFS | Rhythmic anchor; sets the floor for the mix |
| Bass | -2 to -4 dB below kick | Sits just under kick to avoid low-end masking |
| Snare | -12 to -14 dBFS | Punchy but not dominant over kick |
| Lead vocal | 3 to 6 dB above loudest instrument | Streaming vocal targets sit around -10 to -8 LUFS momentary |
| Supporting elements | -18 dBFS and below | Texture and width without competing with leads |
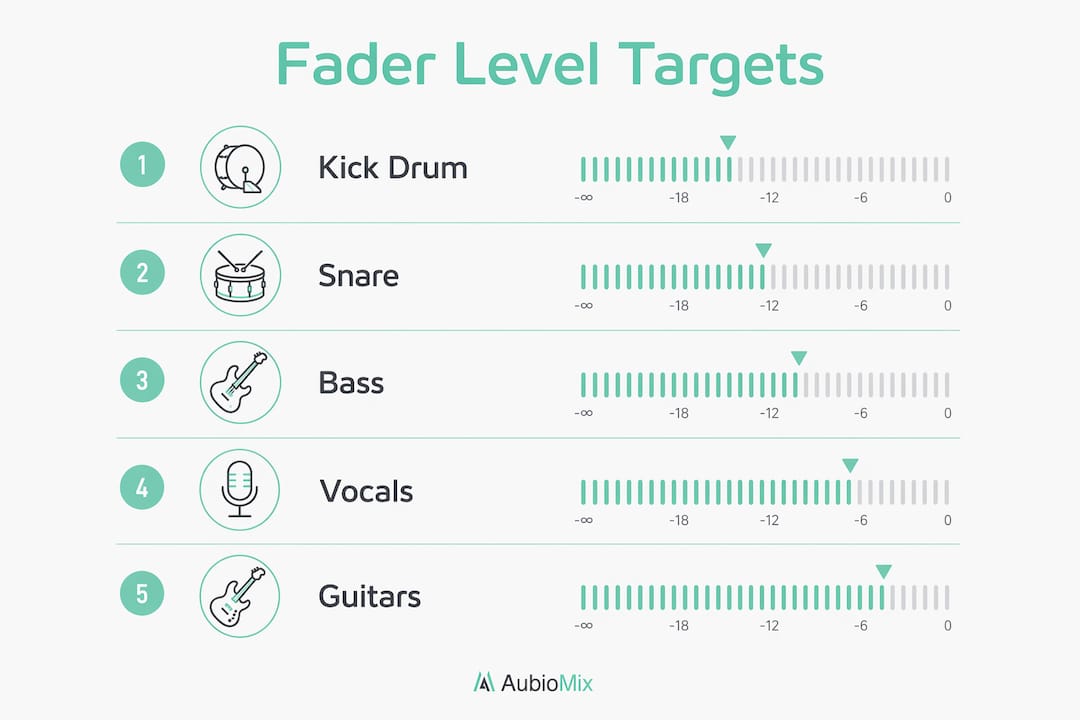
Mixing level targets like these guide early fader balance decisions, especially in rhythm-driven music. They give you a reference point before your ears start to fatigue.
Pro Tip: Use the pink noise method to calibrate your monitoring level before starting a mix. Play pink noise at -12 dBFS RMS and set your monitor volume so it sits at a comfortable conversational level, around 70 to 75 dB SPL. Every subsequent balance decision you make will be more consistent.
Level, pan, and balance: what is the actual difference?
These three terms are used interchangeably by many producers, and that confusion causes real mixing problems. Balance, level, and pan are separate controls affecting audio mix differently, and common mixing errors arise from confusing them.
Level refers to the fader position of an individual track. Pan refers to the left/right position of that track in the stereo field. Balance, in the strictest sense, refers to the aggregate loudness relationship across the full mix, evaluated as a whole rather than per track. Treating pan as a substitute for level is one of the most damaging habits in mixing.
Here are the most common mistakes that arise from confusing these concepts:
- Using pan to create separation instead of level. Panning a guitar hard left does not fix the problem if it is 8 dB too loud. The level issue remains; you have just moved it to one side.
- Panning low frequencies wide. Panning bass and kick hard left or right creates imbalance and phase problems, reducing mono compatibility. Keep everything below 200 Hz centred.
- Ignoring mono compatibility. Relying on stereo panning too much to create space causes problems when mixes are summed to mono, degrading balance. Check your mix in mono regularly throughout the session.
- Confusing stereo width with loudness. A wide mix is not a loud mix. Stereo width is a spatial tool, not a level tool.
Pro Tip: Check your mix in mono at least three times during a session: once after your static balance, once after processing, and once before export. If the mix still sounds clear and punchy in mono, the stereo version will translate everywhere.
Panning strategy should serve clarity and impact. Rhythm guitars, backing vocals, and synth pads benefit from stereo placement because they create width without competing with centred lead elements. The mix engineer workflow treats panning as a complement to level decisions, not a replacement for them.
How does automation improve dynamic mix balance?
A static mix is a starting point, not a finished product. The limitation of a static balance is that it treats a verse and a chorus identically, which rarely serves the music. Dynamic balance through automation is what gives a mix life, movement, and emotional arc.
Level automation of faders and effect sends helps create engaging mixes where elements breathe and do not sound flat or static. Think of automation as the performance layer of your mix. Here is how to use it purposefully:
- Volume riding on lead vocals. Vocals sit at different recorded levels across a performance. Ride the fader so every phrase sits consistently 3 to 6 dB above the loudest instrument, regardless of the singer's dynamics.
- Automated effect sends. Pull back reverb and delay send levels during dense chorus sections to prevent wash. Open them up in breakdowns and verses for space and atmosphere.
- Section-level fader moves. Raise the overall level of your rhythm section by 1 to 2 dB going into the chorus. This creates perceived energy without touching individual track levels.
- Deliberate focus on 'superstars'. A balanced mix is not about making everything sound even, but guiding listener focus to intended key elements. Automate supporting elements down when the lead vocal or solo instrument needs to shine.
- Reference against commercial tracks. Level match your mix to a reference track before comparing. If your chorus does not hit with the same energy, automation is usually the fix before reaching for a limiter.
Monitoring at moderate volume, around 70 to 75 dB SPL, helps judge balance with equal-loudness perception applied. Lower listening levels reduce bass and treble salience, which reveals whether your midrange balance is actually working or whether you have been relying on loudness to mask problems.
Preparing your balanced mix for mastering and streaming
The final stage of achieving mixing balance is preparing your mix for delivery. A well-balanced mix that is exported incorrectly wastes all the work you have done.
- Target -6 dBFS peak on the mix bus. Mix files should peak near -6 dBFS to preserve mastering headroom. This is not a guideline to approximate. It is the standard that mastering engineers work to.
- Remove bus limiting before export. Any limiter sitting on your mix bus should be bypassed when you export the final mix file. Limiting bakes in loudness decisions that belong to the mastering stage.
- Check true peak levels. True peak should never exceed -1 dBFS on the exported file. Inter-sample peaks above this level cause distortion on streaming platforms during their own loudness normalisation process.
- Target integrated loudness for streaming. Spotify normalises to -14 LUFS integrated and Apple Music to -16 LUFS. Streaming loudness targets mean a mix delivered at -18 LUFS will be turned up by the platform, making headroom and tonal balance even more critical.
- Check on multiple playback systems. Listen on studio monitors, headphones, a phone speaker, and a Bluetooth speaker. Each system reveals a different aspect of your balance. If the mix holds up on all four, it translates.
Mix export comparison: with and without headroom
| Export approach | Peak level | Mastering flexibility | Streaming compatibility |
|---|---|---|---|
| Correct: no bus limiter | -6 dBFS | High | Excellent |
| Common mistake: bus limiter active | -1 to 0 dBFS | Very low | Risk of distortion |
| Over-compressed mix | -3 to -1 dBFS | Low | Reduced dynamic range |
Pro Tip: Export a reference version of your mix at -6 dBFS peak and load it into a streaming loudness analyser like Youlean Loudness Meter before sending it to mastering. If your integrated LUFS reading sits between -18 and -23, you are in the right zone.
The honest truth about mix balance from our experience
The most common trap we see producers fall into is using stereo effects to hide level problems. Wide reverbs, chorus effects, and stereo wideners can make a mix feel bigger, but they do not fix a balance that is not working in mono. We have heard mixes that sound impressive on headphones and completely fall apart on a mono phone speaker, and the cause is almost always the same: the producer used width as a substitute for clarity.
The discipline that separates good mixes from great ones is the willingness to sit with a rigid mono balance before doing anything else. It feels limiting at first. The mix sounds small and flat. But every level conflict, every masking issue, every arrangement clash becomes audible in mono in a way that stereo conceals. Faders serve as diagnostic tools to identify upstream problems like frequency masking or arrangement clashes before you reach for EQ or compression. If a fader needs to be at -20 dBFS for an element to sit right, that is a signal that something in the arrangement or recording needs attention, not a cue to add more processing.
Artistic intent and technical clarity are not in conflict. A mix can be bold, unconventional, and sonically adventurous while still being technically balanced. The goal is always to serve the music, but you cannot serve the music if the listener cannot hear what matters most.
— AubioMix
Get objective feedback on your mix balance with Aubiomix
Getting a second opinion on your mix balance is one of the fastest ways to improve. Aubiomix is an AI-powered analysis tool where you upload your audio file and receive detailed, specific feedback on your levels, tonal balance, stereo image, and mastering readiness.

The evaluation framework Aubiomix uses assesses your mix against professional standards for level balance, frequency distribution, and dynamic range. You get a clear report with specific steps to address what is not working, not vague suggestions. Whether you are preparing a mix for mastering or trying to understand why your chorus lacks energy, upload your mix and get the clarity you need to move forward with confidence.
FAQ
What is mix balance in music production?
Mix balance is the process of adjusting the relative levels and stereo positions of all tracks in a session so the mix is clear, cohesive, and translates across playback systems. It is the foundation of every professional mixing workflow.
What level should my mix bus peak at?
Your mix bus should peak at around -6 dBFS with no limiting active on the bus. This preserves headroom for mastering and keeps integrated loudness between -18 and -23 LUFS.
Should I balance my mix in mono or stereo?
Start in mono. Balancing in mono reveals true level conflicts and prevents you from using stereo width as a shortcut for clarity. Once the mono balance is solid, open the stereo field.
What is the difference between balance and panning?
Balance refers to the aggregate loudness relationship across the full mix. Panning refers to the left/right position of an individual track. Confusing the two leads to mixes that sound wide but lack focus and mono compatibility.
How do I use automation for better mix balance?
Use volume riding to keep lead vocals consistently above supporting instruments, automate effect sends to control density across sections, and raise the rhythm section slightly into choruses for energy. Automation is the performance layer of your mix.
Key takeaways
A balanced mix requires a disciplined workflow order: gain staging first, static mono balance second, processing third, and automation last.
| Point | Details |
|---|---|
| Gain staging sets the foundation | Target -18 dBFS RMS per track before touching faders to preserve dynamic range. |
| Mono balance reveals truth | Build your static balance in mono to expose level conflicts that stereo width conceals. |
| Level targets guide early decisions | Kick at -10 to -12 dBFS and bass 2 to 4 dB below kick gives a reliable starting point. |
| Headroom protects mastering quality | Export mix files peaking at -6 dBFS with no bus limiting for mastering flexibility. |
| Automation creates dynamic focus | Ride faders and effect sends to guide listener attention across song sections. |