
Five fixes solve most buried-vocal problems: push pre-delay to 20–40ms, high-pass the reverb return around 200–400Hz, Shorten the reverb decay time so that the tail finishes before the next vocal phrase starts, Use an aux send channel for the reverb effect, setting the plugin to 100% wet, to maintain independent control over dry and wet signals, and Use sidechain compression or ducking on the reverb return keyed from the dry vocal to reduce reverb level when the vocal is present, allowing it to bloom in gaps. Start there before touching anything else in the chain.
TL;DR:
- Increasing pre-delay to 20–40ms helps separate consonant sounds and clarifies intelligibility without sacrificing the sense of space.
- High-pass filtering the reverb return around 200–400Hz reduces low-mid muddiness and prevents masking with vocal warmth.
- Shortening the reverb decay time prevents tails from overlapping into the next vocal phrase, maintaining clarity and focus.
- Using sidechain compression on the reverb return keyed from the dry vocal allows the reverb to duck during vocal delivery, enhancing presence.
- Adjusting reverb levels in full mix context, not solo, ensures effects support, rather than drown, the vocal in the final sound.
Table of Contents
- Vocal buried reverb: the five-minute triage checklist
- Why does reverb bury a vocal in the first place?
- Pre-delay, decay and EQ: practical settings to start from
- Building the right send-and-return workflow
- Advanced tricks: layering, mid/side, and automation
- A step-by-step diagnostic flow when the checklist doesn't fix it
- Beyond reverb settings: automation and instrumental blending
- The over-processing trap: when fixing it makes it worse
- Modulation effects that reinforce a buried, ambient vocal
- Choosing the right reverb type for a buried vocal texture
- When buried reverb is an artistic choice, not a mistake
- Get an objective read on your reverb before you master
- Sources
- FAQ
Vocal buried reverb: the five-minute triage checklist
Before you rebuild your reverb chain from scratch, run this checklist. It takes less time than making a coffee, and it usually tells you exactly which knob is the culprit.
- Mute the reverb return and listen. If the mix barely changes, the reverb isn't adding space, it's adding mud. That's your first real clue, and it's the single most useful test in the mix for spotting a wasted or harmful effect.
- Push pre-delay up in 10–20ms steps. Listen specifically to consonants, the "t", "s", and "k" sounds that carry intelligibility. If they sharpen up as you increase pre-delay, you've found a big part of the problem.
- High-pass the reverb return at an appropriate frequency around 200–400Hz to reduce muddiness. Sweep it while soloing the return briefly, then unsolo and check in context. You're hunting for the point where the low-mid fog disappears without losing the sense of space.
- Shorten the decay time until tails stop bleeding into the next phrase. A reverb tail that's still ringing when the next line starts will always fight for the same sonic real estate.
- Add a compressor or sidechain on the return, triggered by the dry vocal, so the wet signal ducks the moment the singer opens their mouth and blooms again in the gaps.
Run through these five checks in order and you'll usually land on the answer within a couple of minutes. If the vocal is still buried after all five, the issue probably isn't the reverb itself. It's more likely stacking (too many reverbs competing), an arrangement problem (too many instruments occupying the same frequency range), or a level issue upstream of the reverb entirely. But for the vast majority of buried-vocal complaints, one or two of these five moves is the actual fix.
Pro Tip: Do the mute test in full context, never in solo. A reverb that sounds gorgeous on its own can still be the exact thing smothering your vocal once the kick, bass, and guitars are back in the picture.
Why does reverb bury a vocal in the first place?
Reverb buries a vocal because of two separate mechanisms working together: timing confusion and frequency masking. Understanding both makes every fix on the checklist above make instant sense, rather than feeling like arbitrary knob-twiddling.
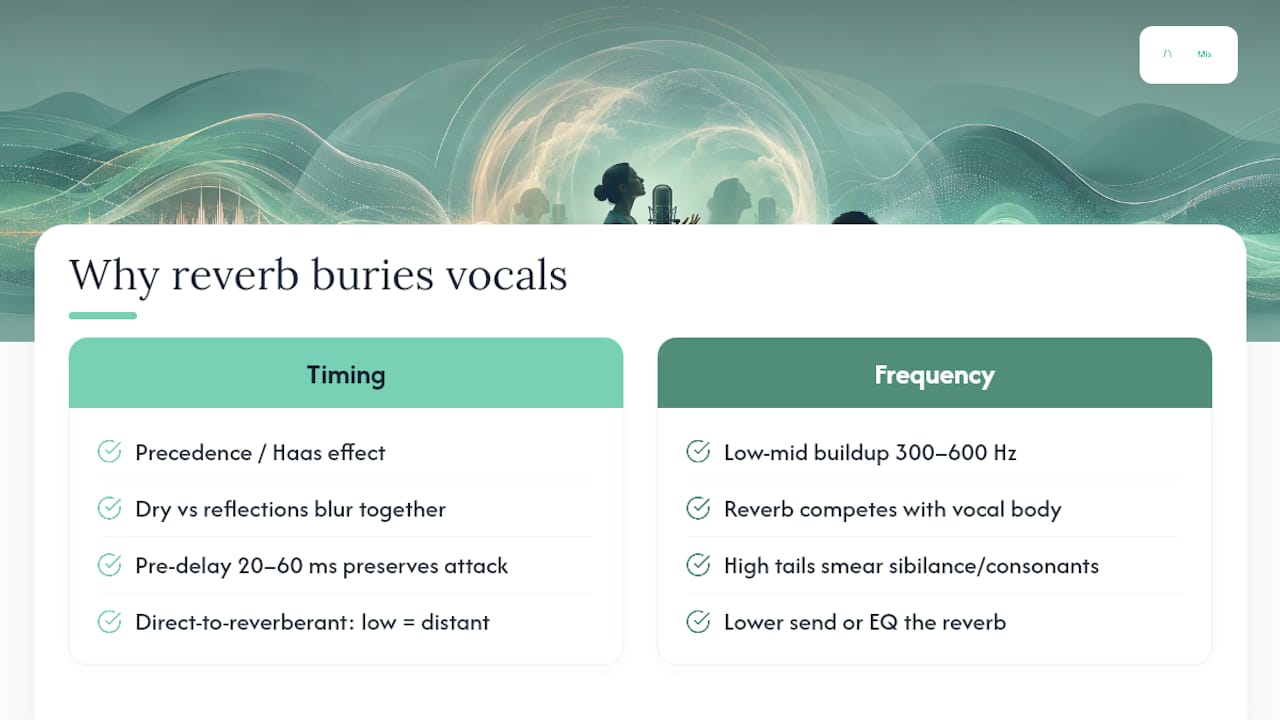
The timing side comes down to something called the precedence effect, sometimes called the Haas effect. Your brain decides where a sound is coming from based on which version of it arrives first, the direct sound or its reflections. When reverb starts almost the instant the dry vocal hits, your ear can't cleanly separate "voice" from "room," and the two blur into a single smeared event. Pre-delay fixes this by inserting a small gap, typically 20 to 60 milliseconds, between the dry signal and the reverb's onset. That gap lets the brain register the vocal's attack first, then hear the reverb as a separate, supporting layer rather than a competing one.
This connects directly to the direct-to-reverberant ratio, usually shortened to D/R ratio. It's simply the balance between the dry signal and the wet signal reaching the listener. A high D/R ratio (lots of dry vocal, comparatively little wet reverb) sounds close and present. A low D/R ratio sounds distant, as though the singer stepped back from the microphone or into a bigger room. Every time you turn up a reverb send, you're lowering the D/R ratio and pushing the vocal further away, whether you meant to or not. That's the core mechanism behind "buried": not a broken plugin, just too much wet relative to dry.
Frequency masking is the second half of the story, and it's arguably the more common culprit in modern mixes. Reverb tails carry a huge amount of low-mid energy, and the human ear is especially sensitive to buildup in the 300 to 600Hz range. That's unfortunately also where a lot of vocal body and warmth lives. When the reverb return dumps energy into that same band, it doesn't just sound "washy," it actively competes with the vocal for the listener's attention, and the vocal usually loses. Bright, splashy tail energy up in the highs can do something similar to sibilance and consonant clarity, smearing the "s" and "t" sounds that your brain uses to parse words.
This is exactly why setting reverb levels in solo is a trap. Soloed, a reverb send always sounds smaller and less obtrusive than it actually is once the kick, bass, guitars, and every other reverb tail in the mix pile in around it. Every serious mixing engineer sets reverb levels with the full mix playing, adjusting the send until they can just hear the effect doing its job, then trusting that judgement over how it sounds in isolation.
Pre-delay, decay and EQ: practical settings to start from
You don't need to guess at these numbers from scratch every session. A handful of starting points will get you close on almost any vocal, and from there it's a matter of nudging by ear.
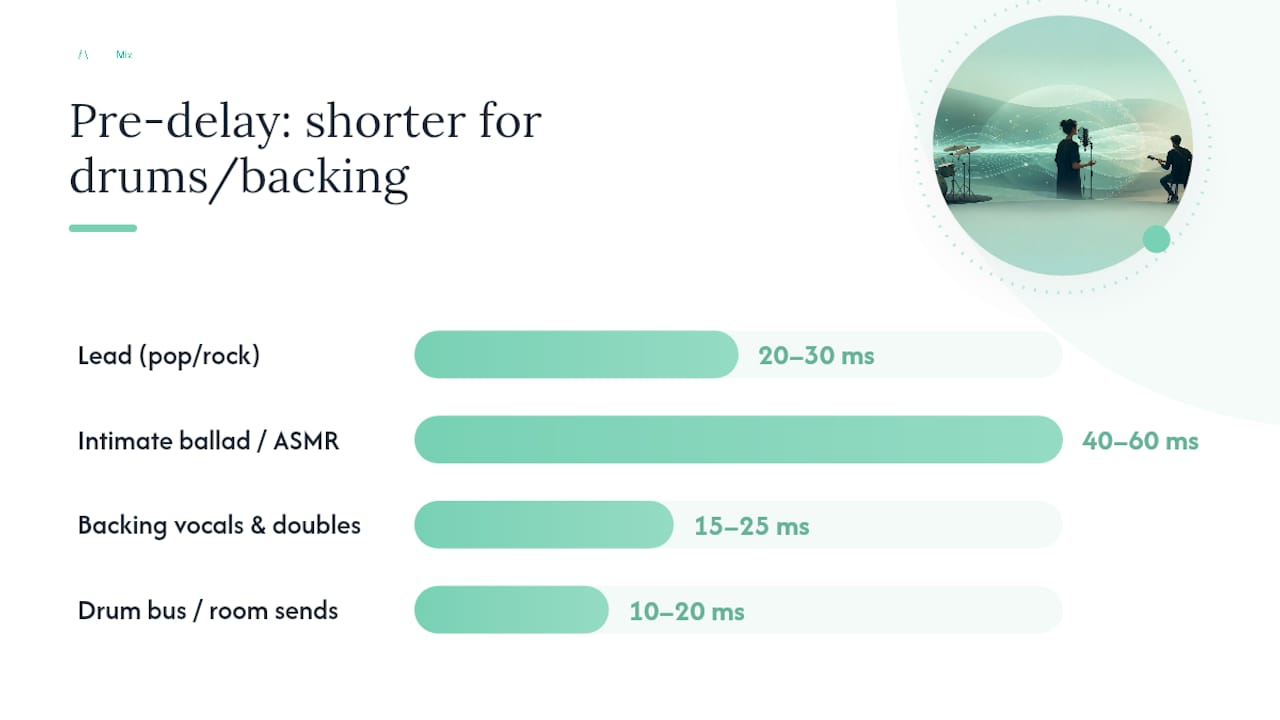
Pre-delay by vocal type:
- Lead pop or rock vocal: 20–30ms
- Intimate ballad or ASMR-style whisper vocal: 40–60ms
- Backing vocals and doubles: 15–25ms (tighter, so they don't compete with the lead's space)
- Drum bus or room sends: 10–20ms
If your reverb plugin doesn't offer a dedicated pre-delay control, insert a short, zero-feedback tempo-synced delay before the reverb in the chain. That gives you the same effect: a clean gap before the wet signal arrives, timed precisely to your session's tempo rather than an arbitrary millisecond value.
Decay time by genre and tempo. The golden rule here is that the tail should clear before the next lyric or phrase starts, otherwise you get exactly the overlap that causes burying in the first place.
Faster tempos and denser lyric delivery need shorter decay, full stop. A 3-second reverb tail on a rap verse with a word every quarter note will smear every single line into the next. Slower ballads with more space between phrases can afford a longer, more luxurious tail because there's actual silence for it to live in.
EQ on the reverb return is where most of the "mud versus clarity" battle gets won or lost:
- High-pass filter at 200 to 400Hz to strip out the low-mid buildup that makes a mix sound congested and unclear.
- Low-pass filter around 6 to 10kHz to tame excessive air and sparkle in the tail, which stops it competing with sibilance and cymbal energy.
- An optional narrow dip around 2 to 3kHz if the tail still feels like it's fighting the vocal for presence. This is the frequency range where vocal intelligibility lives, so trimming the reverb here, rather than the vocal, keeps the words upfront.
To test any of these adjustments properly: mute the return to hear the dry baseline, solo it briefly to identify problem frequencies, then always finish by A/B testing in full context with the rest of the mix playing. That last step is non-negotiable. A change that sounds like an improvement in solo can vanish, or backfire, the moment the rest of the arrangement returns.
If you want a deeper primer on the different reverb algorithms and where each one shines, our guide to reverb settings and types covers the ground in more detail.
Building the right send-and-return workflow
Getting reverb to sit correctly is as much about routing as it is about settings. The order in which signal passes through your chain determines how much control you actually have over the final blend.
Use an aux send, not an insert, for your main vocal reverb. Set the reverb plugin itself to 100% wet on the return channel, and control the amount of reverb purely through the send level on the vocal track. This gives you a completely separate channel to process the reverb's tone and dynamics without ever touching the dry vocal, which is exactly what you want when you're trying to shape space independently from clarity.
Insert EQ after the reverb plugin on the return, not before it. Processing the wet signal after it's already been through the reverb algorithm lets you shape exactly what comes out the other end:
- High-pass around 200 to 400Hz to cut the low-mid mud.
- Low-pass around 6 to 10kHz to tame excess brightness.
- A surgical notch anywhere the tail is clashing hardest with the vocal's own frequency content, found by sweeping a narrow boost while soloing the return.
Sidechain the reverb return to the dry vocal. This is the single most transformative move available if your plugin supports it, and it's a technique more engineers are adopting precisely because it lets you have your cake and eat it. A compressor sits on the reverb return, keyed from the dry vocal track. The moment the vocal sings, the compressor clamps the reverb down. The instant the vocal pauses, the reverb swells back up to fill the gap.
Reasonable starting settings: a ratio of 2:1 to 3:1, a fast attack (1 to 5ms) so it reacts before the reverb builds, and a medium release around 100 to 300ms so the recovery feels musical rather than pumping. For longer, more atmospheric tails, try automating the release time to stretch out during instrumental sections and tighten up again once the vocal returns.
- Bus your reverb to a dedicated aux, always.
- EQ the wet signal after the reverb, never before.
- Sidechain from the dry vocal whenever your session allows it.
- Automate release time rather than leaving it static across the whole song.
Pro Tip: If your DAW doesn't support sidechaining a reverb return directly, try automating the send level itself in tight sync with the vocal phrasing. It's more manual work, but it achieves a similar ducking effect by hand.
Parallel compression deserves a mention here too, though it solves a different problem. It's for adding punch and perceived loudness to a vocal without squashing its dynamics, not for controlling reverb. Don't confuse the two chains: parallel compression sits on a separate blend of the dry vocal, while ducking compression sits specifically on the reverb return.
Advanced tricks: layering, mid/side, and automation
Once the basics are dialled in, a few more advanced moves separate a competent reverb from a genuinely great one, especially on busy or ambitious arrangements.
Layer a short, bright reverb with a long, dark one, but keep the long one quiet. A short room or plate gives immediate presence and glue. A longer hall or shimmer tail underneath adds atmosphere and depth. The trap here is running both at similar volumes, which puts the vocal in two rooms simultaneously and destroys any sense of a coherent space. Keep the long tail well below the short one in level, treating it as seasoning rather than a co-lead.
Use mid/side EQ or multiband processing on the reverb return to reduce masking in the centre while preserving width. Since the vocal typically sits dead centre, you can cut competing low-mid energy specifically from the mid channel of the reverb return while leaving the side channel's ambience untouched. It's a more surgical way to solve the masking problem without thinning out the overall stereo picture.
Automate reverb send and decay across the arrangement, rather than setting one value and leaving it for the whole song. Verses often want a tighter, more controlled reverb so every word lands. Choruses and outros can open up with more send and a longer tail because the energy and instrumentation support it. A single static setting for a full four-minute song is almost always a compromise somewhere.
Beware of reverb stacking. Running two or three different reverbs on the same vocal, each with its own character, creates competing spatial signatures that read as mud rather than depth. One primary reverb per element is a safer default; layer a second only when you have a specific, deliberate reason and you're controlling both tails' levels carefully.
If you're leaning into deliberate atmospheric burial as an aesthetic choice, consider printing your reverb tail to audio and resampling it. That separates the creative shaping (reversing, pitching, chopping, rhythmic gating) from your live mixing decisions, and gives you far more freedom to mangle the texture without wrecking your session's CPU or your recall.
A step-by-step diagnostic flow when the checklist doesn't fix it
Sometimes the five-minute triage isn't quite enough, and you need a more systematic path through the problem. Work through these steps in order, stopping as soon as you find the fix.
- Mute the reverb return entirely. If the mix sounds virtually identical with it off, the reverb is either too quiet to matter or masked by something else. Either way, it's not doing its job, and that's your starting clue.
- Solo the reverb return on its own to hear exactly what frequencies dominate the tail. Nine times out of ten you'll hear an obvious low-mid rumble or an overly bright, splashy top end, both of which point straight to an EQ fix.
- Increase pre-delay in small steps, listening specifically for consonant clarity returning. If this alone fixes 80% of the muddiness, you've found your main culprit and can stop tweaking here.
- Shorten the decay time until the tail clears before the next vocal phrase begins, checking against the song's actual tempo rather than a generic preset value.
- Add or adjust sidechain ducking if the previous steps have improved things but the vocal still occasionally disappears during busier sections of the arrangement.
If you've worked through all five and the vocal is still getting swallowed, the problem has likely moved beyond the reverb itself. At that point, revert to the mid/side EQ and arrangement-wide automation techniques covered above, or step back and check whether other instruments (a wide synth pad, a dense guitar strum, a second vocal harmony) are the real source of the masking. Our piece on fixing boxy, low-mid heavy vocals walks through a related triage process for exactly that kind of frequency conflict.
Beyond reverb settings: automation and instrumental blending
Reverb isn't the only tool for pushing a vocal back into a mix, and sometimes it's not even the best one. Volume automation is the most direct alternative: manually riding a vocal's level down a decibel or two in dense sections, then bringing it back up for the hook or a key lyric, achieves a "buried" feel without touching your reverb chain at all. It's slower work than a plugin setting, but it gives you word-by-word control that no algorithm can match.
Blending the vocal with other instruments is the second major lever. Doubling a vocal line with a synth pad or guitar part at a similar pitch range creates a natural masking effect, the ear starts to hear the vocal as part of a texture rather than a standalone element, which is often exactly the "buried in the mix" aesthetic producers are chasing, particularly in shoegaze, dream pop, and lo-fi genres.
Saturation and subtle distortion on the vocal itself can push it further back too, oddly enough, by roughening its edges so it blends into a denser instrumental bed rather than cutting through it. Combine two or three of these approaches rather than relying on reverb alone, and you'll get a result that feels intentional and textured rather than simply "too much wet signal."
The over-processing trap: when fixing it makes it worse
The most common mistake engineers make while chasing a buried vocal is over-correcting. Stack five different fixes at once, aggressive HPF, heavy ducking, a shortened decay, and a hard low-pass, and you can end up with a reverb so processed it barely sounds like reverb anymore. It becomes a thin, artificial-sounding smear that draws more attention than the muddy version you started with.
The fix is to change one variable at a time and reassess in full context after each move. Adjust pre-delay, listen. Adjust the HPF, listen again. Resist the urge to nudge four knobs simultaneously because it's faster, since you lose the ability to tell which change actually helped.
Watch out too for chasing "clarity" so hard that you strip the tail of all character, leaving a vocal that sounds dry and awkward rather than tastefully spaced. A reverb that's been EQ'd and ducked into oblivion isn't doing anyone any favours. If you can no longer hear the reverb at all in context, even during pauses, you've probably gone too far in the other direction.
Modulation effects that reinforce a buried, ambient vocal
Chorus, flanging, and subtle pitch modulation layered alongside reverb can deepen a buried aesthetic considerably, because they add movement and instability to the tail that a static reverb can't provide on its own. A slow chorus on the reverb return, rather than the dry vocal, thickens the ambience without smearing the vocal's own pitch centre.
Modulated delays, particularly ping-pong or tape-style delays with subtle wow and flutter, sitting alongside a short reverb, create a wash that feels alive rather than static. This combination is common in genres built around deliberately obscured vocals, where the goal isn't clarity at all but atmosphere and texture.
The key discipline is keeping modulation on the wet path only, applied after the reverb, never on the dry vocal signal itself. That way you retain a clean, controllable dry source for automation and ducking, while the modulation does its work purely on the ambient layer around it.
Choosing the right reverb type for a buried vocal texture
Reverb type shapes the character of a buried vocal as much as any setting does. Plate reverbs are dense and smooth with a fast buildup, making them a strong choice when you want thickness without an obvious sense of a physical room. Room reverbs are short and tight, useful for adding subtle presence and blend without pushing the vocal noticeably backward.
Hall reverbs carry a longer, more spacious tail with a clear sense of size, ideal for ballads or atmospheric sections where genuine distance is the goal. Shimmer reverbs, which pitch-shift the reflections upward, usually by an octave, add an ethereal, otherworldly quality that works beautifully for deliberately hazy, dreamlike vocal textures, though they need careful high-frequency control to avoid clashing with cymbals and other bright elements.
Matching the reverb type to the intended texture, rather than defaulting to whichever preset is loaded, is often the difference between a vocal that sounds tastefully distant and one that sounds like a mixing mistake.
When buried reverb is an artistic choice, not a mistake
There's a real difference between a vocal that's accidentally drowned and one that's deliberately, beautifully buried. Genres built around dark, atmospheric vocals, the kind associated with artists like Burial, treat reverb less like a mixing tool and more like an instrument in its own right.
The practitioners who pull this off well don't just slap on a huge reverb and call it a mood. They process the return aggressively: heavy high-pass filtering to stop it turning into a rumbling wash, sidechain ducking tied to the vocal rhythm so the atmosphere blooms and recedes in time with the performance, and often printing the reverb to audio so it can be manipulated further, reversed, pitched, chopped, without touching the live mix session.
The tail can be enormous, several seconds long, genuinely huge in scale, but it's shaped so tightly around the vocal's rhythm that the words still read during the important moments, the hook, the key line, the emotional peak. That's the real skill: knowing exactly when to let the vocal disappear into the texture and when to let it cut back through, rather than picking one setting and leaving the vocal buried uniformly for four minutes straight.
Rhythmic gating on the reverb return, opening and closing in time with the beat rather than the vocal itself, is another technique worth exploring if you're chasing this kind of deliberately hazy, textural sound. It turns the ambience into a rhythmic element in its own right rather than a passive wash sitting behind everything else.
— AubioMix
Get an objective read on your reverb before you master
Ear fatigue is the real enemy here. After hours staring at the same session, it gets genuinely hard to tell whether your vocal reverb is sitting perfectly or quietly drowning the performance you spent weeks recording. That's exactly the gap AubioMix closes: upload your mix and get back a session-specific report flagging exactly where reverb, EQ, dynamics, and effects decisions are working against your vocal, not a generic checklist, an analysis of your actual file.

Run your mix through AubioMix after you've worked through the triage steps above, or before you send anything off to mastering, and you'll get concrete, prioritised feedback across more than 15 areas of your session, from frequency masking to stereo width to loudness. If you're producing in a specific genre, the electronic mix benchmarks give a useful reference point for how your reverb decisions compare against well-mixed reference tracks in a similar style. Upload a mix you're unsure about today and get a clear, actionable breakdown back in minutes rather than another round of second-guessing on your monitors.
Sources
The guidance above draws on established mixing wisdom around pre-delay, masking, and reverb routing. For a deeper look at the psychoacoustics behind pre-delay and the precedence effect, Tonalux's breakdown is worth a read. The Vocal Market's guide to reverb settings and mud covers EQ shaping on the return in more detail, and Soundfly's Flypaper piece on sidechaining reverb is a solid primer on ducking technique. Audio Issues' mute-test article is short, practical, and worth bookmarking for every future session. For a broader vocal clarity workflow beyond reverb alone, see our own guide to fixing vocal intelligibility.
- How a 1949 psychoacoustics thesis decides where your vocals sit in the mix | Tonalux Blog
- Vocal reverb guide: settings, types & avoid mud | The Vocal Market
- Hold up—can you sidechain reverb? | Flypaper (Soundfly)
- This simple technique makes your reverb sit perfectly in the mix | Audio Issues
FAQ
What is the best reverb effect for vocals?
There's no single best reverb type. Plates and rooms suit tight, present vocals, while halls and shimmer reverbs suit spacious or atmospheric textures. The right choice depends on the song, and settings matter more than the plugin brand.
What are the four types of reverb?
The four most common categories are room, hall, plate, and shimmer, each producing a different sense of space, size, and character on a vocal.
What does vocal reverb mean?
Vocal reverb is the ambient reflection effect added to a vocal to simulate the sound of a physical space, giving the voice a sense of depth and placement within a recording.
Can too much reverb ruin a song?
Yes. Excessive reverb send, overly long decay, or unfiltered low-mid buildup on the return can bury a vocal's intelligibility, making lyrics hard to follow and the mix sound washed out.
How do I know if my vocal reverb is too loud?
Mute the reverb return in full mix context. If the mix sounds noticeably drier and clearer with it off, your send level is likely too high, or the reverb needs EQ and ducking rather than a straightforward level cut.