

For the fastest gains in vocal intelligibility mixing, sort out levels and problems before you reach for anything glamorous: clip gain, subtractive EQ, gentle compression, targeted de-essing, then a touch of presence and a proper automation pass. The 1.5–4.5 kHz band carries most of what makes a vocal understandable, but boosting it blind is the wrong first move. Get the fundamentals right and that band barely needs touching.
TL;DR:
- Correct gain staging and basic filtering, such as high-pass and subtractive EQ, are essential before applying additional processing to avoid amplifying problems.
- Boosting the 1.5–4.5 kHz presence band should be subtle, focus on problem areas, and avoid narrow or harsh spikes to improve clarity.
- Using serial compression in 2–4 dB stages and parallel compression helps control peaks while maintaining natural dynamics and transients.
- Manual automation and clip gain rides at the phrase level are more effective than relying solely on EQ and compression to achieve intelligibility.
- Proper microphone choice, placement, and room treatment significantly influence initial vocal clarity, reducing the need for extensive corrective EQ later.
Table of Contents
- Quick checklist: immediate fixes you can apply in minutes
- Signal chain and gain staging: order, rationale and target levels
- EQ recipes: practical frequency ranges and Q settings you can audition now
- Compression and dynamics control: settings, serial vs parallel, and traps to avoid
- De-essing and sibilance control: how to tame 'S' without losing clarity
- Space and time-based effects: add depth while preserving consonants
- Automation and clip gain: phrase- and word-level rides that lock the vocal in the mix
- Choosing appropriate microphones and recording techniques to enhance vocal clarity before mixing
- Using spectral shaping tools such as dynamic EQ and multiband compression specifically for vocal intelligibility
- Techniques for managing vocal phrasing and articulation via transient shaping or gating
- Treatment of overlapping frequency ranges with other instruments to prevent masking vocals
- Listening environment considerations and monitoring practices to accurately assess vocal intelligibility during mixing
- AubioMix perspective: how automated feedback complements manual mixing
- Get a structured intelligibility check before you finalise the mix
- Sources
Quick checklist: immediate fixes you can apply in minutes
If you only have ten minutes before a client call, work through this order. Each step removes a problem the next step would otherwise have to fight.
- Sweep a high-pass filter from a low frequency upwards until the rumble disappears without thinning the voice.
- Ride obvious peaks with clip gain before any compressor sees the track, flattening the loudest syllables by ear.
- Cut mud and boxiness with a subtractive EQ move somewhere in the 200–400 Hz range.
- Add a wide, gentle boost across 1.5–4.5 kHz, a decibel or two at most, rather than a narrow spike.
- Apply de-essing carefully in the 5–8 kHz zone, watching for lisping side effects.
- Carve space in competing instruments instead of pushing the vocal louder to compete with them.
That last point trips up more mixers than any plug-in setting. If the guitar and vocal are fighting for the same 2 kHz territory, cutting the guitar usually beats boosting the singer.
Signal chain and gain staging: order, rationale and target levels
Processing order isn't a matter of taste. Get it wrong and every plug-in downstream reacts to the wrong signal.
Start with clip gain and fader rides, aiming for a consistent level, around a sensible working reference point, before any dynamics processing touches the track. A compressor set against wildly uneven input levels will chase the loudest syllables and squash the quiet ones unpredictably. Mixing and Mastering AI's signal chain guide lays out the same logic: gain staging, then subtractive EQ, then compression, then de-essing, then additive EQ, then time-based effects on sends.
That sequencing matters because subtractive EQ before compression stops you amplifying problems you haven't fixed yet:
- Clip gain and fader rides first, for even levels.
- Subtractive EQ next, removing rumble, mud, and boxiness.
- Compression in serial stages of 2–4 dB reduction each, rather than one heavy crush.
- Parallel compression as an optional density layer once the serial chain sounds clean.
High-pass filtering also affects how a compressor's detector responds. Low-end energy below 100 Hz can trigger gain reduction that has nothing to do with the vocal's actual loudness, so filtering first keeps the compressor honest.
Pro Tip: Using clip gain before compression turns the compressor into a tone shaper rather than a level chaser, which is exactly what keeps consonants articulate instead of squashed flat.
EQ recipes: practical frequency ranges and Q settings you can audition now
Every vocal EQ move should answer a specific complaint, never a vague desire to "make it sound better." Here's where to look.
High-pass filter (80–150 Hz). Start around 100 Hz for male vocals and closer to 120–150 Hz for female vocals, then sweep upward slowly until you hear the body thin out, and back off a touch. This single move often does more for clarity than any boost that follows.
Mud and boxiness. Muddiness and boxiness occupy low-mid frequency ranges typically between a few hundred hertz to around six hundred hertz. A narrow cut with moderate Q and gain reduction in the congested spot clears space instantly. Aubiomix's guide to fixing boxy vocals walks through this exact triage if you want a deeper drill.
Nasal resonance. A narrow, surgical cut in the mid frequency range can fix the "kazoo" quality some voices carry, particularly on sustained vowels.
Presence (1.5–4.5 kHz). This is the band that genuinely drives intelligibility. Avid's EQ guide recommends a wide Q with small gains, typically +0.5 to 2 dB, rather than a narrow spike that sounds harsh fast. iZotope's breakdown of vocal EQ ranges confirms the same territory, alongside sibilance at 5–8 kHz and air from 8–12 kHz.
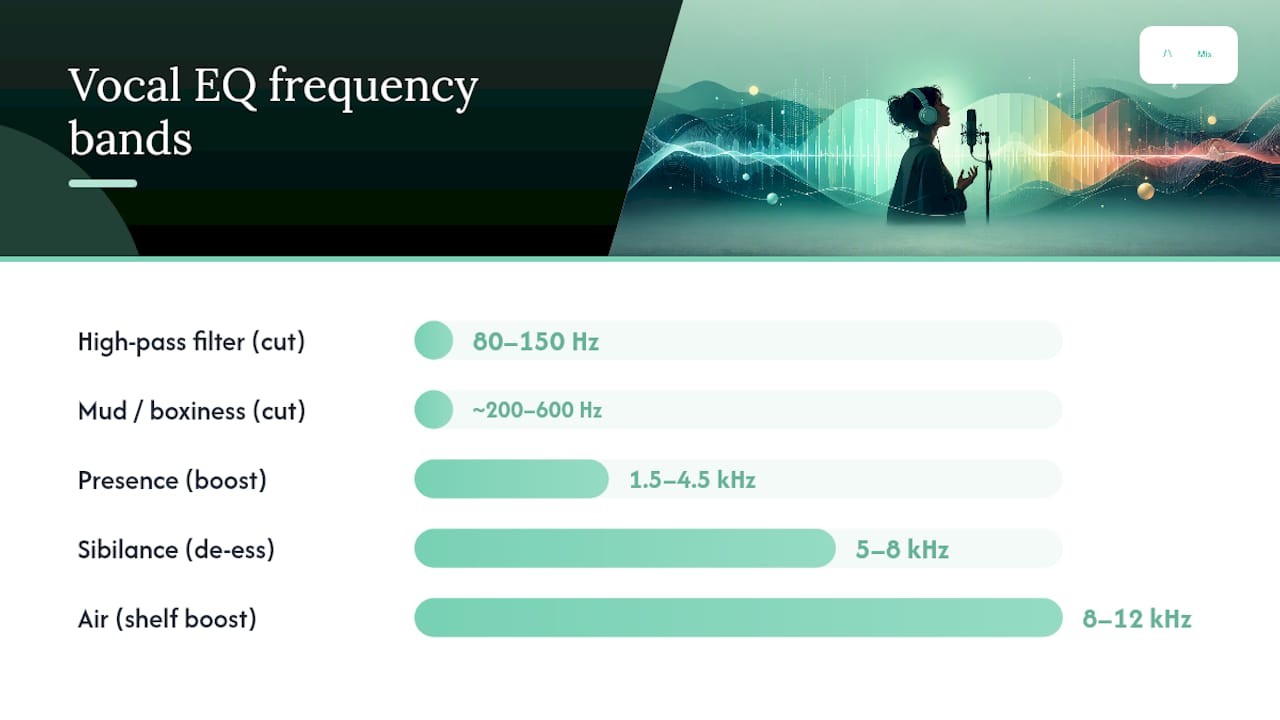
Air shelf. A gentle high-frequency shelf boost can add sheen and help reveal detail on small speakers, but it should be applied cautiously and typically after de-essing to avoid harshness.
Compression and dynamics control: settings, serial vs parallel, and traps to avoid
Compression on vocals isn't about squashing the performance into submission. It's about controlling the two or three syllables that spike ten decibels above everything else.
For a typical pop vocal, start with a 3:1 ratio, attack around 10–30 ms, and release between 100–200 ms, adjusting release until the compressor breathes with the phrasing rather than pumping against it. Titan Audio's mixing guide recommends splitting the workload across two compressors rather than leaning on one:
- Stage one: fast, low-ratio, catching only the sharpest transients.
- Stage two: slower, slightly higher ratio, gluing the overall performance together.
Aim for 3–6 dB of gain reduction from each stage rather than 10 dB from one. Conservative processing wins here: pushing past 8–10 dB of total reduction tends to squash the natural dynamics that make a performance feel alive, a pattern that shows up across most professional workflows even without a single named benchmark to point to.
Parallel compression adds density without crushing transients. Send the vocal to an aux channel, compress that send hard, three to one or heavier, and blend it back under the dry signal until you hear thickness without losing the original attack.
Watch for one side effect: heavy compression raises sibilance and noise floor along with everything else. If de-essing suddenly feels harder after adding a compression stage, that's why, and a dynamic EQ can isolate the offending frequency without recompressing the whole vocal. Aubiomix's compression walkthrough covers serial and parallel setups in more depth if you want worked examples.
De-essing and sibilance control: how to tame 'S' without losing clarity
Sibilance lives in a fairly narrow window, and finding it by ear beats guessing at a preset. Sweep 5–8 kHz with a narrow boost until the "S" and "T" sounds jump out, then set your de-esser's frequency there and dial in enough reduction to shave 3–6 dB off just the sibilant transients, according to Mixing and Mastering AI's chain breakdown.
Placement matters more than most mixers assume. Putting the de-esser before compression stops the compressor from grabbing sibilant peaks and pushing them louder overall, a common cause of de-essing feedback loops where every fix seems to reveal a worse problem underneath.
- Sweep and locate the sibilant frequency by ear, not by preset.
- Target 3–6 dB of reduction on transients only.
- Place the de-esser before compression when sibilance keeps creeping back after gain reduction.
- If the vocal starts lisping, lower the target frequency slightly or switch to manual clip-gain drops on individual syllables.
- Use dynamic EQ for isolated harsh words a de-esser handles clumsily.
Pro Tip: If a de-esser fixes the chorus but mangles a single word in the verse, don't chase it with more de-essing. Automate a manual gain drop on that one syllable instead. Aubiomix's full guide to sibilance covers manual alternatives when a de-esser starts fighting the performance rather than helping it.
Space and time-based effects: add depth while preserving consonants
Reverb and delay should live on sends, never baked into the dry vocal chain, so you can shape the wet signal independently without touching the source.
Set predelay somewhere between 15–40 ms. That gap lets the initial consonant land clearly before the reverb tail arrives, which is exactly what Titan Audio's guide recommends for keeping words legible in a wash of ambience.
- High-pass the reverb return around 250–400 Hz to stop low-end mud building up underneath the vocal.
- Add a moderate low-pass on the return too, trimming harsh top end from the reflections.
- Try tempo-synced short delays for width instead of long reverbs when the mix already feels busy.
- Filter delay returns the same way as reverb returns, protecting consonant clarity.
Automation and clip gain: phrase- and word-level rides that lock the vocal in the mix
Everything before this point sets up the vocal to respond predictably. Automation is where intelligibility actually gets won or lost, and it's the step most home producers skip.
- Follow the lyric sheet, not the waveform, raising narrative words the listener needs to catch and letting filler syllables sit back.
- Ride obvious peaks with clip gain, aiming for 6–8 dB of practical correction on the worst offenders before compression has to do the heavy lifting.
- Automate effects sends per section, pulling reverb back in verses and opening it up in choruses.
- A/B the mix on earbuds, small speakers, and reference monitors before calling it finished, since presence reads differently on each.
Beat Kitchen's mixing guide puts it plainly: phrase-level fader rides are often the single biggest contributor to how intelligible a vocal feels, bigger than any EQ or compressor move.
Choosing appropriate microphones and recording techniques to enhance vocal clarity before mixing
Mixing can rescue a rough take, but it can't manufacture detail that was never captured. A large-diaphragm condenser microphone tends to pick up more high-frequency detail and air than a dynamic mic, which matters directly for the presence and air bands you'll be shaping later. If the source already has weak 3 kHz content, no EQ boost fully replaces it without adding artificial-sounding grain.
Microphone placement affects intelligibility as much as the mic itself. Singers positioned too close to a condenser trigger heavy proximity effect, a bass buildup that later forces you into aggressive high-pass filtering just to undo what the recording technique caused. Positioning the mic 15 to 30 centimetres away, off-axis by a few degrees, usually tames plosives and sibilance at the source rather than leaving it for a de-esser to fix after the fact.
Room treatment matters just as much as mic choice. A vocal recorded in an untreated room picks up early reflections that smear consonants, the exact clarity problem predelay and reverb filtering try to solve later in the mix. A few moving blankets or a reflection filter around the mic often does more for eventual intelligibility than any plug-in chain downstream.
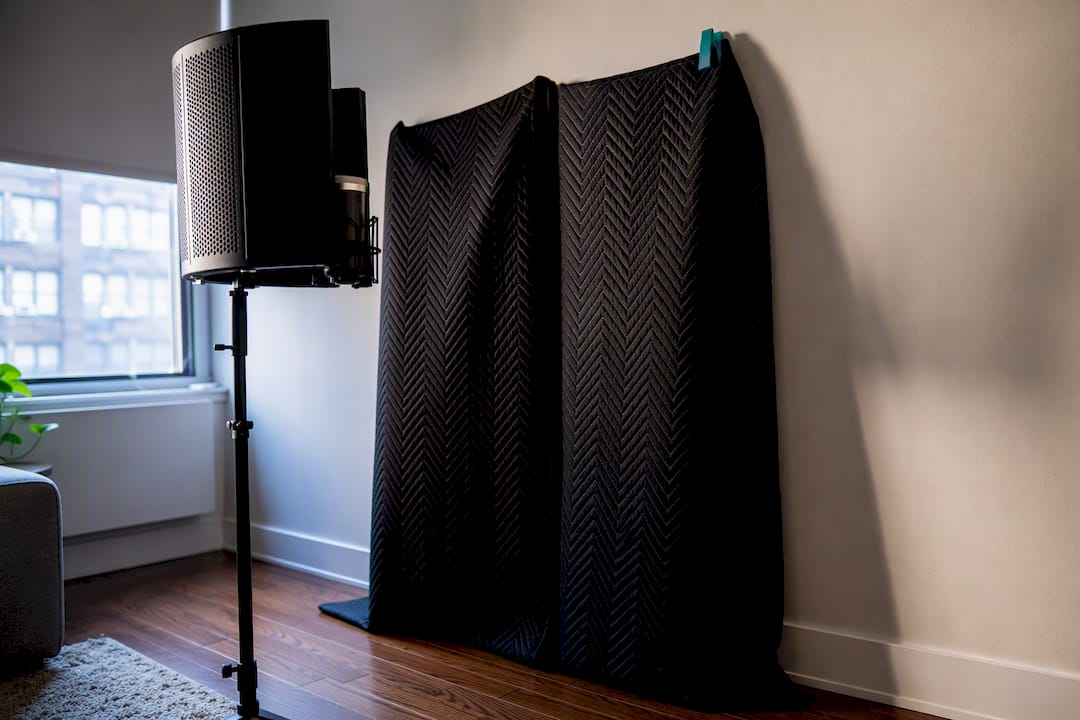
Pop filters and consistent mic technique matter too. A singer who drifts off-axis mid-line changes the tonal balance take to take, forcing inconsistent EQ decisions across a single verse. Coaching consistent distance and angle during the session saves hours of corrective work later.
Using spectral shaping tools such as dynamic EQ and multiband compression specifically for vocal intelligibility
Static EQ treats every moment of the performance identically. Dynamic EQ and multiband compression only step in when a problem actually appears, which makes them far better suited to vocals that change character from word to word.
A dynamic EQ set to trigger around 700 Hz to 1.2 kHz, for instance, can duck nasal resonance only on the syllables where it flares up, leaving the rest of the performance untouched. That's a meaningfully different result than a static cut, which shaves the same amount off every single word whether it needs it or not.
Multiband compression earns its place in the presence band specifically. Instead of one broadband compressor reacting to the loudest frequency in the signal, a multiband setup lets you compress 1.5–4.5 kHz independently from the low end, taming harsh presence peaks without dulling the warmth sitting below 400 Hz.
The sibilance band benefits from the same logic, and this is functionally where a smart de-esser already lives: a dynamic EQ node targeting 5–8 kHz that only engages when sibilant energy crosses a threshold. The advantage over a standard de-esser is precision. You can shape the attack and release independently, which helps on vocals with inconsistent sibilance across a single line, loud on "sisters," barely there on "sun."
Use these tools after your static EQ and compression stages are already doing most of the work. Reaching for dynamic EQ first, before fixing gain staging and gross tonal problems, usually means chasing symptoms rather than causes.
Techniques for managing vocal phrasing and articulation via transient shaping or gating
Transient shaping works on the attack portion of a sound, independent of overall level, which makes it useful for a very specific intelligibility problem: consonants that get buried under compression.
Boosting the transient response slightly on a vocal that's already been through two compression stages can bring consonants like "T," "K," and "P" back into focus without raising the overall loudness of the phrase. This works especially well on vocals that sound compressed and mushy but aren't actually too loud, a texture problem rather than a level problem.
Gating solves a different issue: bleed and breath noise sitting in gaps between phrases. A vocal take recorded in a room with any ambient noise, or with a hot headphone bleed, benefits from a gate set to open only when the singer is actually singing. This matters for intelligibility indirectly. Every bit of noise sitting in the gaps competes for the listener's attention during silences, and a cleaner background makes the actual words that follow land harder.
Set gate thresholds conservatively. An overly aggressive gate clips the front of words, cutting consonants exactly where clarity depends on them most, which defeats the purpose entirely. Listen specifically for clipped "S" and "T" sounds at the start of phrases after setting a gate, since that's where over-aggressive settings do the most damage.
Neither tool replaces careful automation. Think of transient shaping and gating as support for the phrase-level fader rides covered earlier, not a substitute for them.
Treatment of overlapping frequency ranges with other instruments to prevent masking vocals
Frequency masking happens when two sounds compete for the same range and the listener's ear can only properly track one. Vocals lose this fight constantly, usually to guitars, synths, and snare drums occupying the same 1.5–4.5 kHz presence band that carries most intelligibility.
The fix that works most reliably isn't boosting the vocal louder. It's cutting the competing instrument in the exact spot where the vocal needs to be heard. A rhythm guitar carrying energy at 2.5 kHz, right where vocal consonants live, benefits from a targeted dip there rather than forcing the vocal to shout over it with an aggressive presence boost.
Panning helps separate instruments that share frequency content but can't both be cut heavily. A guitar and vocal both sitting in mono at 2 kHz mask each other regardless of level; moving the guitar hard to one side and keeping the vocal centred gives the ear two distinct spatial cues to latch onto, even when the frequency content overlaps.
Snare drums present a specific problem because snare crack often sits directly in the same zone as vocal presence. Rather than notching the vocal to avoid the snare, try a brief EQ dip on the snare's 2–3 kHz crack, timed only to the beats where the vocal phrase actually lands. This is more surgical than a static cut and preserves the snare's punch everywhere else.
The broader principle: every instrument doesn't need full-range presence in every moment. Arrangement and automated EQ moves that clear space specifically when the vocal is singing beat static EQ decisions made in isolation. Every time.
Listening environment considerations and monitoring practices to accurately assess vocal intelligibility during mixing
A vocal that sounds perfectly present on studio monitors can vanish entirely on a phone speaker, and that gap trips up more mixes than any single EQ decision. Avid's guide makes the point directly: presence is a relative, contextual perception, so A/B testing needs to happen inside the full mix, never in solo.
Room acoustics distort what you're hearing before any plug-in gets involved. A room with untreated parallel walls builds up standing waves in the low-mid range, the exact 200–400 Kz zone where muddiness lives, making it hard to judge whether a cut there is actually needed or whether the room is lying to you. Basic acoustic treatment, even a few absorption panels at first reflection points, changes what decisions sound correct.
Monitoring at consistent, moderate volume matters more than most mixers admit. Cranking the volume makes a vocal feel present because loudness itself flatters clarity temporarily, masking problems that reappear the moment the level drops. Working at a controlled, slightly quieter level than feels exciting keeps your EQ and compression decisions honest.
Cross-referencing across playback systems isn't optional for intelligibility work specifically, because intelligibility is the exact quality that degrades most on compromised speakers. Check the mix on:
- Studio reference monitors, for accurate low-end and stereo detail.
- Earbuds or phone speakers, where presence and air bands do most of the intelligibility work.
- A single small speaker in mono, revealing masking problems stereo width can hide.
If the vocal reads clearly on all three, the presence and de-essing decisions made earlier in the chain are probably correct.
AubioMix perspective: how automated feedback complements manual mixing
Every EQ move above still needs a trained ear to execute. What automated analysis adds is speed: flagging boxiness, weak presence, or sibilance spikes before you spend twenty minutes hunting for them by sweep. That shortens A/B cycles and cuts guesswork, though it doesn't replace judgement. Our deeper drills on sibilance, boxy vocals, and vocal role in a mix go further than any report can.
— AubioMix
Get a structured intelligibility check before you finalise the mix
Everything in this piece is a manual workflow, sweep, cut, compress, de-ess, automate, and it works. But knowing which move to make first on a specific vocal, in a specific mix, is where most producers lose time second-guessing themselves.

Upload your mix to Aubiomix and get back a structured report covering EQ balance, compression behaviour, de-essing needs, and where automation would help most, alongside benchmarks measured against tracks in your genre. Instead of guessing whether that 2.5 kHz boost actually helped or just felt like it did in the moment, you get a concrete starting point and a way to measure the change. Producers working in electronic genres can check their mixes against real genre benchmark data to see exactly where a vocal sits relative to released tracks, then come back to this workflow with a clearer target instead of an educated guess.
Sources
- How to EQ Vocals: Essential Tips for Clarity & Presence
- Ultimate guide: How to EQ vocals for beginners
- How to Mix Vocals: Step-by-Step Guide for Home Producers | Titan Audio
- Mixing Vocals | Beat Kitchen