

Boxy vocals happen when energy piles up in the low‑mids, roughly 200 to 900 Hz, giving a voice that cardboard, cupped-hands quality instead of clarity. The quickest fix is a three-step triage: sweep a narrow EQ boost through that range to find the culprit frequency, apply a narrow cut or dynamic processing to tame it, then check whether the mic position or room is the real source. Source fixes work best, but a good mix engineer can rescue most takes at the desk.
TL;DR:
- Proper mic placement, acoustic treatment, and choice of microphone are more effective for permanent boxiness reduction than relying solely on EQ corrections.
- Dynamic processing techniques like dynamic EQ and multiband compression better manage boxiness that varies across performance, compared to static cuts.
- Sweeping a narrow EQ boost between 200 and 900 Hz helps identify problematic resonant frequencies specific to each voice and room.
- Verifying the fix in mono, on different systems, and with spectrum analysis ensures the low-mid hump is genuinely reduced without damaging vocal warmth.
- A measured before-and-after comparison using tools like AubioMix provides objective confirmation that boxiness has been effectively minimized.
Table of Contents
- Quick diagnostic checklist for boxy vocal sound
- How do you identify boxiness precisely?
- Source-level fixes: microphone, placement and quick acoustic remedies
- Mix-stage techniques: EQ, dynamic EQ and multiband compression
- Practical plugin settings for tackling a boxy vocal fix
- How to verify your boxy vocal fix actually worked
- How AubioMix helps diagnose and remove boxiness
- What actually matters when you're fixing boxy vocals
- Sources
Quick diagnostic checklist for boxy vocal sound
Before you touch a single EQ node, spend five minutes confirming what you're actually dealing with. I always start here because half the time the "fix" turns out to be a mic move, not a plugin.
Solo the vocal and listen with fresh ears. Boxy sound tends to get described as honky, nasal-adjacent, or like the singer recorded inside a cardboard box (which, frankly, is exactly what's happening tonally).
- Solo the vocal track and listen specifically for that muffled, congested quality rather than air or presence.
- Sweep a narrow bell boost slowly between 200 and 900 Hz while listening on headphones. Where it screams, that's your target.
- Grab a duvet or thick blanket and drape it near the mic as a temporary absorber, then re-record a few seconds. If the boxiness drops, your room is contributing.
- Solo the vocal, then unmute the full mix. If boxiness only appears with everything playing, you're dealing with masking from other instruments, not a vocal problem at all.
That last check matters more than most producers realise. A vocal that sounds perfectly clean in solo can turn boxy the moment a rhythm guitar or synth pad fills the same 300 to 500 Hz pocket.
How do you identify boxiness precisely?
Boxy vocals share a recognisable signature: a hollow, cupped, "singing into a bucket" quality that swallows articulation. It's distinct from muddiness (which sits lower, around 100 to 250 Hz) and from nasal tone (which spikes higher, near 1 to 2 kHz). The commonly cited range for boxiness sits between 200 and 900 Hz, with the worst offenders usually clustering in a tighter 250 to 600 Hz hotspot.
The sweep-and-identify method is the single most useful skill in this entire process, and it works the same way in every DAW:
- Load a parametric EQ on the vocal channel and set a narrow bell with a Q of around 4 to 6.
- Boost that band by 6 to 9 dB, then slowly sweep it from 200 Hz up towards 900 Hz while the track plays.
- Listen for the point where the vocal suddenly sounds harsh, honky, or exaggerated. That's your resonant frequency.
- Invert the boost into a cut at the same frequency and start with a modest reduction rather than matching the boost dB for dB.
- Bypass and re-engage the EQ repeatedly to confirm you're removing boxiness rather than just darkening the vocal.
The 300 to 600 Hz band deserves particular attention because it does double duty. It's the same region that gives a vocal warmth and body, so an over-aggressive cut here can leave a voice sounding thin and lifeless rather than clean. Sweep carefully and cut conservatively; you're hunting a spike, not flattening the whole neighbourhood.
Statistic to keep in mind: the 200 to 900 Hz range is the working definition most mixing engineers use for boxiness, but the actual offending frequency is different for every singer, mic, and room. Treat that range as a search zone, not a fixed target.
Beyond your ears, a spectrum analyser earns its place here. Watch for a persistent hump in the low-mids that doesn't move with the melody, which usually signals a room resonance or mic proximity issue rather than something baked into the performer's voice. Checking the mix in mono also reveals problems that stereo widening can mask, since low-mid buildup often becomes more obvious once the stereo image collapses. If you suspect masking, mute surrounding instrument buses one at a time. A vocal that clears up the moment you drop the rhythm guitar tells you the fix belongs on the guitar, not the singer.
Source-level fixes: microphone, placement and quick acoustic remedies
Mixing engineers love talking about plugins, but the cheapest and most effective boxy vocal fix almost always happens before the signal even reaches your interface. A Sound on Sound studio case study found that adjusting mic distance and introducing a simple absorber produced noticeable improvements without touching a single plugin.
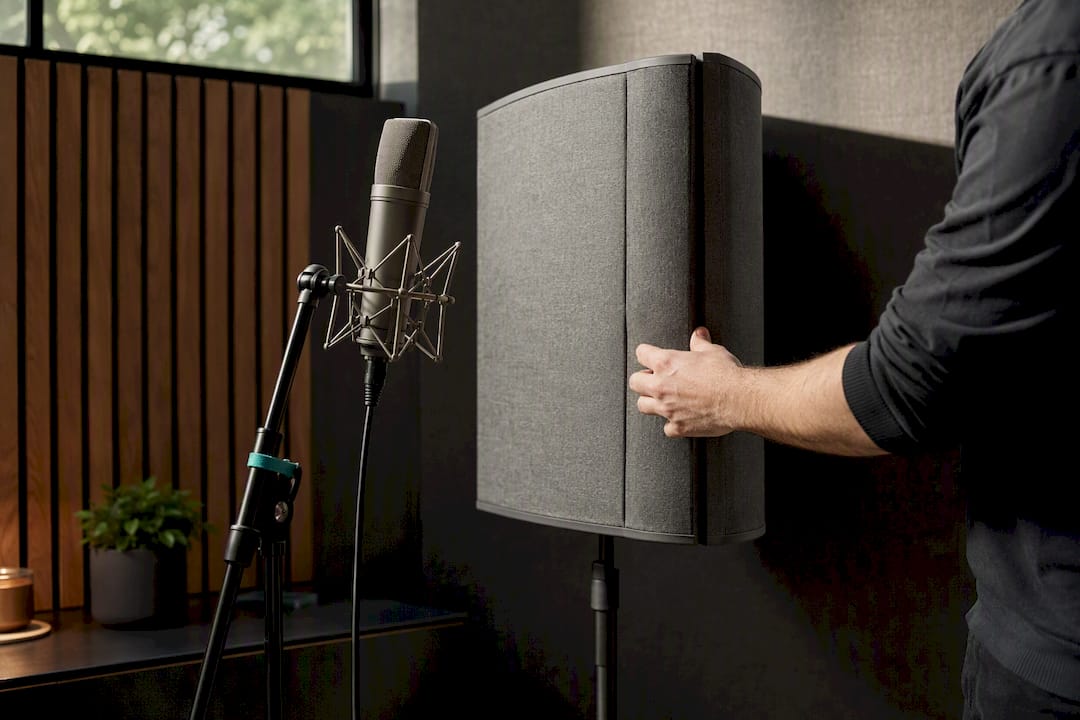
Microphone choice matters more than people admit. A large-diaphragm condenser flatters most voices but also captures more room information, which can amplify boxiness in an untreated space. A dynamic microphone, being less sensitive and more directional, often sounds tighter and less boomy in a bedroom studio, even if it costs less than the condenser sitting next to it. If your room is small, untreated, or shared with a washing machine, consider that the "better" mic on paper might be the worse mic for your actual space.
Proximity effect is either your best friend or your worst enemy, depending on how you manage it. Getting close to a cardioid or figure-8 mic boosts low frequencies, which can sound rich on some voices and boxy on others. Start at 6 to 12 inches from the capsule and move in small increments from there.
- Start at 6 to 12 inches and adjust from there rather than assuming closer always sounds better.
- Try angling the vocalist slightly off-axis (10 to 15 degrees) if the on-axis sound feels congested; this often reduces boxiness without losing presence.
- Walk the room during a scratch take and listen for spots where the voice sounds most open, then set up there.
- Physically inspect the space for anything that might resonate sympathetically, including hanging guitars, loose picture frames, or shelving, since sympathetic resonance from nearby objects can add exactly the kind of low-mid buildup you're trying to avoid.
- Move any hard, parallel surfaces out of the direct reflection path, or hang a duvet, moving blanket, or reflection filter between the singer and the nearest wall.
- Avoid recording in corners. Room modes concentrate low-mid energy exactly where boxiness lives, and corners are where those modes stack hardest.
Pop filter placement is a smaller detail that trips up more home studios than you'd expect. Position it too close to the capsule and you risk comb filtering, an interference pattern between the direct and reflected sound off the filter itself, which can read as an odd resonant colouration. Keep roughly a couple of inches between the pop filter and the mic to sidestep the issue entirely.
Pro Tip: Record three quick takes at slightly different mic distances and angles before committing to a full vocal session. Comparing them back to back takes two minutes and can save you an entire afternoon of corrective EQ later.
So when do you accept the take and fix it in the mix versus re-recording? If the boxiness is mild and consistent, EQ and dynamic processing will handle it fine. If it's severe, inconsistent across phrases, or clearly tied to a room mode that shifts with the singer's head movement, a quick re-record with the mic repositioned will save you far more time than chasing it with plugins. For practical guidance on capturing a cleaner take from the start, the narration recording techniques from OutaStory cover similar ground on distance and room awareness, even though their focus is voiceover work rather than singing.
Mix-stage techniques: EQ, dynamic EQ and multiband compression
Once you've done what you can at the source, the mix desk takes over. Three tools handle boxy vocal frequencies at this stage, and knowing when to reach for each one separates a competent fix from a great one.
Static EQ is your first move and the simplest to reason about. Having already found the resonant frequency with the sweep method, apply a narrow cut there, starting conservatively at −3 to −6 dB. Static cuts work well when the boxiness is constant throughout the performance, but they'll also thin out the vocal during passages where the resonance wasn't actually a problem, since the cut applies whether it's needed or not.
Dynamic EQ solves that exact limitation. Rather than cutting all the time, a dynamic EQ node only engages once the signal crosses a threshold at the target frequency, which means quieter, cleaner passages pass through untouched while the louder or more resonant moments get tamed. This is the better choice whenever boxiness comes and goes across a performance, which, if you're honest, describes most vocal takes.
Multiband compression offers a third path, and it's particularly effective when the low-mid buildup interacts with the vocal's overall dynamics rather than sitting at one fixed frequency. Instead of a single narrow band, you're compressing a broader low-mid region only when it exceeds a set threshold. Dynamic processing here preserves the vocal's natural body during quieter passages while still controlling the resonance when it flares up.
| Technique | Best for | Typical starting point |
|---|---|---|
| Static EQ cut | Constant, unchanging boxiness | Narrow Q, −3 to −6 dB cut |
| Dynamic EQ | Boxiness that appears on certain words or notes | Threshold set to engage only above problem level |
| Multiband compression | Broad low-mid buildup tied to dynamics | Attack around 8–10 ms, moderate gain reduction |
| Sidechain on instrument bus | Vocal and instrument competing in the same band | Duck instrument bus 200–900 Hz when vocal is present |
For multiband compression specifically, an attack time around 8 to 10 milliseconds is a sensible starting point. Slightly slower attacks let the initial transient through, which keeps consonants and articulation intact, while the sustained low-mid energy still gets caught and controlled. Release should generally track the tempo and phrasing of the vocal rather than sitting on a fixed value; a release that's too fast will pump audibly, while one that's too slow won't recover in time for the next line.
Sidechaining an instrument bus against the vocal is an underused trick worth adding to your toolkit. If a rhythm guitar or synth pad occupies the same 200 to 900 Hz territory as the vocal, a gentle ducking EQ triggered by the vocal, rather than cutting the vocal itself, clears space without touching the voice at all. This is often the better call when your earlier masking check revealed the boxiness only shows up in the full mix.
- Apply static cuts first if the resonance is constant across the whole performance.
- Switch to dynamic EQ if the boxiness only appears on certain syllables, notes, or dynamic peaks.
- Reach for multiband compression when the issue is broader than a single frequency and tied to loudness.
- Consider sidechaining a competing instrument bus before you cut anything on the vocal itself.
- Always check a high-pass filter isn't doing more damage than good; removing too much below 100 Hz can make an already-thin vocal sound hollow rather than clean.
A word of caution on high-pass filters here, since they get misused constantly. They're excellent for removing rumble and proximity buildup below the vocal's fundamental, but pushing the cutoff too high in an attempt to "fix" boxiness will hollow out the voice rather than clean it. Boxiness lives higher than most HPF cutoffs; don't reach for the wrong tool.
Practical plugin settings for tackling a boxy vocal fix
Here's the cheat sheet I'd hand a junior engineer on day one. These are starting points, not gospel. Every voice, mic, and room combination needs its own tuning.
- EQ sweep for detection: set Q between 3 and 6 for a narrow, surgical search; widen the Q afterwards if the boxiness turns out to be broad rather than a single spike.
- Initial correction cuts: start at −3 to −6 dB on the identified frequency, then A/B before pushing further; wider, gentler cuts suit broad boxiness better than one deep narrow notch.
- Dynamic EQ threshold: set it just above the level of your cleanest, least-boxy phrases, so the processing only engages when the resonance actually flares.
- Multiband compressor attack: 8 to 10 ms is a reliable starting point; slower attacks preserve transient clarity, faster attacks control sustained buildup more aggressively.
- Multiband compressor release: tie it loosely to the tempo and phrase length rather than a fixed millisecond value; retune by ear against the vocal's natural rhythm.
- High-pass filter cutoff: start between 60 and 120 Hz depending on how close the mic was during tracking; a 12 to 24 dB per octave slope is typical, steeper for voices with heavy proximity boost.
For deeper technique on the dynamic side of this equation, our guide to dynamic EQ walks through threshold and range settings in more detail, and the companion piece on using compression on vocals covers how multiband and standard compression interact when you're stacking processors on a single channel.
A few generic tool categories are worth knowing by name, even without brand specifics: spectral notchers that automatically find and suppress narrow resonances, dynamic resonance suppressors that act like an automated version of the sweep method, and split-band EQ designs that let you treat the low-mids independently from the rest of the vocal's spectrum. Any of these can speed up the workflow once you understand what they're actually doing under the hood.
How to verify your boxy vocal fix actually worked
Fixing boxiness is only half the job. Confirming it stuck, in context, without collateral damage, is the half most producers skip.
- Level-match before you A/B. A cut always sounds "worse" on a naive comparison simply because it's quieter. Match gain between the processed and unprocessed signal before judging tone.
- Bypass repeatedly, not just once. Toggle the plugin on and off several times across different sections of the song, not just the chorus, to catch verse-only or bridge-only issues.
- Check in mono. Low-mid problems that hide in a wide stereo mix often reveal themselves the moment you sum to mono, since phase interactions can mask or exaggerate the exact frequencies you're targeting.
- Play it on more than one system. Studio monitors, a phone speaker, and a car stereo each reveal different things; boxiness that vanishes on monitors sometimes reappears on smaller speakers with peaky low-mid response.
- Bring in a reference track. Pick a commercial mix in a similar genre and compare your vocal's low-mid balance against it directly; this keeps you from over-correcting based on ear fatigue alone.
- Document every setting you change. Small, incremental adjustments retested in the full arrangement beat one big sweeping change you can't easily undo or explain later.
- Watch a spectrum analyser during playback. Confirm the low-mid hump you identified earlier has actually dropped, rather than just trusting that it sounds better after twenty listens in a row.
Pro Tip: Save a "before" bounce of the raw vocal the moment you finish tracking, before any corrective EQ touches it. Ear fatigue sets in fast during a long mixing session, and having that original file to A/B against hours later is often the only way to tell if you've actually fixed the boxiness or just gotten used to it.
How AubioMix helps diagnose and remove boxiness
Ears get tired, and after the fifth pass on a vocal channel, it's genuinely hard to tell whether you've fixed the boxiness or just talked yourself into liking it less loud. That's exactly where an objective second opinion earns its keep.
Aubiomix analyses an uploaded mix and reports directly on spectral balance across the frequency spectrum, flagging where low-mid energy is sitting relative to typical mix targets and calling out masking between instruments and vocals in that same 200 to 900 Hz territory. Instead of guessing whether your sweep-and-cut actually solved the problem, you get a measured read on where the energy sits now versus where it was.
- Upload your rough vocal or full mix before you start corrective EQ to get a baseline read on low-mid buildup and any masking flags.
- Run corrective EQ, dynamic processing, or a re-record based on the report's guidance.
- Upload the revised mix and compare the two reports side by side to confirm the low-mid reduction actually happened rather than just sounding different.
- Use the detailed written feedback alongside the visual benchmarks to understand not just that boxiness dropped, but by roughly how much, and whether nearby frequencies suffered as a side effect.
That before-and-after comparison matters more than it sounds. It's the same logic behind checking the vocal in solo versus the full mix; you're removing your own ear fatigue and personal bias from the judgement. For a broader look at how vocal tone fits into the rest of the arrangement, the guide on the role of vocals in a mix is worth a read once the boxiness itself is under control.
What actually matters when you're fixing boxy vocals
Most guides on this topic treat boxiness as a plugin problem, and that's the conventional wisdom I'd push back on hardest. The evidence points the other way: mic distance, room treatment, and pop filter placement solve more boxy vocal problems than any EQ curve ever will, and they solve them permanently rather than papering over a bad take.

Where the standard advice falls short is in treating every fix as static. Boxiness rarely behaves consistently across an entire vocal performance, which is exactly why dynamic EQ and multiband compression outperform a fixed narrow cut so often. If your first instinct is always a static EQ node, you're solving half the problem and thinning the vocal for the other half.
Prioritise in this order: fix the room and mic position first, use the sweep method to find the actual resonance rather than guessing, and reach for dynamic processing before static cuts whenever the boxiness comes and goes. Then verify with fresh ears, or better, with a measurement tool that doesn't suffer from ear fatigue after the tenth listen.
— AubioMix
Sources
The sweep-and-identify method, dynamic EQ thresholds, and multiband compression settings covered here draw on established mixing technique rather than any single source, but a few references are worth bookmarking. Waves' guide to fixing boxy vocals and Avid's EQ technique breakdown both cover the frequency ranges in more depth, while Audio Issues' multiband compression walkthrough is the clearest explanation of attack and release tuning I've come across. For the low-mid band specifically, our own breakdown of low mids and how they shape a mix is a useful companion piece. None of this replaces testing on your own material though; every voice, mic, and room reacts slightly differently.
- How to Fix Boxy Vocals | Blog
- How to EQ vocals: essential tips for clarity & presence
- Studio SOS: boxy vocals and weedy mix (Sound on Sound)
- How To Get Rid of Boxy Vocals With Multi-band Compression