

Use a two-stage approach: a fast peak-catching compressor followed by a slower density compressor, targeting a moderate gain reduction on your loudest vocal phrases. That single workflow covers the vast majority of what you need when you use compression on vocals in a modern DAW. Here is the quick setup you can run right now:
- Stage 1 (peak catcher): ratio 4:1–6:1, attack 5–15 ms, release 60–80 ms. Watch the gain-reduction meter; it should only flicker on the hardest hits.
- Stage 2 (density/glue): ratio 2:1–3:1, attack 20–40 ms, release 80–120 ms. Aim for a steady 2–4 dB of gain reduction across the phrase.
- Parallel option: duplicate the track or send to a bus, compress heavily, then blend 20–30% back in for thickness without killing transients.
- Verify: check integrated LUFS and true peak with a LUFS-aware meter or upload your stem to Aubiomix for an objective dynamics report.
Starting settings at a glance: ratio 3:1–6:1 / attack 10–30 ms / release 60–100 ms / GR target 4–6 dB on loud phrases.
Those numbers come from converging advice across professional tutorials, and they give you a reliable launchpad before your ears take over.
Key takeaways
Effective vocal compression comes down to splitting the work across two stages, targeting 4–6 dB of gain reduction on loud phrases, and verifying the result with objective loudness metrics before you call the mix done.
| Point | Details |
|---|---|
| Two-stage serial chain | Use a fast peak catcher (4:1–6:1, 5–15 ms attack) followed by a slower glue compressor (2:1–3:1, 20–40 ms attack) for transparent results. |
| GR target: 4–6 dB | Watch the gain-reduction meter on loud phrases; sustained reduction above 10 dB signals over-compression. |
| Parallel for thickness | Blend a heavily compressed parallel bus at 20–30%, with a high-pass filter at 150–200 Hz, to add density without crushing transients. |
| Pre-process first | Use clip gain and automation to level extreme outliers before compression, and treat sibilance with a dedicated de-esser rather than lowering the threshold. |
| Verify with Aubiomix | Upload your vocal stem to Aubiomix to check LUFS, true peak, and dynamic range metrics and get specific, written feedback on compression decisions. |
Table of Contents
- Why should you compress vocals in the first place?
- How do compressor controls work, and what are the best starting settings?
- How does serial compression give you a more natural vocal sound?
- When does parallel compression work better than serial?
- Tonal compression versus dynamic compression: which do you need?
- Why pre-processing before compression makes everything easier
- Which compressor plugins and hardware should you use on vocals?
- A 7-step workflow from raw take to finished vocal bus
- Troubleshooting: pumping, dull vocals, and sibilance jumping out
- How Aubiomix can verify and improve your compressed vocal
- The case for trusting your ears over the rules
- Get objective feedback on your compressed vocal
- Sources
Why should you compress vocals in the first place?
A raw vocal performance has enormous dynamic range. A singer might whisper one line and belt the next, and that 20 dB swing will bury the quiet moments and clip the loud ones in any mix. Vocal compression reduces the difference between the loudest and quietest parts so the performance sits consistently in the mix, phrase by phrase, word by word.
The musical outcomes you are chasing fall into three categories:
- Consistency: every word is audible without constant fader rides.
- Presence: a compressed vocal feels closer, more intimate, more "in your face" in a good way.
- Glue: the vocal locks into the rhythm of the track rather than floating above it.
Different contexts call for different amounts of compression. A pop lead vocal in a dense production needs aggressive control, often 6–8 dB of average gain reduction, so it cuts through layers of synths and drums. A spoken-word podcast or voice-over benefits from moderate, transparent compression that smooths delivery without sounding processed. Backing vocals usually get lighter treatment, perhaps 2–4 dB, so they blend without drawing attention to themselves.
A gain-reduction meter is your primary diagnostic tool here. If the needle barely moves, you are not controlling dynamics. If it is pinned constantly, you are squashing the life out of the performance. Aubiomix's dynamics metrics give you an objective read on whether your vocal's dynamic range is appropriate for the genre and arrangement, which is especially useful when your ears have gone numb after a long session.
How do compressor controls work, and what are the best starting settings?
Understanding each parameter lets you make deliberate choices rather than guessing. Here is a plain-language breakdown of the core controls and what they actually do to your vocal.
Threshold sets the level above which compression kicks in. Lower it and the compressor works more of the time; raise it and only the loudest peaks get caught. Start with the threshold set so the gain-reduction meter moves 4–6 dB on your loudest phrases and barely registers on quieter ones, as recommended by MusicProductionWiki.
Ratio determines how much the signal is reduced once it crosses the threshold. A 4:1 ratio means a signal 4 dB above threshold comes out only 1 dB above it. For most lead vocals, 3:1–6:1 covers the range from gentle control to assertive peak management.
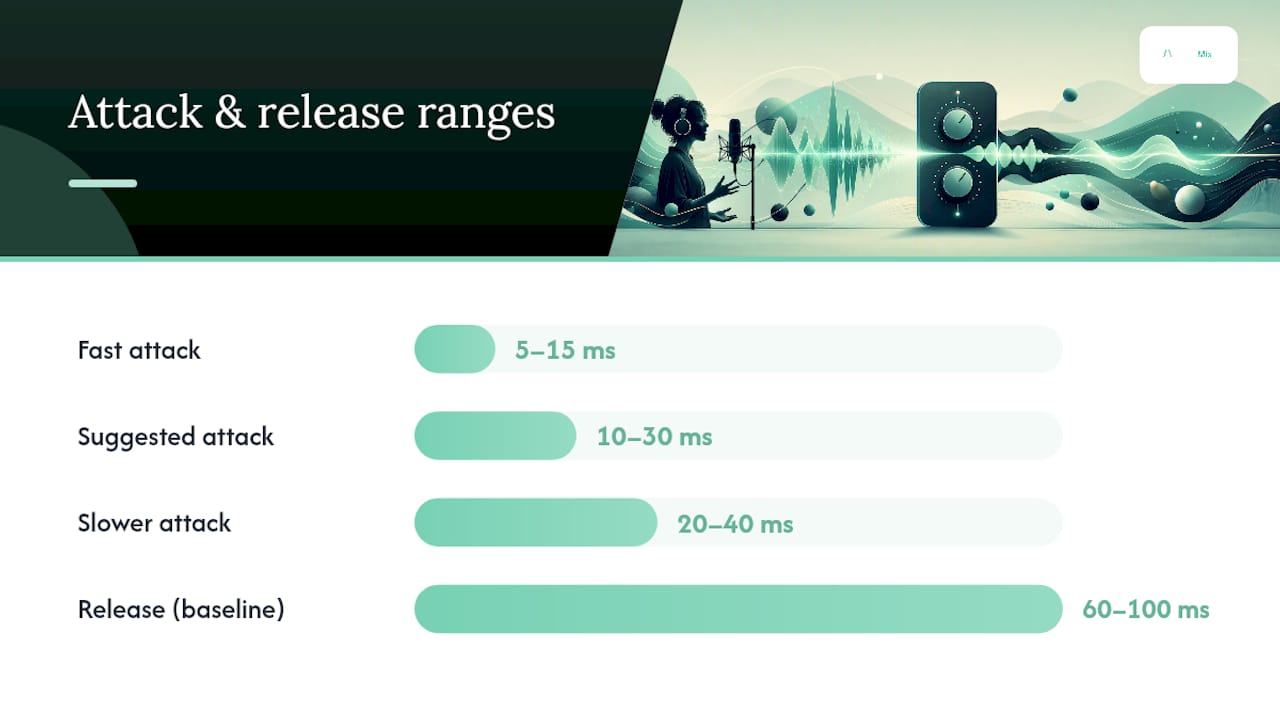
Attack controls how quickly the compressor clamps down after the signal crosses the threshold. A fast attack (5–15 ms) grabs transients immediately; a slower one (20–40 ms) lets the initial consonant through before compression engages, which preserves natural articulation and punch.
Release sets how quickly the compressor lets go after the signal drops below the threshold. Too short and you get pumping; too long and the compressor stays engaged through the next phrase. The 60–100 ms range is a sensible baseline for pop vocals, though many engineers prefer an auto-release mode on vocals because phrasing is irregular and a fixed release can cause pumping in sections with dense, rapid-fire lyrics.
Makeup gain compensates for the level lost during compression. Apply just enough to match the perceived loudness of the uncompressed signal when you bypass the compressor; this prevents you from mistaking louder for better.
Knee determines how gradually compression engages around the threshold. A soft knee eases in gently, which sounds more natural on vocals; a hard knee is more assertive and suits peak-catching duties.
| Parameter | Suggested starting point | What to listen for |
|---|---|---|
| Ratio | 3:1–6:1 | Consistent level across phrases |
| Attack | 10–30 ms | Natural consonants, no dullness |
| Release | 60–100 ms | No pumping between words |
| GR target | 4–6 dB on loud phrases | Meter moving, not pinned |
| Makeup gain | Match bypass level | No perceived loudness jump |
Once you have dialled in these settings, run a LUFS check. Integrated LUFS tells you whether the vocal's overall loudness is sitting where it should relative to the mix, and it catches the common mistake of adding so much makeup gain that the vocal becomes fatiguing over a full track. For a deeper look at audio compression concepts and meter use, the fundamentals are worth revisiting alongside these practical settings.
How does serial compression give you a more natural vocal sound?
Serial compression means placing two compressors in sequence on the same channel, each doing a modest share of the work. The logic is straightforward: splitting gain reduction across two compressors produces more transparent dynamics control than asking one unit to deliver heavy reduction on its own. When a single compressor is pushed hard, its character becomes exaggerated and the artefacts, whether that is pumping, distortion, or tonal colouration, become audible. Two compressors, each working lightly, stay in their sweet spot.
Here is how to set up a practical two-stage chain:
- Stage 1 (peak catcher): Use a fast, transparent compressor (a FET-style plugin or a clean VCA). Set ratio 4:1–6:1, attack 5–15 ms, release 60–80 ms. The meter should only move on the hardest transients. This stage tames the peaks that would otherwise cause the second compressor to overreact.
- Stage 2 (density/glue): Use a slower, more coloured compressor (optical-style works well here). Set ratio 2:1–3:1, attack 20–40 ms, release 80–120 ms. This stage provides steady, musical gain reduction that adds presence and glue.
A useful practical tip: when setting the threshold on your peak catcher, loop the loudest section of the vocal and watch the gain-reduction meter in real time. That way you are tuning the compressor to the actual problem area rather than an averaged read of the whole track.
Pro Tip: If the vocal still sounds uneven after two stages, do not reach for more compression. Instead, use clip gain or volume automation to manually level out the two or three most extreme phrases before the signal even hits the compressors. This keeps both units working musically rather than firefighting.
Some engineers invert the order for certain vocal styles, placing the slower, coloured compressor first to shape the tone and then using the fast compressor to catch any peaks that slip through. This is less common but worth experimenting with on a warm, breathy vocal where you want the optical character upfront. For a third stage, a gentle limiter on the vocal bus catching 2–3 dB of the remaining peaks is a clean safety net, as covered in the bus compression guide.
When does parallel compression work better than serial?
Parallel compression routes a heavily compressed copy of the vocal alongside the dry signal and blends the two together. The result is added density and thickness without the transients being crushed, because the unprocessed signal preserves the attack of each word while the compressed signal fills in the body and sustain.
Here is how to set it up step by step:
- Duplicate the vocal track in your DAW, or create an aux send and route the vocal to a dedicated parallel bus.
- On the parallel track or bus, apply heavy compression: ratio 8:1 or higher, fast attack (5–10 ms), medium release (60–80 ms). You want the signal to be noticeably squashed.
- Apply a high-pass filter at 150–200 Hz on the parallel bus to prevent low-frequency build-up when you blend the compressed material back in.
- Bring the parallel fader up until you hear the vocal thicken, then back off slightly. A blend of around 20–30% parallel to 70–80% dry is a practical starting point, though your ears should make the final call.
- Check that the blended result does not feel louder than the dry signal alone; if it does, trim the parallel fader down and re-evaluate.
The routing and blend technique for parallel compression is worth studying in detail if you want to go deeper on the filter and fader mechanics.
Parallel compression tends to work best on genres where you want a vocal to feel powerful and present without sounding over-processed: R&B, hip-hop, and modern pop all benefit from this approach. It is also useful on backing vocal stacks where you want thickness without each individual voice sounding squashed. Serial compression is usually the better choice when the vocal has extreme dynamic swings that need taming before anything else, because parallel compression does not actually reduce peaks; it only adds density around them.
Tonal compression versus dynamic compression: which do you need?
Not all compression is about level control. Some compressors add colour, warmth, and character as a side effect of their circuit design, and engineers often reach for them specifically for that tonal quality rather than their gain-reduction behaviour. Understanding the difference helps you choose the right tool for each job.
Dynamic compression is primarily about level control. The goal is transparent, accurate gain reduction with minimal colouration. Clean VCA-style compressors and most modern digital plugins fall into this category. Use them when you want the vocal's natural character to come through and you simply need to manage the dynamic range.
Tonal compression uses the compressor's character as a creative tool. Optical compressors like the LA-2A have a slow, programme-dependent response that adds warmth and a gentle, musical quality to vocals. FET compressors like the 1176 have a fast, aggressive character that adds presence and a slight harmonic edge. These are not just level-control tools; they are tone-shaping tools that happen to compress.
Common compressor types and their vocal roles:
- Optical (e.g. LA-2A style): warm, slow, musical. Excellent for the glue/density stage in a serial chain or as a standalone compressor on a smooth, breathy vocal.
- FET (e.g. 1176 style): fast, punchy, slightly aggressive. Ideal for the peak-catching stage or for adding presence to a vocal that needs to cut through a dense mix.
- VCA: tight, accurate, versatile. Works well for transparent peak control and bus compression.
- Dynamic EQ / multiband: frequency-selective dynamics control. Use when a specific frequency range is causing problems, such as a boxy low-mid buildup or a harsh upper-mid peak that only appears on certain vowels.
During tracking, tonal compression can be printed to tape or to the recorded file if you are confident in your settings; this commits the character early and can inspire a better performance. During mixing, you have more flexibility to experiment, so using a transparent compressor first and adding a coloured compressor as a second stage is a common and sensible approach.
Why pre-processing before compression makes everything easier
Compression amplifies whatever is already in the signal. If you have a loud plosive, a harsh sibilant burst, or a phrase that is 10 dB louder than everything else, the compressor will react to those problems and behave erratically everywhere else. A small amount of prep work before the compressor makes the whole chain behave more musically.
Clip gain and volume automation are your first tools. Before the signal even reaches a compressor, manually reduce the gain of the two or three loudest phrases using clip gain in your DAW. This is not about making everything the same level; it is about removing the extreme outliers so the compressor can work within a sensible range. Similarly, automate the fader to ride the vocal through sections where the performance dynamics are too wide for compression alone to handle.

De-essing is a separate dynamics problem and should be treated as such. A de-esser is a frequency-selective compressor that reduces sibilant energy, typically in the 4–8 kHz range, where harsh 's' and 't' sounds live. Treating sibilance as its own dynamics issue and routing it to a dedicated de-esser rather than trying to cure it by lowering the compressor threshold is the professional approach. Lowering the threshold to tame sibilance causes the compressor to over-react on every loud phrase, not just the sibilant ones.
A typical de-esser setup targets a narrow band around 5–7 kHz with reductions of a few dB on the worst offenders. For a thorough treatment of sibilance control in the mix, the techniques go well beyond what a compressor alone can achieve.
Pro Tip: Place your de-esser after the first compressor in a serial chain. The peak-catching compressor may actually increase the perceived brightness of sibilants by reducing the level of everything around them, so de-essing after that stage gives you a more accurate read of the problem.
Plosive handling belongs even earlier in the chain. A high-pass filter set around 80–100 Hz removes the low-frequency thump of 'p' and 'b' sounds before they ever reach a compressor. For anything more severe, manual editing in the DAW, cutting or reducing the gain of individual plosive transients, is faster and cleaner than trying to compress them away. The guide to plosives in vocal recording covers the editing workflow in detail.
Which compressor plugins and hardware should you use on vocals?
The market is full of options, but a handful of tools appear on professional vocal chains again and again. Here is a practical breakdown of the must-know units and what each one actually does.
-
1176 (FET-style compressors and emulations): the 1176 is fast, punchy, and slightly aggressive. Its all-buttons-in mode delivers a dense, saturated sound that has defined the character of countless rock and pop vocals. Use it as the peak catcher in a serial chain, or as a standalone compressor when you want presence and edge. Plugin emulations from Universal Audio, Waves, and Softube are all widely used.
-
LA-2A (optical-style compressors and emulations): the LA-2A has a slow, programme-dependent release that makes it almost impossible to set badly on vocals. It adds warmth and a gentle, musical compression that sits beautifully as the second stage in a serial chain. It is less suited to catching fast transients but exceptional for glue and tonal character.
-
Waves R-Vox: a vocal-specific compressor with an integrated gate and simple controls. It is designed to be quick to set up and forgiving to use, making it a practical choice for producers who want consistent results without deep parameter tweaking. The gate helps clean up noise between phrases, which is a genuine time-saver on busy sessions.
-
oeksound Soothe2: technically a dynamic resonance suppressor rather than a traditional compressor, but it belongs in any serious vocal processing discussion. Soothe2 targets harsh, resonant frequencies in real time, reducing them only when they appear. It is the cleanest solution for a vocal that has a persistent harshness in the 2–5 kHz range that a static EQ cut would affect too broadly.
-
Soundtoys Decapitator: an analogue saturation plugin rather than a compressor, but it is often used alongside compression on vocals to add harmonic density and warmth. A light setting on Decapitator can make a compressed vocal feel more alive and three-dimensional, compensating for the slight flatness that heavy gain reduction can introduce.
Mixing coloured gear with transparent plugins is a deliberate choice, not a compromise. Use a clean VCA or digital compressor for accurate peak control, then add an 1176 or LA-2A emulation for character, and finish with a touch of Decapitator if the vocal needs more life. Each tool has a specific job; stacking them all for the same purpose just creates a muddy, over-processed mess.
A 7-step workflow from raw take to finished vocal bus
This is the order of operations we follow on a typical session. Work through it top to bottom and you will have a vocal that sits, breathes, and translates.
-
Clean up the take. Edit out noise between phrases, fix any obvious tuning issues, and check for clipping on the recorded file. A clean starting point means every subsequent step behaves predictably.
-
Apply clip gain. Manually reduce the gain of the loudest two or three phrases so the dynamic range of the track is roughly even before any plugin touches it. Watch the waveform; you are looking for outliers, not perfection.
-
Stage 1 compression (peak catcher). Insert a fast, transparent compressor. Set ratio 4:1–6:1, attack 5–15 ms, release 60–80 ms. Loop the loudest section and set the threshold so the gain-reduction meter moves 3–5 dB on the peaks. Check: meter moves only on hard hits.
-
De-essing. Insert a de-esser after the first compressor. Target the sibilant band (typically 5–7 kHz) and reduce by a few dB on the worst offenders. Check: 's' sounds are controlled but not lispy.
-
Stage 2 compression (density/glue). Insert a slower, more coloured compressor. Set ratio 2:1–3:1, attack 20–40 ms, release 80–120 ms. Aim for 2–4 dB of steady gain reduction. Check: vocal feels present and locked in without sounding squashed.
-
Parallel top-up (optional). If the vocal still lacks thickness, blend in a heavily compressed parallel bus at 20–30%. Apply a high-pass filter at 150–200 Hz on the parallel bus before blending. Check: vocal feels thicker without transients being dulled.
-
Bus compression and limiting. Route the vocal to a vocal bus. Apply gentle bus compression (ratio 2:1, slow attack, 2–3 dB GR) for cohesion, then add a limiter as a final safety net catching 2–3 dB of the remaining peaks. Check integrated LUFS and true peak before bouncing.
Genre-appropriate starting settings vary, but the table below gives you a practical reference:
| Genre | Ratio | Attack | Release | GR target |
|---|---|---|---|---|
| Pop lead vocal | 4:1–6:1 | 10–20 ms | 60–80 ms | 5–7 dB |
| R&B / soul | 3:1–4:1 | 20–30 ms | 80–100 ms | 4–6 dB |
| Rock vocal | 4:1–6:1 | 5–15 ms | 50–70 ms | 6–8 dB |
| Acoustic / folk | 2:1–3:1 | 25–40 ms | 80–120 ms | 3–5 dB |
These are starting points from genre-appropriate guidance; your ears and the specific performance always have the final say.
Troubleshooting: pumping, dull vocals, and sibilance jumping out
Even with solid starting settings, things go wrong. Here are the most common problems and the fastest fixes.
- Pumping: the mix audibly breathes in time with the vocal. Fix: lengthen the release time, or switch to an auto-release mode. Programme-dependent release modes are particularly useful on vocals because phrasing is irregular and a fixed release can cause pumping in dense lyrical sections.
- Dull, lifeless vocal: the consonants have lost their snap and the vocal feels buried. Fix: slow the attack time. A slower attack lets the initial transient through before compression engages, restoring articulation and presence.
- Sibilance jumping out after compression: the 's' sounds feel louder than before. Fix: add a dedicated de-esser after the compressor rather than lowering the threshold. Lowering the threshold to tame sibilance causes the compressor to over-react on every loud phrase, not just the sibilant ones.
- Vocal disappearing in the chorus: the compressor is working too hard on the loudest section and pulling the vocal down. Fix: use clip gain or automation to reduce the gain of the loudest phrases before the compressor, so it never has to work that hard.
- Harsh, resonant mid-range: a static EQ cut is affecting too much of the vocal. Fix: use a dynamic EQ or oeksound Soothe2 to target the resonant frequency only when it appears.
A useful meter-based check: if your gain-reduction meter is showing sustained reduction of more than 10 dB, you are almost certainly over-compressing. The vocal will sound squashed, fatiguing, and flat. Back off the threshold, reduce the ratio, or split the work across two stages. For a broader look at signs your mix needs attention, over-compressed vocals are one of the most common red flags.
Meter check: sustained gain reduction above 10 dB on a lead vocal is a reliable indicator of over-compression. Aim for 4–6 dB on loud phrases as your ceiling, not your floor.
When compression is not the answer, automation is. If a specific word or phrase is consistently too loud or too quiet, draw in a volume automation curve rather than pushing the compressor harder. Automation is precise, transparent, and does not introduce the artefacts that heavy compression can.
How Aubiomix can verify and improve your compressed vocal
Once you have worked through the compression chain, it is worth getting an objective read on the result. Your ears adapt to what they have been hearing for hours, and what feels balanced in the session can translate poorly on other playback systems.
Aubiomix analyses uploaded audio files and returns detailed feedback across 15+ areas of mixing and mastering, including the dynamics metrics that relate directly to compression decisions. Specifically, it measures:
- Integrated LUFS: tells you whether the vocal's overall loudness is appropriate for the genre and the mix context.
- True peak: flags any peaks that have slipped through the compressor and limiter chain.
- Dynamic range (LRA and crest factor): shows whether the vocal has been over-compressed (low LRA, low crest factor) or under-compressed (high LRA, inconsistent crest factor).
- Transient balance: indicates whether the attack of consonants is being preserved or crushed, which maps directly to your attack time settings.
For the most useful feedback, upload a stem of the vocal with all processing active rather than the full mix. This isolates the compression decisions from everything else in the arrangement and gives Aubiomix a clear signal to analyse. Include any parallel bus processing in the bounce so the report reflects the actual blended result.
When you receive the report, look at the dynamics section first. If the LRA is very low and the crest factor is compressed, the feedback will typically suggest backing off the threshold or slowing the attack. If true peak is clipping, the limiter stage needs attention. You can then adjust your GR targets, re-bounce the stem, and re-upload to track the improvement. The loudness metrics glossary explains LUFS, true peak, and crest factor in plain language if any of those terms are new to you.
Pro Tip: Run the analysis on both the vocal stem and the full mix. Sometimes a vocal that looks perfectly compressed in isolation is actually sitting too dynamically in the context of the full arrangement, and the mix-level report will flag that discrepancy.
The case for trusting your ears over the rules
There is a version of vocal compression advice that turns into a checklist religion: always use serial compression, always target 4–6 dB, always de-ess after stage one. Those rules exist because they work reliably across a wide range of material, and we have covered them in detail throughout this guide for exactly that reason.
But the most interesting vocal sounds in recorded music often come from breaking those rules deliberately. An 1176 pushed into heavy limiting on a rock vocal, a single optical compressor set to barely touch the signal on a folk track, a parallel bus blended so aggressively it almost sounds like a separate instrument underneath the lead. None of those choices would survive a strict checklist audit, but they serve the song.
The two-stage workflow and the GR targets are your safety net, not your ceiling. Use them to get a vocal that works, then ask whether it is the right kind of working for the track you are making. A technically correct vocal that feels sterile is a worse outcome than a slightly imperfect one that has character and emotion. The meters and the reports are there to catch genuine problems, not to replace the creative judgement that makes a mix memorable.
Get objective feedback on your compressed vocal
After all that compression work, the last thing you want is to discover on release day that the vocal was sitting wrong in the mix all along. Aubiomix gives you a professional-grade dynamics report in minutes: upload your vocal stem or full mix, and you get written feedback, visual analysis, and a downloadable PDF covering LUFS, true peak, dynamic range, transient balance, and more across 15+ mixing and mastering areas.

Prepare your file by bouncing the vocal stem with all processing active, including the parallel bus if you are using one. The report will flag over-compression, clipping peaks, and dynamic range issues with specific, actionable steps so you know exactly what to adjust. Aubiomix works on a pay-as-you-go credit basis or via a monthly or annual subscription, so you can run a single analysis or build it into every session without a long-term commitment. Upload your mix to Aubiomix and get your compression feedback today.
Sources
The following sources were used to build this guide and are worth bookmarking for deeper study. The most effective way to use them is to open a session, loop your loudest vocal phrase, and test each technique in real time rather than reading in isolation.
- Vocal compression: How to compress vocals in 7 steps | LANDR Blog
- How to use compression on vocals — MusicProductionWiki
- Mastering
- Vocal compression: Sit vocals without squishing them | Hyperbits
- Pro vocal compression, dynamics and balance – sonible
- How to compress vocals — Product London