
Bus compression is the application of a compressor to a grouped set of tracks or the master mix bus, unifying multiple audio signals into a single, cohesive sound with enhanced glue and balance. It is the technique that separates a mix that merely sounds loud from one that sounds together. Whether you are working on a drum bus in Ableton Live, a stem bus in Pro Tools, or the stereo master bus in Logic Pro, the principle is the same: subtle, controlled gain reduction across multiple tracks simultaneously creates the perception that all elements share the same acoustic space. The primary goal is mix cohesion, not loudness. Compressors like the SSL G-Bus and Softube Bus Processor 670 are the industry benchmarks for this technique, and understanding why they work the way they do will change how you mix.
How does bus compression work?
Bus compression works by routing multiple tracks to a single bus channel and placing a compressor across that summed signal. The compressor responds to the combined level of all tracks together, rather than each track individually. This shared dynamic response is what creates the glue effect. Think of it as the compressor breathing with your whole mix, rather than just one instrument.

Attack time: preserving the punch
Attack time controls how quickly the compressor clamps down after the signal crosses the threshold. Attack times of 10–30 ms allow drum transients to pass through before compression engages, preserving the punch and snap you worked hard to achieve. On a master or mix bus, you can push this further, using 30–100 ms to let the full energy of the mix breathe before the compressor acts. A too-fast attack on a bus will dull your transients and make the mix feel flat.
Release time: syncing to the groove
Release time determines how quickly the compressor lets go after the signal drops below the threshold. Release timing synced to song tempo affects the groove and feel of the mix noticeably. A release that is too slow causes the compressor to hold on between beats, killing the rhythmic energy. A release that is too fast creates an audible pumping artefact. The sweet spot is where the compressor recovers naturally between musical phrases, adding a sense of forward motion to the mix.
Ratio, threshold, and gain reduction targets
- Ratio: Standard bus compression ratios range from 1.5:1 to 4:1. Higher ratios belong on individual tracks, not the bus.
- Threshold: Set the threshold so the compressor only engages on the loudest peaks, leaving quieter passages untouched.
- Gain reduction target: Aim for 1–4 dB of gain reduction on the loudest transients. More than 4 dB and you are likely squashing the life out of your mix.
- Sidechain high-pass filter: Engage a sidechain HPF between 60–120 Hz to prevent bass frequencies from triggering excessive compression and causing low-end pumping.
Pro Tip: Set your gain reduction meter to peak at around 2 dB during the loudest chorus. If it is regularly hitting 6 dB or more, pull the threshold back and let the mix breathe.
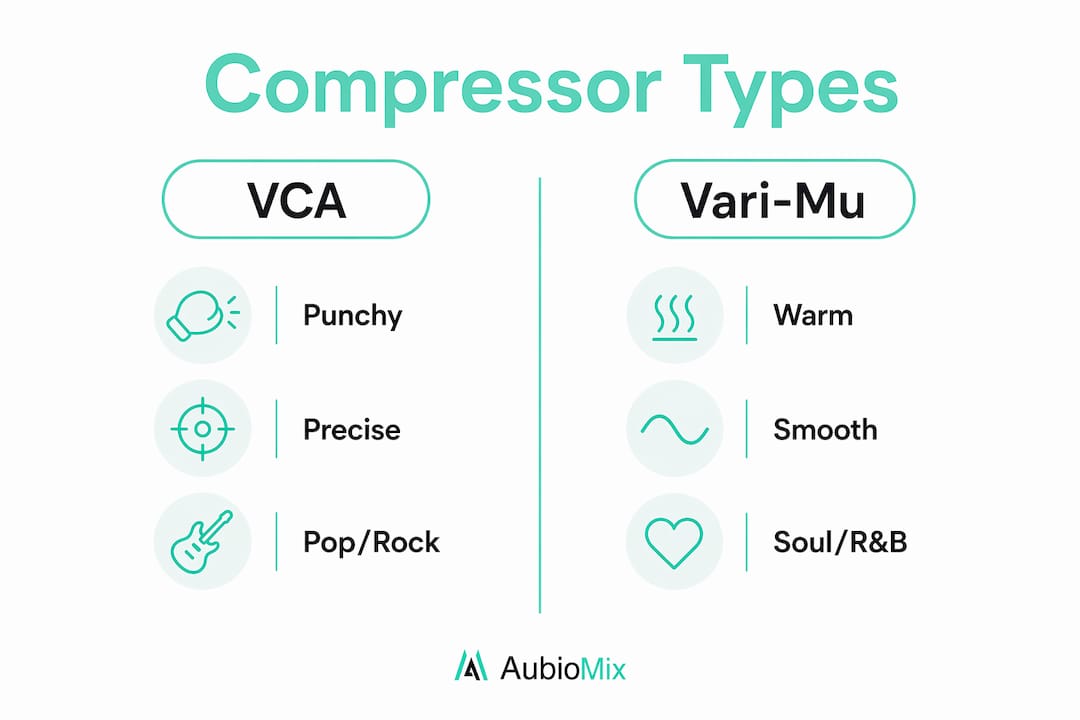
Which compressor type is best for bus compression?
The choice of compressor topology significantly influences the final bus character, from clinical precision to warm harmonic richness. There is no single correct answer. The right compressor depends on the genre, the material, and the sonic quality you are after.
| Compressor Type | Character | Best Bus Application | Example Units |
|---|---|---|---|
| VCA | Punchy, precise, clinical | Drum bus, mix bus for modern pop and rock | SSL G-Bus, Neve 33609 |
| Vari-Mu | Warm, smooth, harmonically rich | Mix bus for jazz, soul, and vintage sounds | Manley Variable Mu, Fairchild 670 |
| FET | Fast, aggressive, forward | Drum bus, parallel compression | Universal Audio 1176 |
| Optical | Gentle, musical, programme-dependent | Vocal bus, acoustic instruments | Teletronix LA-2A |
VCA compressors offer punch and precision, making them the go-to for modern genres where clarity and impact matter most. The SSL G-Bus is the defining example: fast, controlled, and transparent when used gently. Vari-Mu compressors like the Manley Variable Mu add warmth and harmonic density that makes a mix feel expensive and analogue. The Fairchild 670, and its emulations such as the Softube Bus Processor 670, sit in this category and are beloved for their musicality on the mix bus.
FET compressors like the Universal Audio 1176 are less common on the master bus because of their speed and aggression, but they shine on drum buses where you want excitement and attitude. Optical compressors like the Teletronix LA-2A are programme-dependent, meaning they respond differently to different material, which can be either a feature or a limitation depending on your mix.
Pro Tip: Do not default to the SSL G-Bus on every project. Try a Vari-Mu emulation on your next soul or R&B mix and notice how the low-mids fill out and the mix starts to feel like a record.
Bus compression techniques used in modern mixing
Knowing which compressor to reach for is only half the job. How you apply it matters just as much. These are the core bus compression methods that professional engineers use consistently.
-
Mix into the compressor from the start. Mixing into a bus compressor early in the session shapes your volume and balance decisions in real time. You make better choices because you are always hearing the mix in its compressed state. Adding compression at the very end of a session often reveals problems that are too late to fix properly.
-
Use parallel bus compression for density without sacrifice. Parallel compression blends a heavily compressed signal with the dry bus signal. This adds density and sustain without crushing the transients. On a drum bus, this technique can make a kit sound enormous while keeping the snare crack intact. Set up a send from your drum bus to a parallel compression channel, compress aggressively, then blend to taste.
-
Engage sidechain high-pass filtering. Sidechain filtering is often underestimated but critical to maintaining low-end clarity under bus compression. Set the sidechain HPF to around 80 Hz on your mix bus compressor so that kick and bass energy does not trigger unnecessary gain reduction across the whole mix.
-
Always use level-matched A/B comparisons. Level-matched A/B testing prevents your ears from being fooled by the simple fact that a louder signal sounds better. Bypass the bus compressor and match the output level manually before comparing. If the compressed version still sounds better at the same volume, you are genuinely improving the mix.
-
Adjust settings by genre and material. A drum bus in a heavy rock track needs a faster attack and higher ratio than a mix bus on a jazz recording. Electronic music often benefits from deliberate pumping as a creative effect, which means a faster release and a more aggressive threshold. Acoustic and orchestral material needs the gentlest touch, often 1–2 dB of gain reduction at most.
-
Treat the drum bus and master bus differently. The drum bus can handle more aggressive settings because it is a single instrument group. The master bus is the sum of everything, so subtlety is non-negotiable there. Use the drum bus to add punch and excitement, and use the mix bus to add glue and cohesion.
What mistakes should you avoid with bus compression?
Over-compression is the most common and most damaging mistake in bus processing. Here is what to watch for and how to correct it.
- Excessive gain reduction: Over-compression on the main mix bus kills dynamics and excitement. If your GR meter is pinned and the mix sounds flat, pull the threshold up immediately.
- Too-fast attack times: Slamming the attack on a bus compressor removes the transient energy that makes a mix feel alive. Start at 30 ms and slow down from there.
- Ignoring release time: A release that does not sync with the tempo creates pumping that sounds unmusical and distracting. Use a tempo calculator or tap the release until it breathes with the track.
- Skipping the A/B comparison: Without level-matched comparisons, you will almost always prefer the compressed version simply because it is louder. This leads to over-compression over time.
- No sidechain filtering: Low frequencies are the biggest trigger for unwanted pumping on a bus. Activate the sidechain HPF on every bus compressor, every time.
- Wrong compressor type for the material: Using a fast FET compressor on a delicate acoustic mix will sound harsh and unnatural. Match the compressor topology to the sonic character of the material.
Pro Tip: After setting your bus compressor, solo the mix and listen to just the gain reduction meter moving. If it looks like a heartbeat monitor, your release is too fast. If it barely moves, your threshold is too high.
Key takeaways
Bus compression works best when applied subtly, with the right compressor topology for the material, and with level-matched comparisons to confirm genuine improvement over loudness bias.
| Point | Details |
|---|---|
| Target subtle gain reduction | Aim for 1–4 dB of gain reduction on peak hits to add glue without squashing. |
| Match attack to transient content | Use 10–30 ms on drum buses and 30–100 ms on the mix bus to preserve punch. |
| Sync release to song tempo | Release time should allow the compressor to recover naturally between musical phrases. |
| Use sidechain HPF every time | Set the sidechain high-pass filter to 60–120 Hz to prevent low-frequency pumping. |
| Always A/B at matched levels | Bypass and level-match before comparing to avoid loudness bias skewing your judgement. |
What i have learned from years of bus compression
My honest view is that most producers apply bus compression too late and too hard. I started mixing into an SSL G-Bus emulation from the very first fader move years ago, and it changed the way I balance tracks entirely. When the compressor is already there, you stop pushing individual elements too loud because you can hear immediately how they interact with the whole mix.
The thing I keep coming back to is musicality over metering. A compressor that is barely moving the needle but making the mix feel like a single performance is doing its job perfectly. A compressor that is visibly working hard but making the mix feel tight and exciting is also doing its job, just differently. The mistake is chasing a number rather than listening to what the music needs.
I also think engineers underestimate the Vari-Mu topology for modern music. There is a warmth and harmonic density that a VCA simply cannot replicate, and it works beautifully on anything with real instruments. If you have not tried a Manley Variable Mu emulation on your mix bus, do it on your next session. You might find the mix balance falls into place with far less effort than usual. Patience and careful listening will always outperform chasing loudness.
— Aubiomix
Hear the difference bus compression makes in your mix
Getting bus compression right takes practice, and sometimes you need a second opinion to know whether your settings are genuinely improving the mix or just making it louder.

Aubiomix gives you pro-level mix feedback in minutes. Upload your track and receive detailed, specific feedback on your dynamics, compression, balance, and overall mix quality, including how your bus compression is affecting the final sound. The evaluation framework covers every stage of the signal chain, so you can hear exactly where your mix is working and where it needs attention. Stop guessing and start hearing the truth about your mixes.
FAQ
What is bus compression in music mixing?
Bus compression is the application of a compressor to a grouped set of tracks or the stereo mix bus to create cohesion and glue across multiple audio signals simultaneously. The goal is subtle dynamic control that makes a mix feel unified rather than loud.
How much gain reduction should a bus compressor apply?
Target 1–4 dB of gain reduction on the loudest peaks for mix bus compression. More than 4 dB typically causes over-compression that reduces dynamic excitement and musical energy.
What attack and release settings work best on a bus?
Use 10–30 ms attack on a drum bus to preserve transients, and 30–100 ms on the mix bus for a more transparent response. Sync the release time to the song tempo so the compressor recovers naturally between musical phrases.
Should i use a VCA or vari-mu compressor on the mix bus?
VCA compressors like the SSL G-Bus suit modern pop, rock, and electronic music where punch and precision matter. Vari-Mu compressors like the Manley Variable Mu suit jazz, soul, and vintage-leaning material where warmth and harmonic richness are the priority.
What is parallel bus compression?
Parallel bus compression blends a heavily compressed version of a bus signal with the original dry signal. This technique adds density and sustain to the mix while keeping transients intact, making it particularly effective on drum buses.