
Mid-side compression is defined as a dynamic processing technique that splits a stereo signal into two independent components, the Mid (centre) signal and the Side (stereo difference) signal, and applies compression to each separately. Tools like FabFilter Pro-Q 3, Brainworx bx_digital V3, and iZotope Ozone Dynamics all support M/S processing natively, making this technique accessible to producers at every level. The core benefit is precise, independent control over your centre image and your stereo width, something standard stereo compression simply cannot offer. If you want tighter low-end in the middle without squashing your reverb tails on the sides, mid-side processing is the tool for the job.
How does mid-side compression work?
Mid-side compression works by encoding a standard stereo signal into two new signals. The Mid signal is the sum of the left and right channels (L+R), which captures everything panned to the centre, including kick drums, bass, lead vocals, and snares. The Side signal is the difference between the channels (L-R), which captures all the stereo information: reverb tails, wide synth pads, and room ambience.
Once encoded, a compressor processes each signal independently before decoding them back into stereo. This means you can apply a firmer ratio to the Mid without touching the Side, or gently tame the Side dynamics without affecting your centred elements at all.
The recommended ratio settings reflect this logic. A typical mastering chain uses a ratio of 2:1 to 3:1 on the Mid and a more conservative 1.5:1 to 2:1 on the Side. The Mid handles the punch and weight of a mix, so it can take more compression. The Side carries the sense of space and air, so you treat it gently.
Key settings to keep in mind:
- Mid ratio: 2:1 to 3:1 for controlled punch without killing dynamics
- Side ratio: 1.5:1 to 2:1 to preserve stereo width and spatial feel
- Attack times: Slower attack on the Side prevents transient collapse and keeps the mix feeling open
- Release times: Match release to the tempo of the track to avoid pumping artefacts
- EQ type: Linear-phase EQ is preferred over minimum-phase EQ for M/S processing, as it avoids frequency-dependent phase shifts that damage stereo consistency
Pro Tip: Before you touch a single parameter, solo the Mid and Side signals separately. Listen to what is actually in each channel. You will make far better decisions when you know exactly what you are compressing.
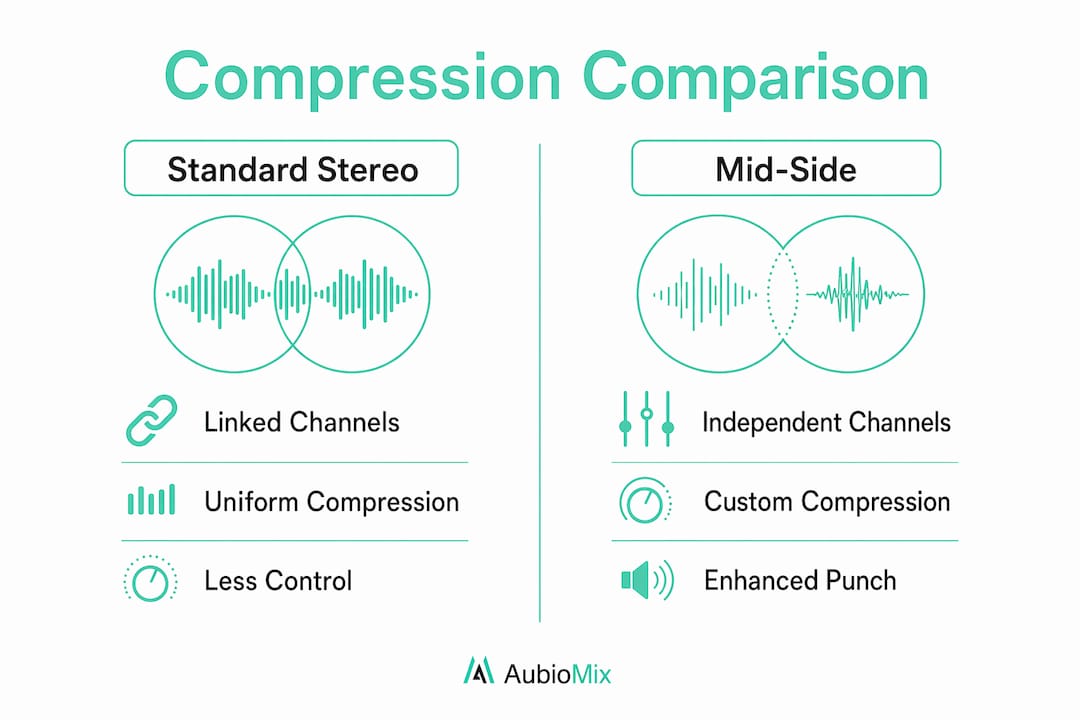
Mid-side vs. standard stereo compression: what is the difference?
Standard stereo compression treats the left and right channels as a linked pair. When the kick drum hits and triggers the compressor, the entire stereo image ducks together. That can cause the reverb tails and wide elements to pump in an unnatural way, and it gives you no way to address the centre and sides independently.
Mid-side compression solves this by decoupling those two worlds entirely. You can add punch to the kick and snare in the Mid without touching the lush reverb on the Side. You can tighten up a slightly loose stereo image without squashing the vocal.
| Feature | Standard stereo compression | Mid-side compression |
|---|---|---|
| Channel control | Left and right linked | Mid and Side independent |
| Stereo image impact | Can cause pumping and width collapse | Maintains stereo integrity when used correctly |
| Width adjustment | Not possible | Subtle width control via Side compression |
| Mono compatibility | Risk of phase issues | Better mono compatibility with careful settings |
| Best use case | Glue and general dynamics | Mastering and precision stereo control |
One limitation worth knowing: M/S processing cannot create width from mono source material. Boosting the Side channel only amplifies existing stereo differences. If there is nothing there, you are amplifying silence. Mid-side compression is a precision tool for mixes that already have good stereo content, not a rescue tool for fundamentally flat recordings.
What are the most common mid-side compression mistakes?
The most damaging mistake producers make is compressing the Side harder than the Mid. Compressing Side harder than Mid causes an unnatural, swimmy stereo image and phase incoherence that makes the mix feel unstable and disorienting. The golden rule is simple: always compress the Mid more aggressively than the Side.
The second most common error involves attack times. Fast attack times on the Side channel produce a mono-pumping effect, making the mix sound like it collapses inward on every transient hit. Slower attack times on Side compression prevent this and keep the stereo field feeling natural and open.
Other pitfalls to avoid:
- Over-boosting the Side channel: Boosting the Side by more than 3dB risks destroying mono compatibility, causing the mix to collapse on small speakers and earbuds. Keep boosts below 1.5dB, ideally between 0.5dB and 1dB.
- Skipping separate monitoring: Monitoring Mid and Side separately before processing prevents blind adjustments and catches mono compatibility issues early.
- Aggressive EQ moves: Keep M/S EQ adjustments subtle, ideally below 1.5dB, to avoid pushing the correlation meter into risky territory and causing spatial artefacts.
- Using M/S to fix bad mixes: Mid-side compression is for precision, not rescue work. If the mix has fundamental balance problems, address them in the mix before mastering.
Pro Tip: Use a correlation meter and a width meter throughout your M/S session. If the correlation drops below zero, you have a phase problem. Catch it early and you will save yourself a lot of frustration.
Genre-specific applications of mid-side compression
Mid-side compression is not a one-size-fits-all process. The right approach depends heavily on the genre you are working with, and tailoring your settings to the style of the music makes a real difference to the final result.
Genre-specific M/S strategies include high-pass filtering the Side channel at different frequencies to clean up low-end phase issues. Here is how that breaks down by style:
- Hip-hop and trap: High-pass the Side channel around 60Hz to keep the sub and kick focused in the Mid. Apply a 2:1 to 2.5:1 ratio on the Mid to add punch to the drums and bass. Keep the Side gentle to preserve the width of hi-hats and pads.
- Electronic and dance: High-pass the Side around 80Hz for a clean, phase-coherent low end. The Side channel often carries wide synth layers, so use a slow attack and a 1.5:1 ratio to let the transients breathe. Tools like iZotope Ozone and Brainworx bx_digital V3 are well suited to this genre.
- Indie rock: Focus Mid low-mid cuts around 320Hz to reduce boxiness in guitars and room mics. Apply moderate compression to the Mid at 2:1 to tighten the drum room, and leave the Side relatively open to preserve the live, spatial feel.
- Folk and acoustic: Use the lightest touch here. A 1.5:1 ratio on the Mid and barely any compression on the Side keeps the natural dynamics of acoustic instruments intact. The goal is transparency, not control.
| Genre | Side high-pass frequency | Mid ratio | Side ratio |
|---|---|---|---|
| Hip-hop / trap | ~60Hz | 2:1 to 2.5:1 | 1.5:1 |
| Electronic / dance | ~80Hz | 2:1 | 1.5:1 |
| Indie rock | N/A | 2:1 | 1.5:1 |
| Folk / acoustic | N/A | 1.5:1 | 1.2:1 |
For electronic music specifically, the electronic music mixing guide covers additional genre-specific processing decisions that complement your M/S workflow nicely.
How to place mid-side compression in your mastering chain
Placement in the mastering chain matters as much as the settings themselves. Mid-side compression generally sits after your initial corrective EQ and before any stereo widening or limiting. This order lets you shape the tonal balance first, then apply dynamic control, then finalise the loudness and width.
A well-structured mastering chain looks like this:
- Corrective EQ (linear-phase, addressing tonal imbalances)
- Mid-side compression (dynamic control of Mid and Side independently)
- Multiband compression (if needed, for frequency-specific dynamics)
- Stereo widening (subtle, after dynamics are settled)
- Limiting (final loudness ceiling)
Placing stereo widening after M/S compression is deliberate. Once the dynamics are stable, widening tools like those in iZotope Ozone work more predictably and with less risk of phase issues. Applying widening before compression can cause the Side channel to behave unpredictably under dynamic processing.
Mastering engineers typically spend around 90 minutes per song on dedicated M/S mastering sessions. That time covers setup, monitoring, corrective EQ, and compression adjustments. Rushing this process is one of the most common reasons M/S sessions produce poor results.
A/B testing is non-negotiable. Bypass your M/S compression and compare it against the processed version at matched loudness. If you cannot clearly hear an improvement, you are probably over-processing. For more detail on building a solid mastering chain, the guide on mastering chain best practices covers the full picture.
Key takeaways
Mid-side compression delivers its best results when the Mid is compressed more aggressively than the Side, settings are kept subtle, and the technique is applied to well-prepared mixes rather than used as a corrective tool.
| Point | Details |
|---|---|
| Compress Mid more than Side | Use 2:1 to 3:1 on Mid and 1.5:1 to 2:1 on Side to preserve stereo integrity. |
| Avoid fast attack on Side | Slow attack times on the Side channel prevent mono-pumping and mix collapse. |
| Keep EQ moves subtle | Stay below 1.5dB on M/S EQ adjustments to avoid phase artefacts and correlation issues. |
| Monitor Mid and Side separately | Solo each channel before processing to make informed, targeted decisions. |
| Match settings to genre | High-pass the Side at 60Hz for hip-hop, 80Hz for electronic, and use lighter ratios for acoustic styles. |
The subtlety is the whole point
Here is something I have noticed working with producers at all levels: the ones who struggle most with mid-side compression are the ones who treat it like a dramatic tool. They push the Side hard, crank the ratio, and then wonder why the mix sounds strange and wobbly on a phone speaker.
The truth is, the best M/S sessions are almost invisible. You compress the Mid to add a bit more punch to the kick and snare. You gently tame the Side so the reverb tails do not bloom out of control. You high-pass the Side to clean up the low end. And then you step back and realise the mix just sounds more controlled and professional, without sounding processed.
The mistake I see most often is skipping the monitoring step. Producers jump straight to compressing without soloing the Mid and Side first. You cannot make good decisions about what to compress if you have not listened to what is actually in each channel. Spend two minutes listening before you touch a single knob. It changes everything.
My honest recommendation: start with the gentlest settings you can imagine, then ask yourself if the mix genuinely needs more. Most of the time, it does not. Patience and restraint are the real skills here, not knowing which plug-in to reach for.
— Aubiomix
Get pro-level feedback on your mix from Aubiomix
Knowing the theory behind mid-side compression is one thing. Hearing exactly how it is affecting your specific mix is another. Aubiomix lets you upload your track and receive detailed, pro-level mix feedback covering stereo imaging, dynamics, and balance, so you can hear precisely where your M/S processing is helping and where it might be causing issues.

The Aubiomix evaluation framework breaks down your mix across every key dimension, giving you the kind of specific, targeted feedback that helps you make better decisions in your next session. If you are serious about getting your mid-side workflow right, this is the fastest way to close the gap between what you are hearing and what is actually happening in your mix.
FAQ
What is mid-side compression used for?
Mid-side compression is used to apply independent dynamic control to the centre (Mid) and stereo difference (Side) signals of a mix. It is most commonly used in mastering to add punch to the centre while preserving stereo width.
Should I compress the Mid or Side more?
Always compress the Mid more aggressively than the Side. A ratio of 2:1 to 3:1 on the Mid and 1.5:1 to 2:1 on the Side is the standard starting point for mastering.
Can mid-side compression create stereo width?
No. M/S processing cannot create width from mono source material. It only manipulates existing stereo differences, so boosting the Side channel on a mono source amplifies nothing useful.
What plug-ins support mid-side compression?
FabFilter Pro-Q 3, Brainworx bx_digital V3, and iZotope Ozone Dynamics all support native M/S processing and are widely used in professional mastering sessions.
How do I avoid mono compatibility issues with M/S processing?
Keep Side channel boosts below 1.5dB and monitor with a correlation meter throughout your session. If the correlation drops below zero, reduce the Side processing until the mix is phase-coherent again.