
Sibilance is defined as the harsh, high-frequency energy produced by consonants such as 's', 't', 'sh', and 'ch' in vocal recordings, typically concentrated in the 4–10 kHz range. Left unmanaged, it pierces through a mix, causes listener fatigue, and undermines the clarity you have worked so hard to build. The good news is that with the right techniques, including de-essing, dynamic EQ, and careful gain staging, you can tame it without stripping the life from your vocals. This guide covers everything you need to know, from identifying the problem frequencies to applying professional-grade solutions.
What is sibilance and why does it matter in mixing?
Sibilance is the collective term for piercing fricative consonant sounds in speech and singing. In audio mixing, it refers specifically to the unpleasant harshness that builds up when those consonants are amplified, compressed, or poorly recorded. The term comes from the Latin sibilare, meaning to hiss, and that description is apt. When sibilance is out of control in a mix, vocals sound like they are hissing at the listener rather than communicating with them.
The reason sibilance matters so much in professional mixing is that it sits right in the frequency range where human hearing is most sensitive. The ear is naturally drawn to the 2–10 kHz region, which is also where vocal intelligibility lives. When sibilant energy spikes in that zone, it does not just sound unpleasant. It actively competes with the clarity of the vocal performance itself.

Professional vocal mixing standards place sibilance control as a non-negotiable step in the vocal processing chain. Ignoring it is one of the most common reasons amateur mixes sound harsh and unprofessional, even when every other element is well balanced.
What causes sibilance in vocal recordings?
Several factors contribute to sibilance appearing in a recording, and understanding them helps you address the problem at the source rather than relying entirely on processing later.
Microphone and recording factors
Condenser microphones, particularly large-diaphragm models, are highly sensitive to transient detail. That sensitivity is brilliant for capturing nuance, but it also captures every sibilant peak with precision. Microphones with a presence boost in the 5–10 kHz range can exaggerate sibilance further. Proximity effect, where bass frequencies increase as the vocalist moves closer to the capsule, can also shift the tonal balance and make high-frequency consonants feel more prominent by contrast.
Recording technique plays a significant role too. A vocalist singing directly into the capsule at close range will produce far more sibilance than one positioned slightly off-axis or using a pop shield correctly. A pop shield does not just block plosives. It also softens the direct path of sibilant energy reaching the capsule.
How compression makes sibilance worse
Compression is where sibilance often becomes a real problem. A compressor reduces the dynamic range of a vocal, which means it raises the level of quieter sounds relative to louder ones. Sibilant consonants are typically quieter than vowels, so compression effectively turns them up. The result is that a vocal that sounded acceptable before compression suddenly has sharp, cutting 's' sounds after it.
This is precisely why de-essing follows compression in professional vocal chains. Placing a de-esser before a compressor means the compressor will re-introduce the very sibilance you just reduced. The order matters enormously.
Common sibilant consonants and their typical frequency energy:
- 's' sounds: concentrated energy around 5–8 kHz
- 'sh' sounds: broader spread from 3–8 kHz
- 't' sounds: sharp transient energy peaking around 4–6 kHz
- 'ch' sounds: similar to 'sh' but with a harder attack transient
- Male vocals: sibilance typically peaks in the 4–6 kHz range
- Female vocals: sibilance typically peaks higher, around 7–10 kHz
How do you identify sibilance frequencies accurately?
Accurate frequency identification is the difference between transparent de-essing and a dull, lifeless vocal. Guessing the frequency and setting a threshold is one of the most common mistakes producers make. Sweeping the frequency to locate the sibilance centre before setting any threshold is the professional standard.
Using a frequency sweep to find the problem
Load a parametric EQ with a narrow bell curve and a significant boost, around 10–12 dB. Slowly sweep it through the 4–10 kHz range while the vocal plays. When you hit the sibilance centre, the harshness will jump out immediately. Note that frequency, then remove the EQ boost. That is the frequency you will target with your de-esser.
Most de-esser plugins include a sidechain audition or solo mode that lets you listen to only the frequencies the plugin is detecting. Always use this feature. It confirms you are targeting the actual sibilance rather than the broader presence range.
Male vs female vocal differences
The frequency difference between male and female sibilance is significant enough to change your entire approach. Male vocals typically produce sibilant energy in the 4–6 kHz range, while female vocals push that energy up to 7–10 kHz. Setting a female vocal de-esser at 5 kHz will dull the voice without touching the actual problem. Setting it at 8–9 kHz will address the harshness while leaving the warmth and body intact.
Pro Tip: Always check your de-esser frequency setting on the specific vocal you are working on. Genre, microphone, and the vocalist's natural tone all shift where sibilance peaks. There is no universal setting that works across every session.
A few key principles for accurate identification:
- Target the 5–10 kHz range for sibilance, not the 2–4 kHz presence range
- De-essing the wrong range dulls vocals without solving the problem
- Use solo or audition modes to confirm what the plugin is hearing
- Set the threshold so the de-esser only triggers on genuine sibilant peaks, not on every consonant
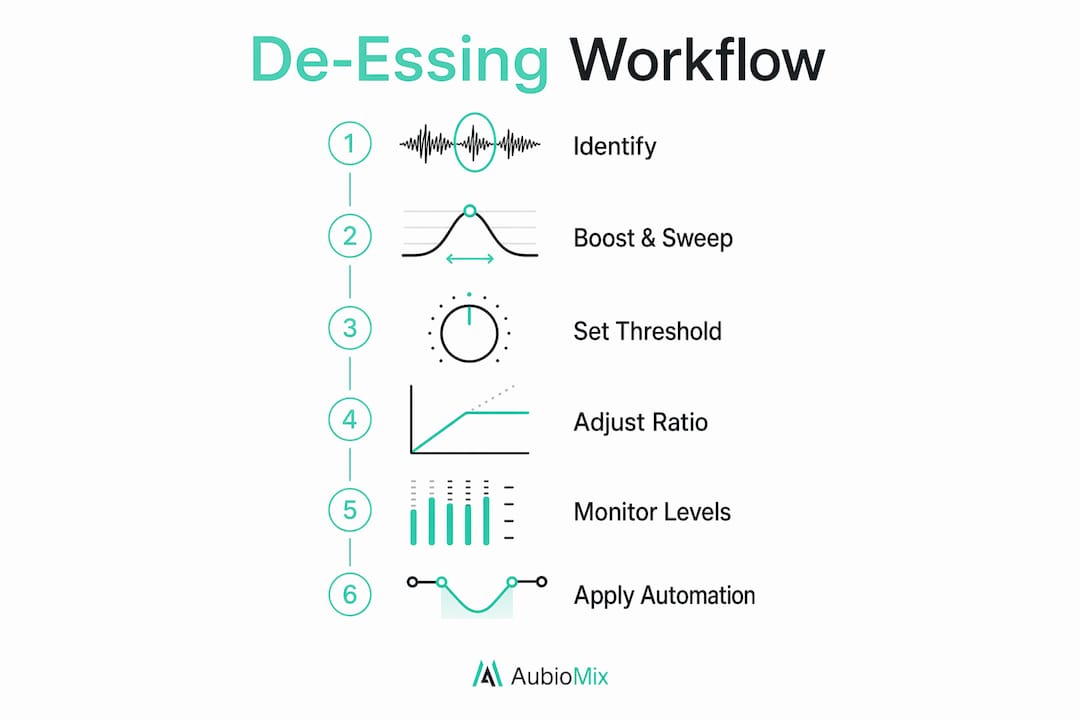
What are the best practices for de-essing and sibilance control?
De-essing done well is nearly invisible. Done badly, it turns a confident vocal into something that sounds like the singer has a lisp. The difference comes down to placement, gain reduction amount, and knowing when to use alternatives.
Standard de-esser workflow
- Apply compression first. Let the compressor do its job on dynamics before the de-esser addresses sibilance. This reflects the standard professional order.
- Sweep to find the frequency. Do not guess. Use the technique described above to locate the exact sibilance peak.
- Set the threshold carefully. The de-esser should only trigger when a genuine sibilant consonant occurs. If it is triggering on vowels, raise the threshold.
- Limit gain reduction to 2–4 dB. Gain reduction of 2–4 dB is the professional target. Anything beyond 6 dB typically signals a recording problem rather than a mixing one.
- Check in context. Always evaluate the de-esser with the full mix playing, not just the vocal in solo. Sibilance that sounds harsh in isolation sometimes sits fine in a dense mix.
Pro Tip: If you find yourself pushing past 6 dB of reduction to tame a vocal, step back and address the recording. Repositioning the microphone, using a different capsule, or applying a resonance suppressor at tracking will save you hours of painful processing later.
When de-essing alone is not enough
Not every vocal needs heavy de-essing. Minimal reduction combined with manual volume automation often produces better results than relying entirely on a plugin. Manual de-essing involves selecting individual sibilant peaks in the waveform and reducing their gain by 3–6 dB. It takes longer, but it gives you complete control over each transient.
Gain staging is another factor that producers frequently overlook. When input levels are too hot, a de-esser triggers prematurely and creates unnatural compression on consonants. Correct gain staging before the de-esser means the plugin only works when it genuinely needs to.
A dynamic EQ is a powerful complement to standard de-essing, particularly on complex vocal lines where sibilance shifts frequency across a performance. Rather than applying static reduction at a fixed frequency, a dynamic EQ only reduces gain when the signal exceeds a threshold at a specific frequency. This makes it far more transparent on vocals with natural variation.
What advanced tools and monitoring practices refine sibilance control?
Getting sibilance under control at a basic level is one thing. Getting it right at a professional level requires attention to both your tools and your listening environment.
Intelligent detection and dynamic processing
Modern de-esser plugins use selective detection algorithms that distinguish between musical high-frequency content and harsh sibilant transients. A plugin with intelligent single-vocal detection, for example, analyses the specific wave patterns of sibilance rather than simply reducing everything above a set frequency. Intelligent detection algorithms preserve vocal air and brightness while targeting only the problematic consonants. This is a meaningful improvement over older broadband de-essers that often made vocals sound dull.
Oeksound Soothe2 takes a different approach entirely. Rather than functioning as a traditional de-esser, it applies dynamic resonance suppression across a broad frequency range. On vocals with complex, shifting sibilance, it can be more transparent than any static de-esser setting.
Monitoring levels and the Fletcher-Munson effect
This is where many producers quietly sabotage their own work. Mixing at low volumes causes the ear to perceive high frequencies as less prominent than they actually are, due to the Fletcher-Munson equal-loudness contours. The result is that producers over-de-ess at low volumes because the sibilance sounds worse than it will on a properly calibrated system. Mixing at approximately 85 dB SPL gives a far more accurate picture of how sibilance sits in the mix.
Pro Tip: Cross-reference your sibilance decisions at multiple volume levels. What sounds fine at 85 dB SPL might still be harsh at low listening volumes. A quick check at bedroom listening levels will catch any remaining problems before the mix leaves your studio.
| Approach | Best use case | Transparency |
|---|---|---|
| Standard de-esser | Consistent sibilance on clean recordings | Good |
| Dynamic EQ | Variable sibilance across a performance | Very good |
| Manual gain automation | Isolated problem transients | Excellent |
| Intelligent detection plugin | Complex vocals with shifting tonal character | Excellent |
Key takeaways
Effective sibilance control requires accurate frequency identification, correct plugin placement after compression, and gain reduction kept within the 2–4 dB range to preserve natural vocal character.
| Point | Details |
|---|---|
| Sibilance frequency ranges | Male vocals peak at 4–6 kHz; female vocals peak at 7–10 kHz. Target accordingly. |
| De-esser placement | Always place the de-esser after the compressor to avoid re-introducing sibilance. |
| Gain reduction limits | Keep reduction to 2–4 dB. More than 6 dB signals a recording problem, not a mix problem. |
| Monitoring level matters | Mix at approximately 85 dB SPL to avoid over-processing caused by Fletcher-Munson sensitivity shifts. |
| Alternatives to de-essing | Manual gain automation and dynamic EQ offer more transparent results on complex vocal lines. |
What I have learned about sibilance after years of vocal mixing
The most common mistake I see from producers who are newer to vocal mixing is treating de-essing as a set-and-forget fix. They drop a de-esser on the channel, pull the threshold down until the harshness disappears, and move on. The vocal sounds fine in solo. Then they play the full mix and wonder why the lead sounds dull and recessed compared to everything else.
The real issue is almost always one of two things: either the frequency is wrong, or the gain staging upstream is causing the de-esser to work far harder than it should. De-essing is not a stand-alone fix. It works best as part of a chain that includes proper gain staging, thoughtful EQ, and a good recording to begin with.
What I find genuinely rewarding about sibilance control is that getting it right is one of those things that listeners never consciously notice. Nobody finishes a song and thinks "the de-essing was excellent." They just feel comfortable listening at volume, and the vocal sits naturally in the mix without drawing attention to itself. That invisibility is the goal. When your processing disappears into the music, you know you have done it well.
The other thing worth saying is that not every vocal needs aggressive treatment. Some voices are naturally smooth in the sibilance range, and a light touch is all that is needed. Always let your ears lead. The role of vocals in a mix is to communicate, and your job as the engineer is to make sure nothing gets in the way of that.
— Aubiomix
Get professional feedback on your vocal mix
Knowing the theory behind sibilance control is one thing. Hearing exactly how it applies to your specific mix is another. Aubiomix gives you fast, detailed feedback on your mixes, including vocal clarity, frequency balance, and processing decisions like de-essing.

Upload your track to Aubiomix and get a clear picture of where your vocal mix stands. The evaluation framework covers everything from sibilance and dynamic range to low-end balance and stereo width, so you know precisely what to fix and how to fix it. If you are serious about professional-sounding vocals, this is the fastest way to close the gap between where your mix is now and where it needs to be.
FAQ
What is sibilance in audio mixing?
Sibilance is the harsh, high-frequency energy from consonants such as 's', 'sh', 't', and 'ch' in vocal recordings, typically concentrated in the 4–10 kHz range. It becomes problematic after compression, which raises quieter consonants relative to louder vowels.
What causes sibilance to get worse after compression?
Compression reduces dynamic range and raises quieter sounds, including sibilant consonants, relative to louder vowels. This is why professional vocal chains place the de-esser after the compressor, not before it.
How much gain reduction should a de-esser apply?
A de-esser should apply 2–4 dB of gain reduction for natural-sounding results. More than 6 dB typically indicates a recording problem that should be addressed at the source rather than in the mix.
What is the difference between sibilance and fricatives?
Fricatives are the broader phonetic category of consonant sounds produced by forcing air through a narrow channel, including 'f', 'v', 'th', 's', and 'sh'. Sibilance refers specifically to the high-frequency hissing subset of fricatives, primarily 's' and 'sh' sounds, that cause harshness in audio recordings.
Why does de-essing sometimes make vocals sound dull?
Targeting the wrong frequency range is the most common cause. De-essing the 2–4 kHz presence range instead of the 5–10 kHz sibilance range removes vocal clarity without touching the actual problem. Always sweep to confirm the exact sibilance frequency before setting your threshold.