

Harshness in mixes is almost always excess energy in the upper mids, roughly 2–5 kHz, a range where human hearing is naturally most sensitive. The fastest way to address it: sweep a narrow dynamic EQ band across that region to find the offending peak, apply 3–6 dB of attenuation only when the level crosses a threshold, then add a touch of tape or tube saturation to round off transients. That combination handles the majority of cases without making your mix sound dull or lifeless.
Here are four quick fixes to try right now:
- Sweep and notch with dynamic EQ. Use FabFilter Pro-Q 3 in dynamic mode with a moderate Q factor in the 2–5 kHz region. Set the threshold so the cut only engages on loud, aggressive moments, not constantly.
- Add gentle harmonic saturation. A subtle tape or tube emulation softens transient edges and adds low-mid density, which shifts the perceived tonal balance away from brittleness.
- Check your gain staging. Clipping anywhere in the signal chain, even soft digital clipping, introduces upper-harmonic distortion that reads as harshness. Pull clip gain down before reaching for EQ.
- Reference at multiple volumes. Harshness is most obvious at louder playback levels. Check at low, medium, and high levels, and on headphones as well as speakers.
Pro Tip: Run Oeksound Soothe2 in listen mode first. It shows you exactly which resonant peaks it would suppress before you commit to any settings, making it a superb diagnostic tool as well as a corrective one.
Key takeaways
Harshness in mixes is a solvable problem when you work systematically: identify the offending band first, use dynamic tools before static ones, and combine small corrections rather than relying on a single large cut.
| Point | Details |
|---|---|
| Primary frequency range | Harshness typically lives in the 2–5 kHz band, where human hearing is most sensitive. |
| Dynamic EQ first | Use narrow dynamic bands (Q 4–8) with 3–6 dB of attenuation before reaching for static notches. |
| Saturation alongside subtraction | Tape or tube saturation restores warmth and presence after surgical EQ cuts. |
| Prevention beats correction | Conservative gain staging, careful mic choice, and regular referencing prevent build-up from the start. |
| Aubiomix for stubborn cases | Upload your mix to Aubiomix for visual spectral analysis and parameter-level steps across 15+ areas. |
Table of Contents
- What does a harsh mix actually sound like?
- What causes harshness in mixes?
- How to diagnose where the harshness is coming from
- Step-by-step corrective techniques for a harsh mix
- How to treat harsh vocals specifically
- How to prevent harshness from building up in the first place
- When should you get a professional mix analysis?
- The habit that changed how we think about harsh mixes
- Aubiomix gives you precise, actionable feedback on harsh mixes
- Sources
What does a harsh mix actually sound like?
A harsh mix is one where the upper-mid and high-frequency content feels edgy, brittle, or piercing, even at moderate listening levels. It is not simply a bright mix. Brightness can be pleasant and airy; harshness is the point where brightness becomes fatiguing and unpleasant, where listeners instinctively want to turn the volume down.
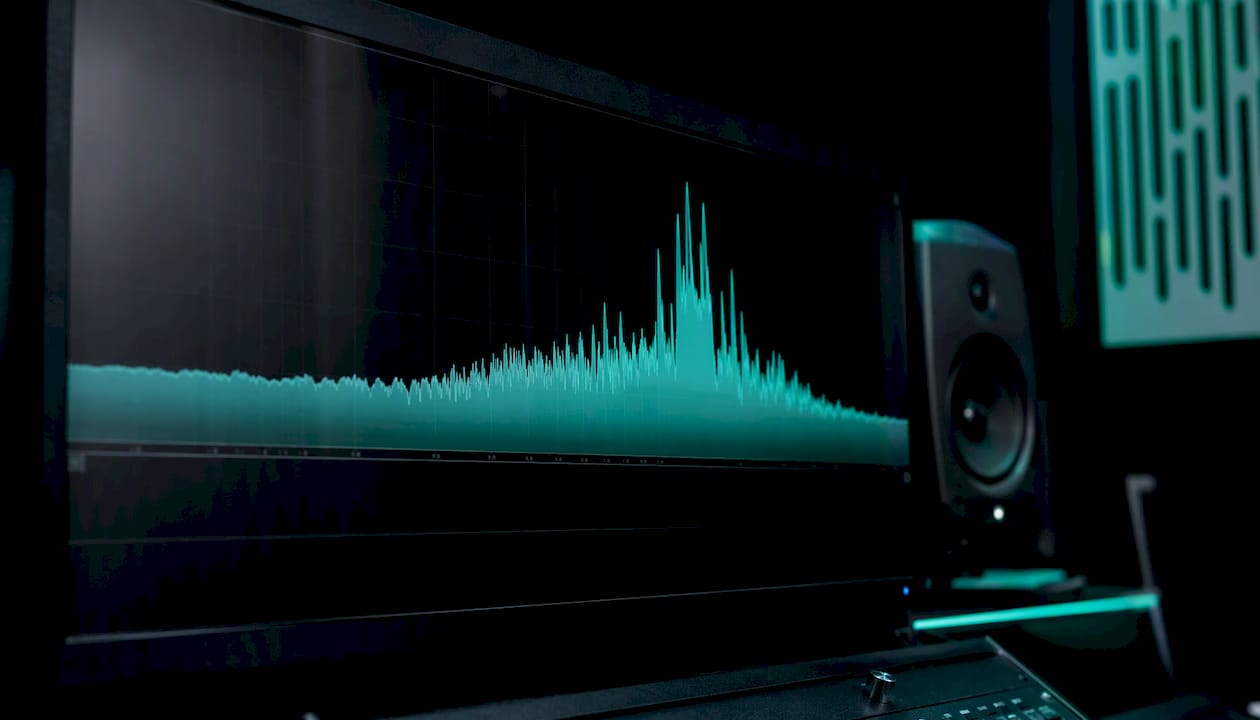
The science behind it comes down to the Fletcher-Munson equal loudness contours. Human hearing is most sensitive between roughly 2 kHz and 5 kHz, the frequency range that carries speech intelligibility and the attack of most instruments. When energy accumulates there, the ear amplifies it further, which is why even a modest 2–3 dB excess in that band can feel far more aggressive than the same excess at 100 Hz or 10 kHz.
Harshness presents in several distinct forms, and knowing which type you are dealing with shapes the fix:
- Narrow resonant peaks. A single frequency, often from a vocal formant, guitar body resonance, or cymbal overtone, that spikes above the surrounding spectrum.
- Broadband brightness. A general excess of upper-mid energy across multiple sources, often the result of cumulative build-up rather than one culprit.
- Transient harshness. The attack portion of a sound, a snare hit, a plucked string, a consonant, that is disproportionately loud relative to the sustain.
- Sibilance. A specific form of transient harshness concentrated in the 5–10 kHz range, most common on vocals and acoustic guitars. Our complete guide to sibilance in music covers that territory in depth.
Listener fatigue is a recognised phenomenon that compounds the problem: the longer you work in a harsh-sounding session, the less accurately you judge it, which is why diagnostic habits matter as much as the tools themselves.
What causes harshness in mixes?
Most harshness is not the result of one bad decision. It accumulates. Each track in a mix might contribute a small amount of upper-mid energy, and when ten or fifteen of them stack up, the sum is a wall of 3 kHz that no single-track fix will solve. Understanding frequency masking interactions across your session is often the first step to seeing why the problem persists.
Common culprits, and how each one presents:
- Accumulation of upper-mid energy. Guitars, synths, vocals, and cymbals all share the 2–5 kHz region. Each sounds fine in solo; together they create a dense, fatiguing wall.
- Poor mic choice or placement. Cheap dynamic mics with a presence peak, close-miking a guitar cab at the dust cap, or recording in an untreated room with reflective surfaces all add upper-mid colouration before the mix even begins.
- Bad gain staging and clipping. Digital overloads, even brief ones, generate upper harmonics that read as harshness. Cheap preamps pushed too hard do the same thing in the analogue domain.
- Excessive additive EQ. Boosting 3 kHz on every track for "presence" or "cut" is one of the most common routes to a harsh-sounding bus.
- Brittle synths, guitars, and cymbals. Certain patches and samples are simply bright by design. A heavily distorted guitar with a scooped mid-range still carries significant upper-harmonic content that builds up in a dense arrangement.
- Unmanaged transients and sibilance. Fast attack transients, especially on drums, percussion, and vocals, carry concentrated upper-mid energy that a compressor with a slow attack will pass straight through.
| Cause | How it presents | First tool to reach for |
|---|---|---|
| Cumulative upper-mid build-up | Mix sounds fine in solo, harsh on the bus | Multiband compression or dynamic EQ on the mix bus |
| Mic/room colouration | Harshness present even on a clean, unprocessed track | High-pass filter, subtractive EQ at source |
| Gain staging / clipping | Harsh edge that does not respond to EQ cuts | Reduce clip gain or preamp level; check for overloads |
| Excessive additive EQ | Harshness appears after EQ is applied | Remove or reduce upper-mid boosts across tracks |
| Brittle samples or synths | Harshness tied to specific instruments | Multiband compression or de-esser on that track |
| Unmanaged transients | Harshness on attack only, not sustain | Transient shaper or compressor with fast attack |
How to diagnose where the harshness is coming from
Resist the urge to reach for a plugin immediately. A quick diagnostic pass saves you from treating the wrong source and making the mix duller in the process.
- Listen at multiple volumes. Play the mix at low, medium, and high levels. Harshness tends to become most obvious at louder playback, so checking across volume levels helps you confirm whether the problem is real or a monitoring artefact.
- A/B against a reference track. Load a commercial release in the same genre into your DAW and switch between it and your mix at matched loudness. The contrast usually makes the offending frequency region obvious within seconds.
- Solo suspect groups. Mute everything except drums, then add guitars, then vocals, and so on. The moment the harshness appears tells you which group is responsible.
- Use a spectrum analyser. Voxengo SPAN (free) or your DAW's built-in analyser in high-resolution FFT mode will show narrow peaks that are hard to hear in isolation. FFT analysis lets you visualise resonances that your ear might miss, especially when you are fatigued.
- Loop the worst section. Find the eight bars where harshness is most obvious and loop them. This keeps the problem consistent while you work, rather than chasing it across the arrangement.
- Check in a different room and on headphones. A mix that sounds harsh on studio monitors might be even worse on earbuds, or vice versa. Translating the check to a different environment confirms whether the issue is global.
Pro Tip: On a de-harsh plugin like Soothe2, engage the delta (difference) output so you hear only what the plugin is removing. If it sounds like music, you are cutting too much. If it sounds like noise and resonance, you have found the right target.
Step-by-step corrective techniques for a harsh mix
Work through these in order. Each step addresses a different layer of the problem, and combining small moves from several steps is almost always safer than one large static cut.
- Fix the source first. Reduce clip gain on the loudest, most aggressive moments before applying any processing. Good level balance across your session removes a surprising amount of harshness before a single plugin is opened.
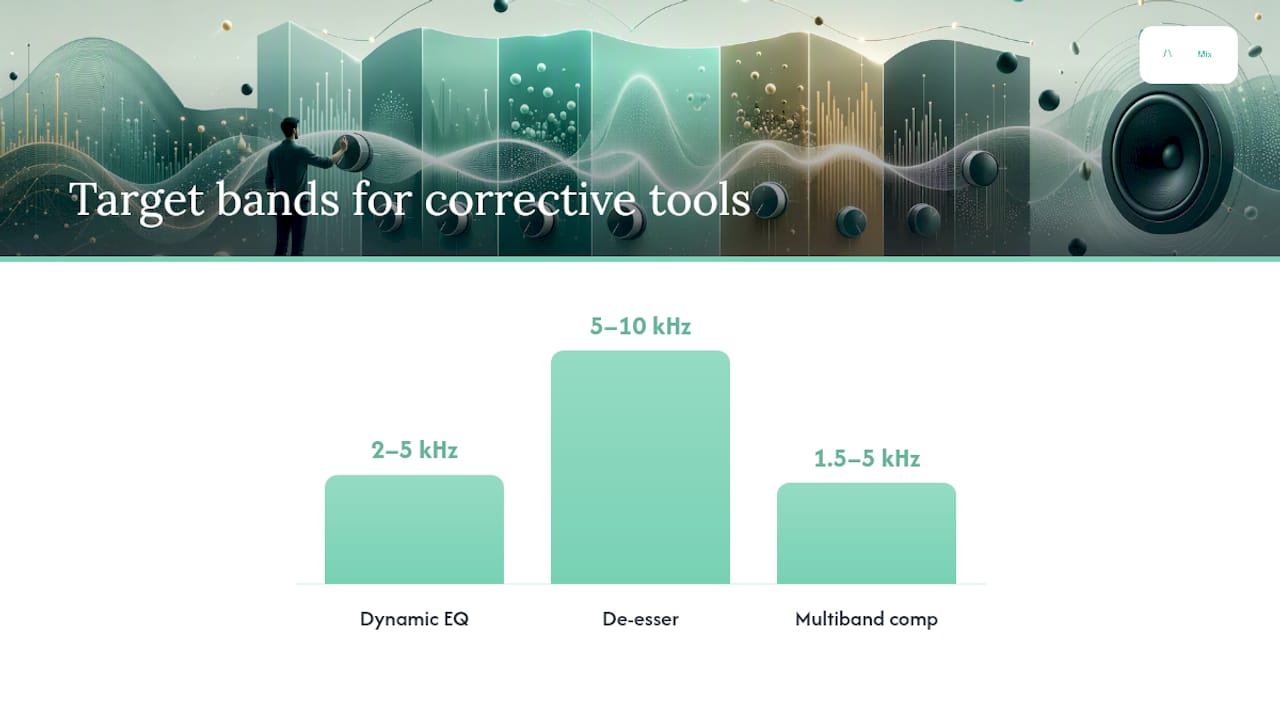
- Apply surgical dynamic EQ. In FabFilter Pro-Q 3's dynamic mode, set a narrow band (Q 4–8) at the offending frequency in the 2–5 kHz range. Set the threshold so the band only attenuates when the level spikes, targeting moderate gain reduction. Dynamic EQ is far more transparent than a static notch because it leaves the tone intact when the resonance is not active.
- De-ess and use multiband compression. A de-esser is essentially a narrow multiband compressor tuned to the sibilance region (5–10 kHz). For broader upper-mid issues from cymbals, guitars, or synths, a multiband compressor with a crossover around 1.5–5 kHz gives you dynamic control over the whole problem band. Multiband compression and de-essing are particularly effective when several instruments are contributing to the build-up simultaneously.
- Use a spectral resonance suppressor. Oeksound Soothe2 operates as a dynamic resonance suppressor, attenuating narrow peaks across many bands simultaneously without collapsing the overall tone. Spectral suppressors like Soothe2 are the most transparent option for complex, multi-source harshness that is difficult to pin to a single frequency.
- Add harmonic saturation. A subtle tape or tube emulation, 10–20% wet, softens transient edges and adds low-mid density. Harmonic saturation works alongside surgical subtraction rather than instead of it; the saturation restores warmth and presence while the EQ removes the peak.
- Shape transients. A transient shaper with a reduced attack setting (try -3 to -6 dB of attack) tames the initial hit of drums, percussion, and plucked instruments without affecting the sustain or the overall level.
- Restore air after cutting. Aggressive cuts in the 2.5–3.5 kHz region can leave a mix sounding closed-in. Compensate with a gentle Baxandall-style high-shelf or an "air" boost starting above 15–16 kHz. This restores perceived openness without reintroducing the harsh band.
Pro Tip: Prefer several small moves of 1–2 dB across multiple tools over one 6 dB static notch. The cumulative result is more transparent, and you can roll back any single step without losing the whole fix.
How to treat harsh vocals specifically
Vocal harshness is the most common complaint, and it usually comes from one of two places: a narrow resonant peak in the 2.5–4 kHz range (the "honky" or "nasal" zone) or sibilance above 5 kHz. The fix for each is slightly different, but the chain below handles both.
- Reduce clip gain on the loudest phrases. Before any processing, pull down the gain on the most aggressive lines by 2–3 dB. This alone often removes the worst offenders.
- Apply broad subtractive EQ. A gentle shelf cut of 1–2 dB starting around 2 kHz reduces the overall upper-mid weight without sounding surgical.
- Add a narrow dynamic EQ band for resonances. Identify the resonant peak by sweeping a narrow boost (Q 8–12) until you hear the harshness amplified, then flip it to a cut and set it as a dynamic band. Threshold it so the cut only engages on loud, sustained notes, not on every syllable. Static EQ cuts at these frequencies make vocals sound dull when the resonance is intermittent.
- De-ess for sibilance. Set your de-esser's detection range to 5–8 kHz for "s" and "sh" sounds, or 2.5–4 kHz if the problem is more of a resonant "ts" or "ch" quality. Aim for 4–6 dB of gain reduction on the worst moments.
- Add gentle tape or tube saturation. A subtle saturation stage after the de-esser smooths the remaining transient edges and restores presence without reintroducing harshness. Keep it light: 10–15% wet is usually enough.
- Mult problem phrases if needed. Copy the most problematic lines to a new track and apply heavier processing there, leaving the main vocal chain lighter and more natural for the rest of the performance.
For a parallel approach, try a gentle "air" boost above 16 kHz on a parallel send after the de-essing stage. This restores the sense of openness that de-essing can sometimes remove.
How to prevent harshness from building up in the first place
The cleanest mixes start with good habits at the tracking stage. A few preventative steps mean far less corrective work later.
- Choose mics carefully. A condenser with a pronounced presence peak sounds exciting in isolation but can cause problems in a dense mix. Large-diaphragm dynamics or ribbon mics often sit more naturally in the upper mids.
- Treat your room. Reflective surfaces add upper-mid colouration to recordings. Even basic acoustic panels behind the mic position make a measurable difference.
- Keep gain staging conservative. Aim for peaks around -18 dBFS at each stage in the analogue-to-digital chain. Headroom is not wasted space; it is protection against the harmonic distortion that causes harshness.
- Track with gentle analogue saturation. Running signals through a tape emulation or a quality preamp with a little colour at the tracking stage can pre-emptively round transients before they reach the mix.
- Use reference mixes from the start. Load a commercial reference into your session on day one and check your upper-mid balance against it regularly, not just at the end.
- Build a mix template that includes a high-mid inspection point. A spectrum analyser on your mix bus, visible at all times, makes cumulative upper-mid build-up obvious before it becomes a problem.
Pro Tip: A subtle low-mid boost of 1–2 dB around 200–400 Hz can reduce perceived harshness without touching the upper mids at all. It shifts the tonal centre of gravity downward, making the mix feel warmer and more grounded. Try it before reaching for a cut in the 3 kHz region.
Monitoring habits matter just as much as processing. Take a break every 45–60 minutes, check the mix at a low volume before you start each session, and avoid prolonged soloing of bright elements. Your ears adapt quickly to whatever they are hearing, and that adaptation is the enemy of accurate judgement. Electronic music mixing practices that emphasise regular level checks and reference comparisons apply equally well to any genre.
When should you get a professional mix analysis?
Sometimes harshness persists after you have tried everything above. That is not a failure of technique; it is a signal that the problem has multiple interacting sources, or that your monitoring environment is masking something you cannot hear clearly.
The right moment to escalate to a professional review:
- You have applied dynamic EQ, de-essing, and saturation, and the mix still sounds harsh on multiple playback systems.
- The harshness appears on the mix bus but you cannot isolate it to a single track or group.
- You are working to a client deadline and cannot afford another round of revisions.
- The mix translates poorly to consumer earbuds or car speakers, even when it sounds acceptable on studio monitors.
A thorough professional analysis goes beyond what you can see in a spectrum analyser. It identifies precise offending bands, bus interactions, transient timing issues, phase problems between tracks, and the cumulative effect of multiple small decisions that each seem reasonable in isolation.
Aubiomix's mix analysis case studies show exactly the kind of specific, band-level feedback that makes the difference between a generic "cut some 3 kHz" note and a precise, reproducible fix. That level of detail is what separates a useful review from a vague one.
The habit that changed how we think about harsh mixes
There is a tendency in mixing to treat harshness as a problem to be solved with a single, decisive move: find the frequency, cut it, done. The reality is almost always more layered than that. Harshness is usually the sum of many small decisions, and the most effective fix is usually a series of small corrections rather than one large one.
The habit we keep coming back to: always check a suspected harsh frequency at both low and high playback levels before committing to a static EQ cut. A frequency that sounds aggressive at 85 dB SPL may be perfectly balanced at 70 dB, which tells you the problem is level-dependent and calls for a dynamic tool, not a static notch. Making that check takes thirty seconds and saves you from cuts that make the mix sound dull at normal listening volumes.
Keep a repair log as you work: note which band you targeted, which tool you used, and by how much. When you revisit the mix the next day, you will have a clear record of what changed and why, which makes it far easier to refine rather than undo everything and start again.
Aubiomix gives you precise, actionable feedback on harsh mixes
Knowing the techniques is one thing. Knowing exactly which band, which track, and which interaction is causing the problem in your mix is another. Aubiomix gives you that precision without the guesswork of solo-and-sweep diagnostics.

Upload your mix to Aubiomix and receive a detailed analysis covering spectral balance, dynamic behaviour, frequency masking, transient issues, and more across 15+ areas of mixing and mastering. You get:
- Visual spectral highlights showing exactly where upper-mid energy is accumulating.
- Written, parameter-level recommendations for EQ, compression, saturation, and de-essing.
- A downloadable PDF report you can reference during your next session.
- Progress tracking so you can see how your mixes improve over time.
Upload your mix at Aubiomix and get pro-level feedback in minutes.
Sources
- Say goodbye to harsh mixes
- Five ways to De‑harsh Your Mixes
- Q. How can I get ‘harsh’ vocals to sit properly in the mix? (Sound on Sound)
- Harshness — The Pro Audio Files
- How to Deal With and Fix a Harsh Mix - Music Guy Mixing
- How to Repair Harsh Vocals The Pro Mixing Blueprint