

Gain staging is the practice of setting your levels so every plugin, bus and fader in your session receives the input it was designed for. Before you touch a single insert, set your clip gain or trim so the track sits around a nominal −18 dBFS average, then build your chain from there.
Get this right and the payoff is immediate: your compressors react the way the manual promises, your saturation plugins add warmth instead of grit you didn't ask for, and your mix bus has room to breathe before mastering even starts.
- Set clip gain or region trim first, before any plugin
- Aim for roughly −18 dBFS RMS as your nominal per-track reference
- Leave headroom on the mix bus, don't chase it back with the master fader
Key Takeaways
Gain staging works because setting clip gain before any plugin, holding a −18 dBFS nominal reference, and checking bus headroom before the master keeps every processor behaving the way its designer intended.
| Point | Details |
|---|---|
| Clip gain comes first | Set clip gain or a utility plugin as the first insert, before any processing touches the track. |
| Target −18 dBFS nominally | Aim for roughly −18 dBFS RMS on tracks, with peaks between −12 and −6 dBFS. |
| Leave master headroom | Keep mix bus peaks around −6 to −3 dBFS before your master limiter, saving LUFS targets for mastering. |
| Fix the fader habit | Never use the channel fader to compensate for bad clip gain, it hides the problem and breaks automation. |
| Verify with AubioMix | Upload a mix to AubioMix to check headroom, clipping, LUFS and bus overload against the targets above. |
Table of Contents
- What gain staging in mixing actually means
- Does gain staging still matter in a digital daw?
- What are the right gain staging levels for a mix?
- How do you gain stage a mix step by step?
- What are the most common gain staging mistakes?
- Which tools help you meter and fix gain staging fast?
- How does AubioMix check your gain staging for you?
- Sources
What gain staging in mixing actually means
Gain staging didn't start in a DAW. It comes from analogue console workflow, where every stage of a signal path, from the mic preamp to the tape machine to the outboard compressor, had a sweet spot between the noise floor and the point where the circuit started distorting. Push too little signal into a stage and you drag up hiss. Push too much and you get unwanted saturation or hard clipping. The goal was never about how loud the final mix sounded. It was about keeping the signal in that optimal window at every single stage so the next piece of gear could do its job properly.
That distinction between loudness and signal integrity is where most confusion starts. A mix can be gain staged beautifully and still sound quiet in solo. It can also be gain staged terribly and still sound loud, right up until you notice the mix bus compressor is pumping in a way you never asked for, or a saturation plugin is adding grit that wasn't there on the last session. Bad gain staging rarely announces itself. It shows up sideways, as a reverb that sounds thin, a compressor that seems to ignore your ratio setting, or a mix bus that turns muddy the moment you add a fourth or fifth instrument.
- Plugins misbehaving (a compressor barely reacting, or slamming instantly)
- A mix bus that feels congested as more tracks are added
- Reverb or delay returns sounding thin or oddly harsh
- Automation that seems to "break" when you bounce a session
Pro Tip: If a plugin sounds wrong the moment you insert it, check the input level before you touch a single knob on the plugin itself. Nine times out of ten, the plugin isn't broken, it's being fed the wrong signal.
Does gain staging still matter in a digital daw?
Yes, and the reason surprises a lot of producers who assume floating-point math made the whole concept obsolete. Analogue gear lived with a hard noise floor at the bottom and a hard distortion ceiling at the top, so engineers rode levels to stay inside that narrow window. Modern DAWs run on 32-bit float internally, which gives you an enormous dynamic range and largely removes the risk of internal clipping between plugins in the same chain.
What that headroom doesn't remove is the behaviour of the plugins themselves. Many developers calibrate their processors, especially anything modelling analogue circuitry, around an operating level near −18 dBFS. Feed a vintage-style compressor or a tape emulation plugin something twenty decibels hotter than it expects, and you're not testing the limits of your DAW's math, you're pushing that plugin's modelled circuit into territory the designer never intended for normal use. The character changes, and not always in a way you'd choose on purpose.
Bus summing is the other place where the old rules still bite. Even in a system with vast internal headroom, structured gain staging remains essential because plugin inputs and the summing of many tracks onto one bus can still produce artefacts you didn't design for, particularly once you start stacking dynamics processors that each expect a certain input range.
- Floating-point headroom protects against catastrophic internal clipping, not bad plugin behaviour
- Analogue-modelled plugins still expect a nominal input level to sound as designed
- Pushing levels hard is fine at the final export stage limiter, not at every stage before it
- Bus summing with many tracks can still overload a plugin's expected input, even with headroom to spare
What are the right gain staging levels for a mix?
Producers ask for a single magic number, and the honest answer is that it depends on the stage, but there are working references worth pinning to your session template.
For individual tracks, aim for a nominal average around −18 dBFS RMS, with transient peaks commonly landing somewhere between −12 and −6 dBFS. This isn't an arbitrary number pulled from nowhere: it's the operating point many plugin developers actually design around, and it's close to the practical target used across most DAW mixing workflows.
Individual tracks that sit near −18 dBFS RMS give you the widest margin before any plugin in the chain starts behaving unpredictably, and it's the reference point most analogue-modelled processors were built around.
At the bus and master stage, the target shifts. You're looking for mix bus peaks around a low dBFS range heading into your master limiter, leaving genuine headroom for the mastering stage to work with rather than a mix that's already slammed flat. Save your LUFS and true-peak targets for mastering itself, they belong to a different job than tracking gain.
Where you place the meter matters as much as which meter you use:
- Pre-insert metering shows what a plugin is actually receiving, not what's happening after it's already processed the signal, which is exactly what verifies correct headroom into a chain
- RMS or VU-style meters suit calibrating individual tracks and analogue-emulation plugin operating points
- True-peak and LUFS meters belong at the master chain, checking for inter-sample overs and loudness compliance
- Post-insert metering tells you what the next stage in the chain will receive, useful for checking makeup gain compensation
How do you gain stage a mix step by step?
Treat this as your session checklist. Work through it in order, and you'll rarely need to firefight a plugin later in the process.
-
Set every fader to unity gain before you start. Zero dB on the fader is your reference point. If you're already compensating with the fader before a single plugin is loaded, you've lost your baseline.
-
Use clip gain, region trim, or a gain plugin as the first insert on every track. This is where you set your nominal level, roughly −18 dBFS average, before any processing touches the signal. Clip gain and dedicated utility plugins are the correct tool here, not the fader, because clip gain works non-destructively at the source and doesn't interfere with fader automation you might add later in the mix.
-
Insert your first processor and check what it's receiving. Glance at a pre-insert meter, confirm the level landing on that compressor or EQ is close to what the plugin expects, then adjust and move on.
-
Use the plugin's own output or makeup gain to restore level after processing. A well-structured workflow sets initial levels with clip gain, then manages the level shift each processor introduces using its own output stage, rather than compensating downstream with the fader.
-
When a bus runs hot, fix it at the bus, not at the master. Add a trim or gain plugin before the bus processing, or a pre-bus utility insert on the group itself. Pulling the master fader down doesn't fix an overloaded bus compressor, it just makes the same problem quieter.
-
Protect your automation by keeping the fader for performance moves only. If you're using clip gain and plugin output trims for level correction, your fader stays free for the mix moves you actually want automated, rides, swells, breakdowns, without fighting a static correction you set weeks ago.
-
Verify at the top and bottom of the chain. Check a meter at the first plugin's input and check the master bus meter before any limiting. If both look right, everything in between has a fighting chance of behaving.
Pro Tip: Keep a spare utility gain plugin as a template insert on every new channel. It costs nothing in CPU and it means clip gain adjustments are never your only line of defence if you need a second, recallable point of control.
What are the most common gain staging mistakes?
Most gain-staging problems trace back to a handful of repeat offenders, and every one of them has a quick fix once you know what to look for.
- Using the fader to fix bad clip gain. Pulling a fader down to compensate for a track that's twenty decibels too hot hides the real problem instead of solving it, and it wrecks any automation you build afterwards.
- Forgetting plugin makeup gain adds up across a session. A compressor here, a saturation plugin there, each adding a little more level, and suddenly your bus is three decibels hotter than when you started without a single deliberate decision behind it.
- Loading hot virtual instrument presets without checking them first. Many stock instrument patches and sample libraries are mixed hot by default, so gain-stage them at the source before you stack five of them into an arrangement.
- Never checking the summed level hitting your master bus. If nobody looks at what's arriving at the master chain until mastering, you find out too late that the bus compressor has been working overtime the whole session.
Which tools help you meter and fix gain staging fast?
The right toolkit is smaller than most producers assume, and none of it needs to be expensive.
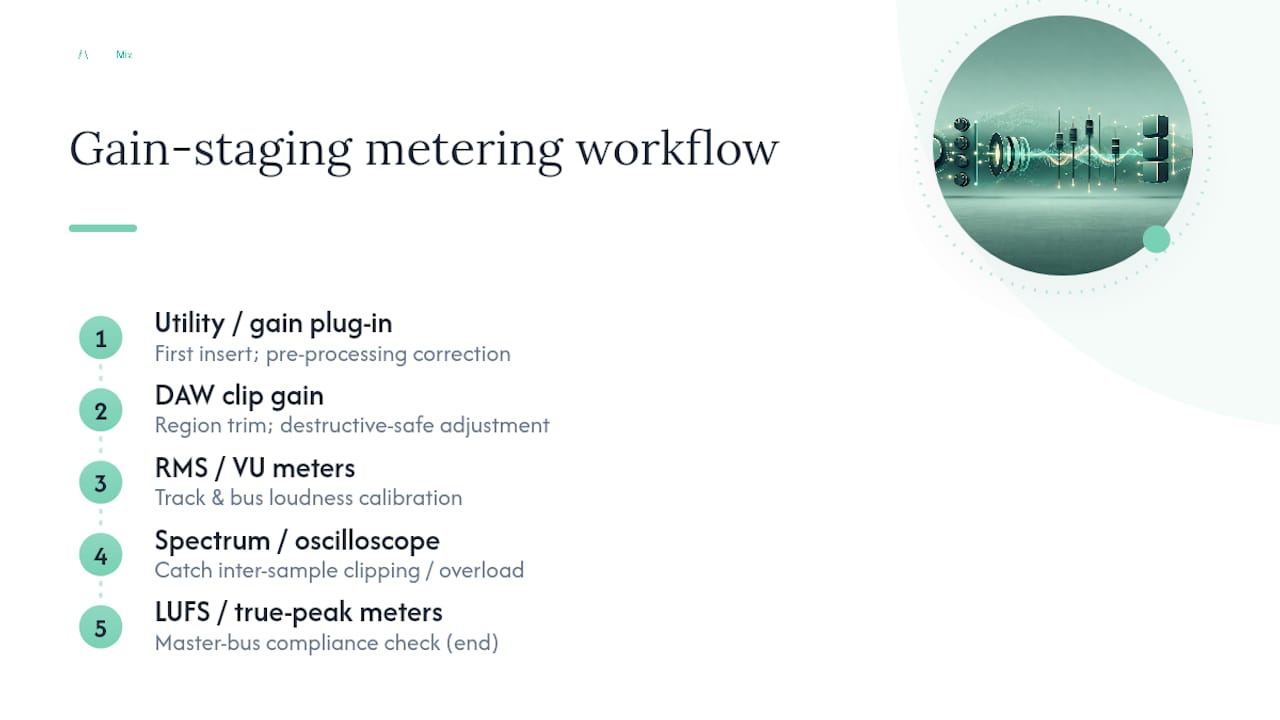
Utility or gain plugins earn their place as your first insert on nearly every channel, doing the pre-processing correction that a fader can't do safely. Pair that with your DAW's native clip gain or region trim tool for destructive-safe adjustments that live with the audio region itself rather than a separate automation lane.
For metering, split the job by stage. RMS and VU-style meters suit calibrating individual tracks and bus levels where you're gauging perceived loudness against your nominal reference. LUFS and true-peak meters belong at the very end of the chain, checking your master bus for mastering-ready compliance rather than track-by-track work. A basic spectrum analyser or even an oscilloscope view earns its keep too, catching inter-sample clipping or internal plugin overload that a standard peak meter won't show you until it's already distorted.
How does AubioMix check your gain staging for you?
Running through a mental checklist during a session is one thing. Having software confirm you actually hit it is another, and that's the gap AubioMix was built to close.
Upload a mix and AubioMix runs an automated pass across the exact points this article has walked through: headroom across your session, clipping on individual tracks and the master bus, LUFS and peak levels, and indicators of bus overload where summed level has crept past a sensible working range.
- Headroom and peak analysis across tracks and the master bus
- Clipping detection, including problems that hide inside a plugin chain
- LUFS and true-peak readings so you know exactly where you stand before mastering
- Bus overload flags where summed tracks are pushing a group into trouble
The workflow is straightforward: upload your mix, let the automated checks run, then work through the specific clip-gain or bus-trim adjustments the report recommends before re-uploading to confirm the fix landed. For a deeper look at the pre-plugin level work that underpins all of this, Aubiomix's guide to clip gain breaks down exactly how that first insert should be set.
When gain staging matters more than creative drive
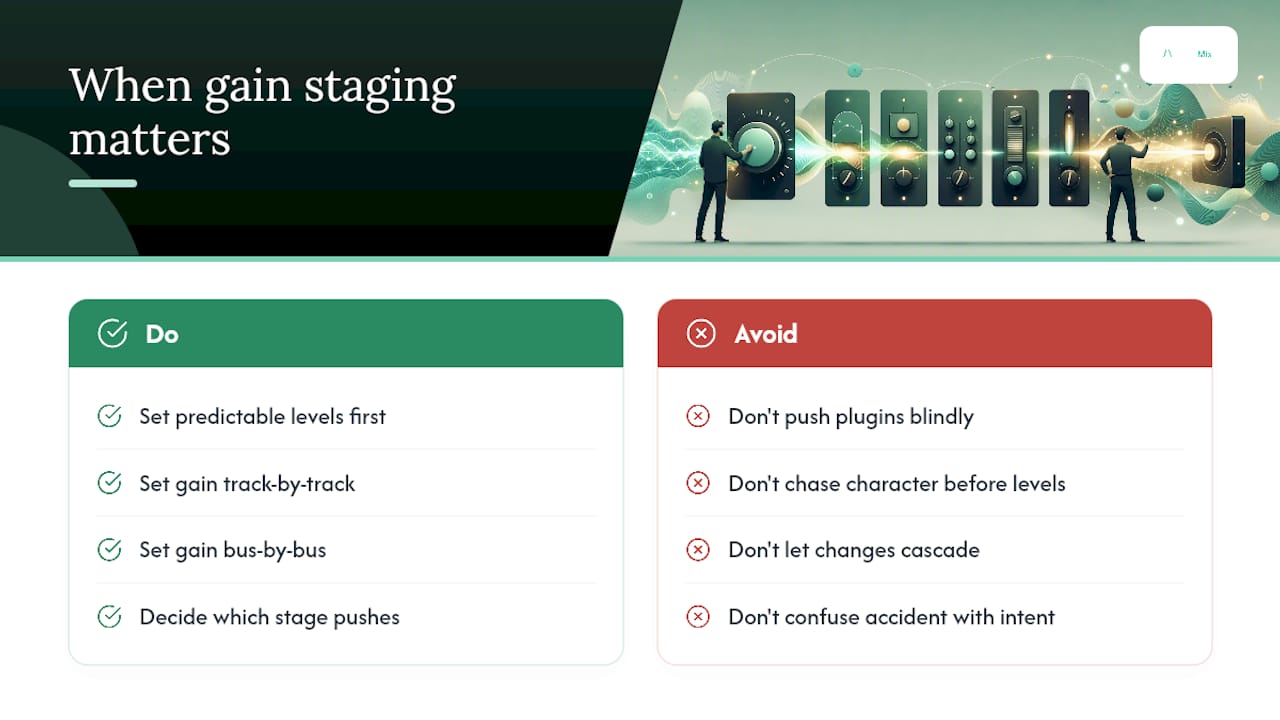
Get your levels predictable before you reach for character. Set a clean, deliberate gain structure track by track, bus by bus, so every processor is receiving what it expects, and only then decide where you want to push a signal into deliberate overdrive.
If a saturated, aggressive tone is the goal, that's a legitimate creative choice, not a mistake. The difference is intention: know exactly which gain stage is doing the pushing, and be able to undo it without unravelling three other decisions downstream. A mix built on a stable foundation lets you break the rules on purpose, which is a very different thing from breaking them by accident.
— AubioMix
AubioMix: verify your gain staging with an automated mix report
There's real skill in learning to read meters and trust your ears across a long session, but even experienced engineers miss a hot bus or a clipped transient buried three plugins deep. AubioMix exists to catch exactly that, running an automated pass over your mix and reporting headroom, clipping, LUFS and peak levels against the same references this article has walked through.

Upload a mix and within minutes you get a breakdown of where your levels sit against genre-appropriate targets, whether your bus is running hotter than it should, and specific, actionable steps to correct it rather than a vague "loudness score" with no context. It's the difference between guessing your gain staging is right and having a report confirm it before you send a mix out the door. If you're working in a genre with tight loudness expectations, the acoustic mastering benchmarks show exactly where your peaks and LUFS should land, and you can run your own mix through the same checks in a few minutes.
Sources
- What is gain staging and how can it help you mix? | MusicRadar
- Gain staging: what it is and how to do it | iZotope
- Guide to gain staging in audio production | Avid
- Gain staging guide | Sonarworks