
Oversampling is a targeted fix for non-linear plugins, saturators, clippers, amp sims, and some limiters, not a blanket setting to switch on everywhere. If you're unsure whether it's doing anything on a given channel, level-match and A/B compare with it off and on before you commit. Remember the trade-off: higher factors cost CPU and can add latency, so working at a higher project sample rate is sometimes the simpler fix.
TL;DR:
- Oversampling is most effective on non-linear plugins such as saturators, clippers, amp sims, and certain limiters, but offers minimal benefit on transparent EQs or time-based effects.
- Using 4x oversampling often provides noticeable improvements over 2x, but pushing to 8x or higher yields diminishing returns at a high CPU cost.
- Applying oversampling during final bounce instead of in real-time helps manage CPU load without sacrificing audio quality.
- Proper A/B testing with level-matched comparisons is essential to determine if oversampling makes a tangible difference on specific material.
- Oversampling prevents aliasing in non-linear processing but can introduce phase shifts and higher CPU demands, especially if used excessively or on multiple plugins simultaneously.
Table of Contents
- What is oversampling in mixing, and why does it cut aliasing?
- How do plugins implement 2x, 4x, and 8x oversampling?
- When should you use oversampling during mixing versus mastering?
- Which plugin types actually benefit from oversampling?
- How do you A/B test whether oversampling makes a difference?
- What are the tradeoffs and pitfalls of oversampling?
- What's the quick checklist for using oversampling well?
- Does oversampling change dynamic range or frequency response?
- How do you configure oversampling settings correctly in your DAW?
- How does an oversampling algorithm actually interpolate new samples?
- AubioMix's take: oversampling is a tool, not a default
- Sources
- FAQ
What is oversampling in mixing, and why does it cut aliasing?
Oversampling temporarily runs a plugin's internal processing at a multiple of your session's sample rate, then filters and brings the signal back down to your project rate before it hits the next stage in the chain. It's an internal trick the plugin performs on its own; nothing about your session sample rate changes.
The reason it matters comes down to a fairly unglamorous bit of digital audio theory: the Nyquist limit. Any non-linear process, saturation, hard clipping, waveshaping, generates new harmonics above the original signal's frequency content. When those harmonics push past half your sample rate, they fold back down into the audible range as aliasing, a harsh, metallic distortion that has nothing to do with the sound you intended. Oversampling pushes the Nyquist ceiling higher during processing, giving those unwanted harmonics room to exist without folding back into your mix.
Three practical benefits fall out of this:
- Anti-aliasing: harmonics generated by saturation or clipping get filtered out before they can alias back into the audible band.
- Better effective resolution: some processes gain a modest signal-to-noise improvement, since noise gets spread across a wider frequency range before filtering.
- Easier filter design: plugin developers can use gentler, more transparent anti-aliasing filters when they've got more headroom above the audible range to work with.
None of this is free. It's context-dependent, and on plenty of pop and rock material the gains are small enough that you'd struggle to hear them blind.
How do plugins implement 2x, 4x, and 8x oversampling?
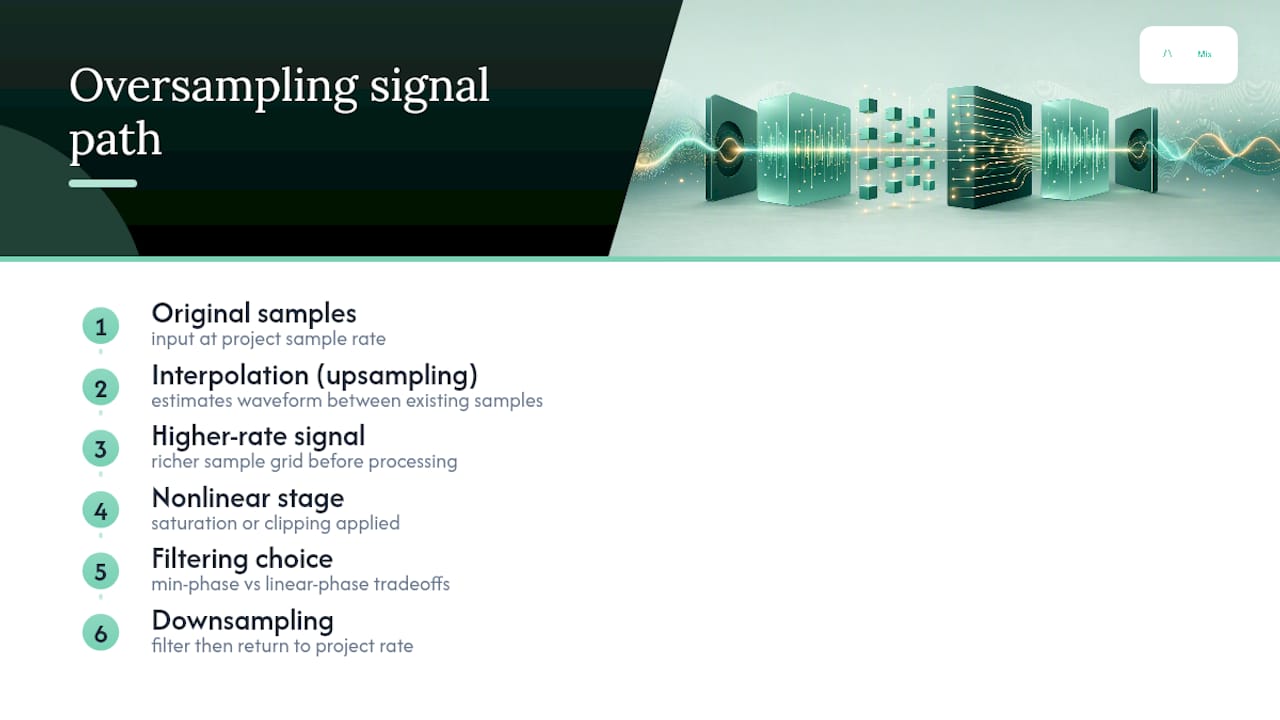
Every oversampling implementation follows roughly the same chain: upsample, process, filter, downsample. Understanding each stage explains why the factor you choose matters more than most people assume.
- Upsample: the plugin interpolates new sample points between your existing ones, effectively doubling, quadrupling, or multiplying the sample rate by whatever factor it's set to (2x, 4x, 8x). Sage Audio's explainer frames this as pushing Nyquist high enough that generated harmonics sit comfortably above the audible band.
- Process: the saturation, clipping, or limiting algorithm runs at this higher internal rate, so any harmonics it generates land above the new, higher Nyquist point rather than folding back into your mix.
- Filter: a low-pass filter strips out everything above the original Nyquist frequency. This filter's quality matters enormously; a poorly designed one introduces its own artefacts, sometimes worse than the aliasing it's meant to prevent.
- Downsample: the signal drops back to your project's native sample rate, ready to pass to the next plugin in the chain.
Going from 2x to 4x usually buys you an audible improvement on aggressive processors. Push to 8x and beyond, and diminishing returns set in fast, you're paying substantially more CPU for a change most ears won't catch. Filter type matters too: minimum-phase filters keep latency low but shift phase slightly, while linear-phase filters preserve phase accuracy at the cost of added delay.
When should you use oversampling during mixing versus mastering?
Context decides whether oversampling earns its CPU cost. Some situations reward it consistently; others barely move the needle.
In the mix, oversampling tends to help most on:
- Transient-heavy drums run through aggressive parallel saturation, where the harmonic content generated by hard-driven saturators is exactly what tends to alias.
- Parallel saturation buses, where you're deliberately pushing a signal hard for character, and any generated harmonics need somewhere to go besides folding back audibly.
- Amp sims on guitars or synths, since amp modelling relies on waveshaping that behaves a lot like analogue clipping.
In mastering, the stakes rise because artefacts on the stereo bus have nowhere left to hide before release:
- Final clipping and limiting stages, where you're pushing gain hard against a ceiling and any aliasing gets baked permanently into the master.
- Harmonic enhancement on the stereo bus, where subtle saturation is meant to feel warm rather than gritty, and aliasing undermines that intention.
Oversampling is unlikely to help much on transparent EQ moves, subtle time-based effects like reverb or delay, or on already noisy, distorted genre material where a bit of extra grit is either inaudible or beside the point — as also discussed in practical tests at the Blog du labo du studio d enregistrement résidentiel zenviewstudios. Sound On Sound's guidance is consistent on this: match the tool to plugins that actually generate new harmonic content, not to your whole session by default.
Which plugin types actually benefit from oversampling?
Not every plugin in your chain deserves the CPU hit. Here's a rough sorting guide worth keeping pinned somewhere visible.
Plugins that usually benefit:
- Saturators of any flavour, tape, tube, transistor, since generating harmonics is the entire point.
- Clippers, both soft and hard, which by design create new frequency content at the moment of clipping.
- Amp simulators, where waveshaping mimics valve or transistor distortion.
- Certain compressors and limiters with aggressive character modes that intentionally colour the signal.
Plugins that usually don't:
- Transparent EQs, which shape existing frequency content rather than generating new harmonics.
- Delays and reverbs, which are largely linear, time-based processes with nothing to alias.
- Simple gain or utility plugins, where there's no non-linear processing happening at all.
Exceptions exist. Vintage-style emulations and any plugin explicitly advertising harmonic modelling are worth checking regardless of category, since "vintage" often means "deliberately non-linear" under the hood. Saturation's role in a mix is worth understanding properly before you decide which of your saturators need the extra headroom.
How do you A/B test whether oversampling makes a difference?
Trusting your ears over your settings menu is the whole point here. Sound On Sound recommends a level-matched A/B comparison as the most reliable way to judge whether oversampling is doing anything worth the CPU cost, and it's the method AubioMix's own analysis keeps coming back to as well.
Here's a workflow that holds up under real deadline pressure:
- Duplicate the channel or bus you're testing before changing anything, so you've got an untouched reference to fall back on.
- Level-match the output between oversampled and non-oversampled versions; even a fraction of a decibel difference will bias what you hear.
- Bypass compare by toggling oversampling on and off repeatedly while listening specifically for harshness, grain, or a metallic edge on transients.
- Stress-test with a sine sweep or a hard-clipped click on the material in question; aliasing reveals itself far more obviously on synthetic test tones than on a full mix.
- Render or print a high-quality pass once you've settled the setting, so the final bounce carries whatever oversampling factor you actually need without taxing your CPU during the rest of the session.
In AubioMix's dataset of over 6,000 mix reports, bright transient sources, cymbals, hi hats, heavily saturated drum buses, show up again and again as the places where aliasing-like artefacts are most likely to accumulate. That's the shortlist worth testing first, rather than auditing every plugin in your session.
Pro Tip: If your machine chokes on multiple oversampled plugins running in real time, drop each one to 2x during tracking and mixing, then bump everything to your target factor only on the final render. You get the CPU headroom you need now and the quality you want later.
If your session is running tight, the Sound On Sound "chain oversampling" approach, doing one up/downsample pass across an entire channel strip rather than enabling it plugin by plugin, cuts cumulative CPU cost noticeably.
What are the tradeoffs and pitfalls of oversampling?
Oversampling solves aliasing but introduces its own set of practical headaches, and none of them are optional extras you can ignore once you've flipped the switch.
- CPU load climbs fast with multiple oversampled plugins running simultaneously; rendering or printing high-quality passes at the end of a session is usually smarter than running everything oversampled in real time throughout mixing.
- Phase issues can appear in send and return setups, where a minimum-phase oversampling filter shifts the processed signal's phase relative to a dry source, sometimes causing audible combing when the two recombine.
- True peak levels can actually rise after oversampling, since the anti-aliasing filter changes the shape of transient peaks slightly. Checking with a proper true-peak meter after any oversampled render catches this before it becomes a mastering problem.
Some minimum-phase oversampling implementations trade lower latency for phase alteration, a fair swap in a straightforward insert chain, but worth listening for carefully if you're running parallel processing. If you notice new latency after enabling oversampling on a busy session, it's worth checking how plugin latency behaves across track versus mix stages before assuming your plugin is broken.
What's the quick checklist for using oversampling well?
Four rules cover most real-world decisions:
- Listen first, decide second. Never enable oversampling by default; A/B it against a level-matched bypass.
- Target non-linear processors specifically, saturators, clippers, amp sims, harmonically aggressive limiters, not your whole session.
- Start at 2x or 4x, then escalate only if a critical listening test genuinely reveals a difference at the higher setting.
- Render your final pass oversampled even if you worked with it off, or at a lower setting, during the bulk of mixing.
For a deeper structural check across your whole session, running a full analysis through AubioMix flags where aliasing-prone material sits alongside everything else worth fixing.
Does oversampling change dynamic range or frequency response?
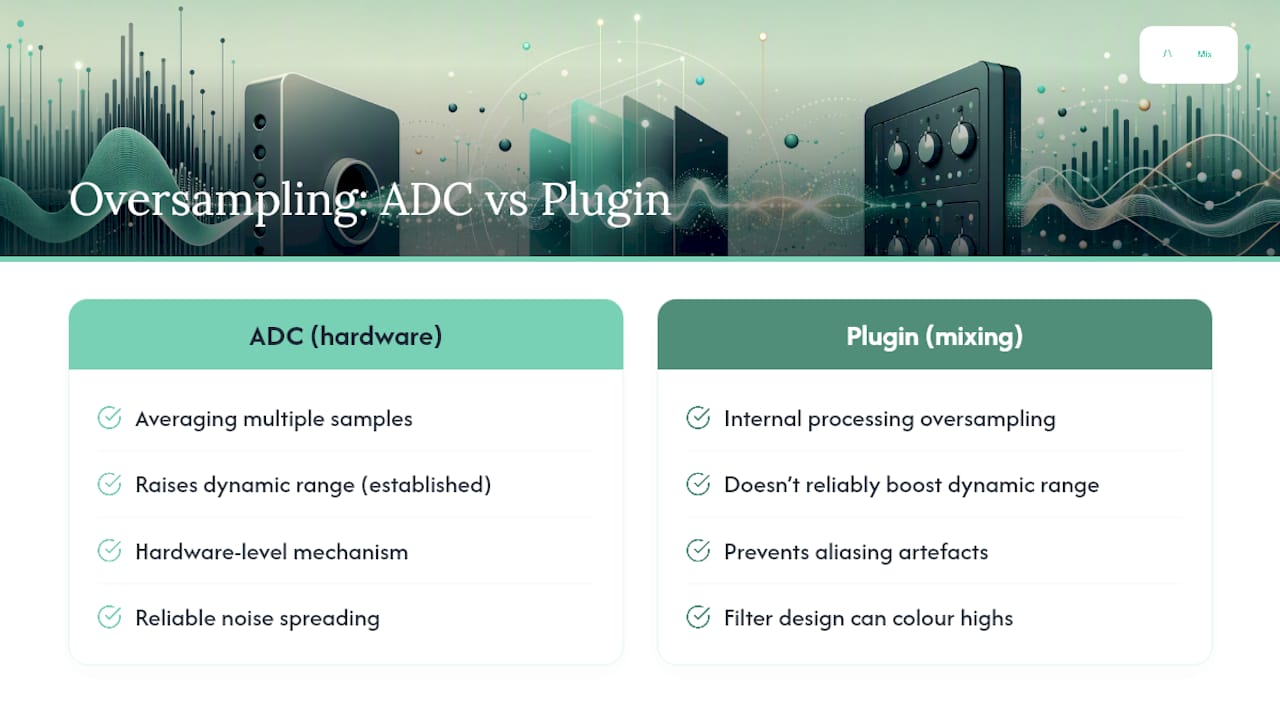
Oversampling's effect on dynamic range is subtler than most producers assume, and it's not the free lunch some plugin marketing implies. The theoretical link between oversampling and signal-to-noise comes from spreading quantisation noise across a wider frequency range before filtering it back down, which can lift effective resolution slightly. In converter design, this principle is well established: oversampling techniques used in SAR ADCs demonstrably increase dynamic range by averaging multiple samples. But that's hardware-level oversampling in an analogue-to-digital converter, a genuinely different mechanism from a plugin's internal oversampling during mixing, and the two shouldn't be conflated when you're deciding how a saturator plugin will behave.
Inside a mix, the audible frequency response impact is usually more about what oversampling prevents than what it actively changes. A well-implemented anti-aliasing filter keeps your intended tonal shape intact while removing the aliased harmonics that would otherwise sit inharmonically across the spectrum, sometimes as a barely perceptible haze, sometimes as an obvious grittiness on bright transients. Poorly designed filters can do the opposite: rolling off high-frequency content you actually wanted, or introducing ripple near the cutoff that colours the top end in ways you didn't ask for.
The practical takeaway is that oversampling's real value sits in preventing frequency response damage from aliasing, not in some independent boost to your dynamic range. Judge it by what your mix sounds like without the artefacts, not by an assumption that switching it on automatically nets you cleaner headroom.
How do you configure oversampling settings correctly in your DAW?
Most modern DAWs offer oversampling in two places: a global, session-wide setting, and per-plugin controls inside individual saturators, clippers, or limiters. Knowing which one you're adjusting matters, because they solve different problems.
Session-wide oversampling, sometimes labelled "project sample rate" rather than oversampling directly, raises your entire session to a higher native rate (88.2kHz or 96kHz instead of 44.1kHz or 48kHz, for instance). This avoids the need for individual plugins to oversample internally at all, since everything already runs at a higher rate throughout. The cost is session-wide: every track, every plugin, every render taxes your CPU and storage more heavily, which is why comparing 44.1kHz and 48kHz against higher rates matters before committing an entire project to it.
Per-plugin oversampling is usually a dropdown or button inside the plugin's interface itself, offering 2x, 4x, or sometimes 8x and 16x options. The practical approach: leave it at your default (often off, or 2x) during tracking and rough mixing to protect CPU headroom, then raise it selectively on the handful of non-linear plugins that actually showed a difference in your A/B tests, ideally just before your final render or bounce. Check your DAW's mixdown or export settings too. Many hosts let you apply a higher oversampling factor automatically during offline rendering than you use in real time, giving you the best of both without taxing your session while you work.
How does an oversampling algorithm actually interpolate new samples?
The upsampling stage isn't just duplicating samples; it's mathematically estimating what the waveform would have looked like at points between your existing samples, a process called interpolation. The quality of that estimate determines how clean the resulting oversampled signal is before it ever reaches the plugin's saturation or clipping stage.
Simple interpolation methods, linear or basic polynomial approaches, are computationally cheap but introduce their own small errors, effectively a mild distortion of their own. More sophisticated plugins use sinc-based interpolation or polyphase filters, which reconstruct the theoretical continuous waveform far more accurately, at the cost of more processing per sample.
This is also where the minimum-phase versus linear-phase choice resurfaces. Minimum-phase interpolation filters are computationally lighter and introduce less latency, useful in a real-time tracking scenario, but they shift phase relationships slightly across frequencies. Linear-phase filters preserve those phase relationships far more faithfully, which matters if you're recombining an oversampled signal with a dry, unprocessed reference elsewhere in your session, but they cost more in both latency and CPU.
None of this needs to become your personal obsession. What's worth remembering is that the algorithm behind your plugin's "2x" or "4x" button isn't neutral. Two plugins running the same oversampling factor can sound and behave differently depending on how carefully their interpolation and filtering were built, which is one more reason A/B listening beats trusting the number on the dial.
AubioMix's take: oversampling is a tool, not a default
Across the mix reports AubioMix has analysed, oversampling issues rarely show up as a missing setting; they show up as a mismatch between the processor and the material. Bright transients and saturated buses are where problems concentrate, and that's exactly where we'd point a producer first. Treat oversampling as a targeted fix, run the A/B tests on your own material, and let your ears settle the argument.
— AubioMix
Sources
- When should you use oversampling? — Sound On Sound
- Should I be oversampling? — Sonarworks blog
- Oversampling — Wikipedia
- What is oversampling in plugins? — SoundUnderControl
FAQ
What is the purpose of oversampling?
Oversampling raises a plugin's internal processing rate so harmonics generated by saturation, clipping, or waveshaping land above the audible band before being filtered back down. This prevents aliasing, the harsh, inharmonic distortion that occurs when those harmonics fold back into your mix.
When should you use oversampling?
Use it on non-linear processors, saturators, clippers, amp sims, and harmonically aggressive limiters, particularly on bright transient material like cymbals or driven drum buses. Sound On Sound recommends deciding by level-matched A/B test rather than switching it on everywhere by default.
What are some examples of oversampling in a mix?
Transparent EQs and reverbs rarely need it since they don't generate new harmonic content.
What does oversampled audio mean at higher resolutions?
Oversampled audio simply means a signal has been processed, temporarily, at a multiple of its native sample rate to give non-linear processing more headroom before downsampling back down. It's distinct from working in a genuinely higher-resolution project sample rate throughout an entire session, which avoids the need for plugin-level oversampling but increases CPU and storage demands across the board.