
The fastest fix for reverb mud is a four-step combo: add pre-delay, high-pass the reverb return starting around 150 to 300 Hz, shorten decay so tails clear before the next phrase, and route the reverb through a send/return bus rather than an insert. Get those four things right and most muddy mixes clean up within minutes. The checklist below walks through the order to tackle them in.
TL;DR:
- Most muddy reverb issues resolve by setting a high-pass filter around 150 to 300 Hz and shortening decay to match the track's tempo.
- Routing reverb to a shared aux bus with full wet signal prevents overlapping tails and low-frequency buildup from multiple sources.
- Using pre-delay of 20 to 40 ms on vocals helps separate the attack from the reverb tail, improving clarity and space perception.
- Choosing reverb types like room or plate instead of hall can reduce mud in busy arrangements, especially on vocals and percussion.
- Applying targeted filtering, gating, or de-reverb tools can be necessary when basic adjustments do not eliminate reverb muddiness.
Table of Contents
- What's the fastest way to fix muddy reverb?
- Pre-delay: set it to separate the attack from the tail
- Decay time and tempo: set tails that clear before the next phrase
- EQ and filtering on the reverb: low‑cut, mid dips and top roll‑off
- Routing and workflow: shared reverb buses, wet returns and grouping
- Choosing the right reverb type for instrument roles
- Advanced surgical tools: gating, transient shapers and de‑reverb
- AubioMix mini case study: triage steps applied to a muddy vocal
- What early reflections do to how a space feels
- Adjusting reverb diffusion and density for different textures
- Using modulation in reverb to add movement and complexity
- Common creative uses of reverb mud and how to use or avoid it
- Strategies for balancing reverb level to maintain clarity without washing out the mix
- When reverb should be felt, not heard — an editorial view
- How AubioMix can help: upload a mix and get targeted reverb fixes
- Sources
- FAQ
What's the fastest way to fix muddy reverb?
When a mix sounds like it's wearing a wet jumper, don't reach for a new reverb plugin. Work through this in order, because each step reveals whether you actually need the next one.
- Solo the reverb return. Pull the send levels down and listen to the tail on its own. You'll often hear the problem instantly, whether that's a boomy low end, a smeary mid-range, or a tail that just won't shut up.
- Add a high-pass filter. Start around 150 to 300 Hz on the reverb return or send. This single move removes low-end build-up that's often the biggest source of mud.
- Add pre-delay and trim decay. Start at 20 ms of pre-delay, then shorten decay to suit the tempo. This gives the dry attack room to speak before the tail arrives.
- Check your routing. Reverb belongs on an aux or send bus set to 100% wet, not stacked as an insert on every channel. And don't send kick or bass to it by default. Bass frequencies in a reverb tail are almost always mud in disguise.
- Go surgical if it's still murky. Try gating the reverb return, using a de-reverb tool on a problem track, or splitting instruments across two or three different reverb types instead of one catch-all verb.
Most mixes clear up by step three. If you're still fighting mud after that, the problem usually isn't the reverb at all. It's frequency masking somewhere else in the arrangement, which is worth checking with an EQ and low-mid audit before you blame the effect.
Pre-delay: set it to separate the attack from the tail
Pre-delay is the gap between the dry sound hitting your ears and the reverb tail arriving behind it. Without it, the reverb starts washing in the instant the transient fires, which smears the attack and makes the whole source feel soft and distant, even when the reverb itself sounds lovely in isolation.
Most engineers work with pre-delay values within a moderate, commonly recommended range, starting at a sensible setting that provides clear separation.
- Vocals: 20 to 40 ms. This is the range that keeps consonants and breaths intelligible while still letting the tail bloom.
- Electric guitar: 10 to 30 ms. Shorter than vocals, because guitar transients are quicker and less forgiving.
- Drums: shorter values, or tempo-synced pre-delay, so the tail doesn't smear the next hit.
Pro Tip: Longer pre-delay doesn't just separate the attack, it also pushes the reverb further back in the soundstage. If a verb feels too "in your face" even after you've cut the level, try adding 10 to 15 ms of pre-delay before you touch the send fader.
Pre-delay is essential for keeping the dry signal distinct from the tail, and it's one of those settings that costs nothing in CPU but changes the entire feel of a space. It's the difference between a vocal that sits in a room and one that sounds like it's drowning in one.
Decay time and tempo: set tails that clear before the next phrase
Decay length has to answer to the tempo, full stop. A three-second tail sounds glorious on a slow ballad and sounds like porridge on a 140 BPM track, because the reverb from one phrase hasn't finished before the next one starts.
As a working guide:
- Faster tempos (house, pop, most modern productions): keep decay around 1.2 to 2 seconds.
- Slower arrangements (ballads, ambient, cinematic material): 2 to 3.5 seconds can work, provided the tail actually clears before the next line or chord change lands.
The listening test is simple: play the part in full context, not solo, and listen for the tail bleeding into the following phrase or downbeat. If you catch yourself losing the next word or hit under a wash of reverb, the decay is too long for the tempo, no matter how good it sounded on its own.
For percussive sources, especially snare and toms, a gated reverb or a room preset with short early reflections often does more for punch than any amount of decay tweaking. It gives you the sense of space without the trailing smear that fights the next hit.
EQ and filtering on the reverb: low‑cut, mid dips and top roll‑off
Filtering the reverb return is where most of the actual mud gets scrubbed out, and it's worth doing properly rather than slapping on a generic preset.
Start with a high-pass filter around 150 to 300 Hz on the return. In busier arrangements with a lot happening in the low-mids, don't be afraid to push that cutoff up to 400 Hz. The reverb doesn't need to carry bass information. It just adds weight where you don't want it.
Next, hunt for problem frequencies in the 200 to 600 Hz range. Sweep a narrow band with some gain and listen for the spot where the tail turns from "space" into "sludge," then pull it down a few dB. This is often the single most effective move on a reverb that still sounds thick after the low-cut.
Finally, consider rolling off extreme highs above 8 to 10 kHz. This keeps the reverb from competing with the dry signal for "air", which matters more than people expect on bright vocal or cymbal-heavy mixes.
- Filter on the send rather than the return whenever your plugin allows it.
- This keeps low frequencies out of the reverb algorithm entirely, rather than processing them and then cutting them afterwards.
- It's lighter on CPU and often sounds cleaner, since the reverb tail is generated from already-filtered material.
Pro Tip: Placing the high-pass before the reverb algorithm, rather than after it, stops the plugin from ever generating muddy low-end in the first place. It's a small workflow change with a genuinely audible payoff.
Routing and workflow: shared reverb buses, wet returns and grouping
One of the quietest causes of reverb mud isn't a bad setting at all. It's using six different reverbs on six different tracks, each with its own tail, its own decay, and its own idea of what a room sounds like.
Using a shared aux or send reverb, rather than inserting a fresh instance on every channel, fixes this in one move. Set the return to 100% wet, then control how much of each instrument sits in that space using the send level on each channel, not by duplicating the reverb itself.
- Group related instruments (backing vocals, a string section, a drum overhead) onto the same reverb bus so they read as occupying one coherent space.
- Fewer, more targeted reverbs beat many overlapping ones, which is also a solid guard against the smeared, washy sound that comes from stacking multiple verbs on top of each other.
- Avoid sending kick and bass to reverb as a default habit. If you genuinely want some, use a very short room tail with heavy low-cut, not the same lush hall you're using on vocals.
This approach also saves your CPU meter a headache, and it sidesteps phase problems that crop up when overlapping tails from separate reverb instances start cancelling each other out.
Choosing the right reverb type for instrument roles
Not every reverb algorithm is equally prone to mud, and picking the right character for the job does a lot of the clean-up work before you touch a single fader.
Hall reverbs are big and thick, gorgeous on orchestral material or a widescreen chorus, but the highest risk for mud on anything with a busy arrangement. Room reverbs are more natural and considerably easier to tuck under a mix without drawing attention. Plate is a strong default for vocals and snare, since it tends to stay clearer through the mids than a hall does. Chamber sits somewhere in between, lush but noticeably cleaner than a full hall. Convolution reverbs model real physical spaces and can sound stunning, though they usually need EQ help to avoid dragging in whatever coloration the original room had.
- In a busy, dense arrangement, reach for a short room or even a slap delay instead of a lush hall. You get the sense of space without the wash.
- Watch your diffusion setting. High diffusion smooths the reflections into a denser wash, which sounds beautiful in isolation and can increase low-mid smear once it's sat under a full mix.
- Match reverb type to the instrument's role, not just its sound in isolation. A vocal doesn't need the same space as a synth pad, even if they're playing at the same time.
Advanced surgical tools: gating, transient shapers and de‑reverb
When pre-delay, filtering, and routing haven't fully solved it, a handful of more targeted tools can finish the job.
Gating the reverb return chops the tail short after a set time, which works well on drums and percussive sources where you want ambience on the hit but not a trailing smear into the next one. A transient shaper on the dry source, pushed to emphasise the attack, achieves something similar from the other direction.
For tracks with reverb already baked into the recording, ML-based de-reverb tools can pull a surprising amount of tail back out, though they're not magic. Expect some artefacts, and always audition the result in full context rather than solo, since processing that sounds fine alone can sound strange sitting inside a busy arrangement.
- Sidechain the reverb return beneath the lead vocal or lead instrument so it ducks automatically when that part is playing.
- Automate reverb send level across a song, pulling it back in verses and opening it up in choruses or breakdowns.
- Use both together for a mix that breathes rather than sitting at one static wet level throughout.
AubioMix mini case study: triage steps applied to a muddy vocal
A recent AubioMix triage example, drawn from the "5 Minute Triage for Mixers" breakdown, tackled a lead vocal that sounded buried under its own reverb on a mid-tempo pop track.
The before state was familiar: a hall reverb, no pre-delay, a decay length borrowed from a preset with no thought given to tempo. The fix followed the same order as the checklist above: Pre-delay went in at 20 to 40 ms, immediately restoring the consonants and giving the vocal a defined leading edge. The reverb return got a high-pass filter around 200 Hz, which pulled a surprising amount of boxiness out of the tail. Decay dropped to 1.2 to 1.8 seconds, matching the mid-tempo groove so the tail cleared before the next vocal phrase landed.
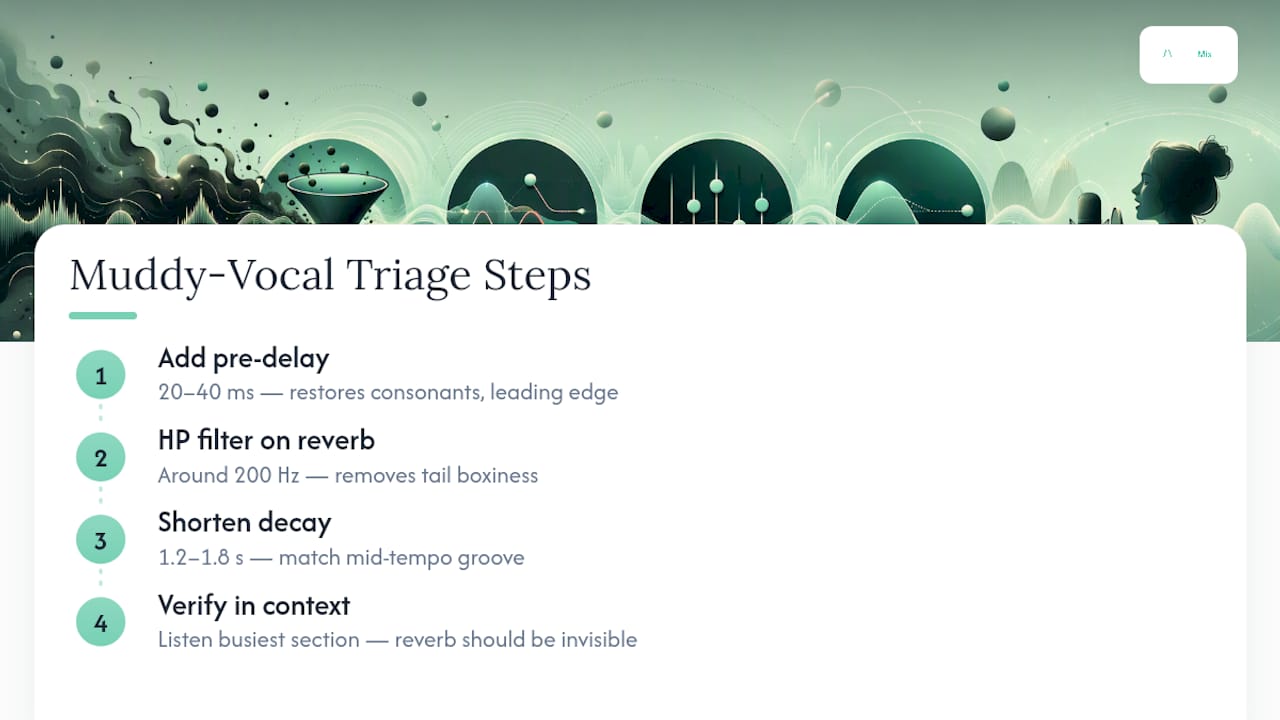
The verification step matters as much as the fix itself. Listen in full context, at the section where the vocal is busiest, and check whether the reverb is still audible as its own thing or whether it's doing its job invisibly. If any mud remains after this pass, it's usually coming from somewhere else in the low-mids, which is exactly the kind of cross-instrument masking a full mix review is built to catch.
What early reflections do to how a space feels
Early reflections are the first handful of bounces a sound makes off nearby surfaces before the fuller reverb tail builds up, and they do more for the sense of "where am I" than most people give them credit for. A short, tight cluster of early reflections reads as a small, close room. A longer, more spread-out pattern reads as something cavernous, even before the main tail kicks in.
This matters for reverb mud because early reflections sit closer in time to the dry signal, which means they're more exposed and more likely to clash with the attack of the source if they're too dense or too loud. Many reverb plugins let you adjust early reflection level and spread independently from the main decay, and turning that level down slightly is often a faster route to clarity than fighting the decay tail alone.
If a vocal or lead instrument feels cluttered right on the attack, rather than smeared later in the sustain, the early reflections are usually the culprit rather than the tail. Try trimming that parameter before you touch decay or pre-delay again, since it's a more surgical fix for that specific symptom.
Adjusting reverb diffusion and density for different textures
Diffusion controls how quickly the individual echoes in a reverb blur together into a smooth wash rather than a series of distinct, countable reflections. Density is closely related. It governs how many reflections are packed into that wash. Together, these two settings decide whether a reverb sounds like a specific, believable room or like an abstract, textural cloud.
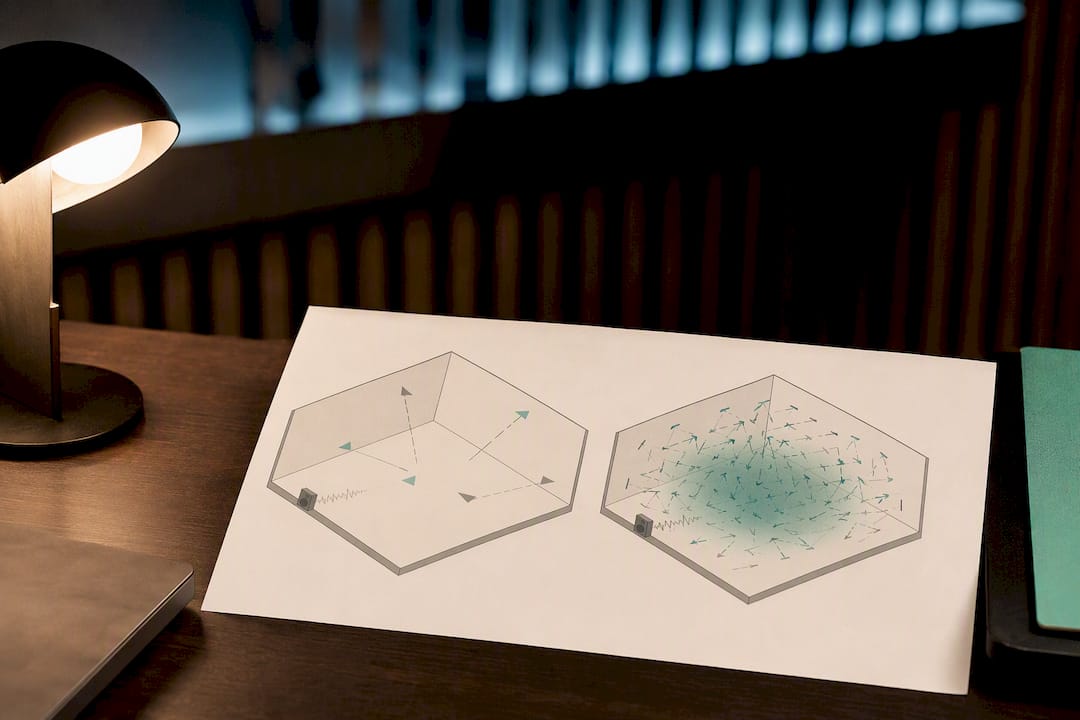
High diffusion suits pads, ambient textures, and anything where you want the reverb to feel like part of the arrangement rather than a space around it. Low diffusion suits drums and percussive sources, where you want to still hear the individual slap of each reflection rather than a smoothed-out wash.
The trade-off is that heavy diffusion tends to thicken the mid-range, and that thickening is exactly what reads as mud once it's stacked under a full arrangement. If a reverb sounds gorgeous solo but turns to sludge in context, try dropping diffusion by 20 to 30% before reaching for more EQ. It's often a cleaner fix than filtering, because it addresses density at the source rather than carving frequencies out afterwards.
Density settings interact with decay too. A short decay with very high density can still sound busier than a longer decay with low density, so judge these two parameters together rather than in isolation.
Using modulation in reverb to add movement and complexity
Modulation applies a slow, cyclical pitch or timing shift to the reflections inside a reverb, which stops the tail from sounding static and adds a subtle chorus-like movement to the space. Most algorithmic reverbs include a modulation depth and rate control, often tucked away in an advanced panel that plenty of producers never open.
Used well, modulation makes a reverb feel alive rather than pasted on, particularly on sustained sources like pads, strings, or long vocal tails where a static reverb can sound slightly synthetic. It also has a practical side effect: modulation can help disguise metallic ringing or resonant frequencies that sometimes show up in algorithmic reverb tails, since the constantly shifting pitch stops any one frequency from building up and drawing attention.
The risk runs the other way if you push it too far. Heavy modulation depth can introduce a warbling, seasick quality that reads as its own kind of mud, less about frequency build-up and more about pitch instability clouding the tail. Start with modulation depth low, around 10 to 20% of the available range, and increase only if the reverb genuinely needs more life. On percussive or transient-heavy sources, it's usually best left off entirely, since the movement it adds fights against the crispness you're trying to preserve.
Common creative uses of reverb mud and how to use or avoid it
Not every mud is a mistake. Plenty of records lean into a deliberately thick, blurred reverb as a texture, particularly in shoegaze, ambient, lo-fi, and certain strains of electronic music, where a hazy wash is the point rather than the problem.
The difference between "intentional atmosphere" and "accidental mud" usually comes down to control. A producer chasing that hazy sound picks one element to blur, often a background pad, a guitar layer, or a transition effect, and keeps everything else in the arrangement clean and forward. The mud becomes a texture sitting behind a clear foreground, rather than something smothering the whole mix.
Trouble starts when that same thick, unfiltered reverb gets applied indiscriminately across several instruments at once, especially when it lands on anything carrying low-mid information, like a vocal, a snare, or a rhythm guitar. At that point, the effect stops reading as atmosphere and starts reading as a mix that's lost definition. If you want the hazy, blurred aesthetic, the Slate Digital guidance on stacked reverbs still applies. Pick your one or two candidates deliberately, and keep everything else on a tighter leash so the contrast reads as a choice rather than an oversight.
Strategies for balancing reverb level to maintain clarity without washing out the mix
Getting the send level right is often more about the listening method than the number on the fader. Set your reverb level while soloing the instrument, then immediately drop back to the full mix. The level that felt tasteful in isolation will almost always feel too loud once every other instrument is competing for the same space, because reverb tails are additive across a whole arrangement.
A useful trick: automate reverb sends to pull back slightly during busy sections (a full chorus, a dense drop) and open up a touch more during sparser moments (a verse, a breakdown). This keeps the sense of space consistent to the ear even though the actual wet level is quietly shifting underneath.
Reference against a commercial mix in the same genre at a matched loudness, and pay attention to how little reverb is often audible as its own element. On most professional records, the reverb isn't something you consciously hear. It's something that would be missed if it were switched off. That's the target: a wet signal that supports the dry source rather than competing with it, checked at more than one listening volume, since reverb tails become far more obvious at low playback levels than at loud ones.
When reverb should be felt, not heard — an editorial view
The instinct to reach for a bigger, lusher reverb when a mix feels flat is almost always the wrong move. The best-sounding reverbs on professional records are usually the ones you can't consciously identify, because subtlety and context beat extreme settings nearly every time.
If you're unsure whether a reverb is too much, reference it against a commercial track in the same genre and check at a quieter listening level too. Mud hides at loud volumes and reveals itself at low ones.
— AubioMix
How AubioMix can help: upload a mix and get targeted reverb fixes
Working through pre-delay, filtering, and decay by ear gets you most of the way there, but it's easy to miss whether the mud is actually coming from your reverb or from unrelated frequency masking elsewhere in the arrangement. That's the gap Aubiomix is built to close.

Upload a mix and you'll get a detailed breakdown across more than fifteen areas of mixing and mastering, including effects and reverb handling, alongside compression, EQ, stereo width, and phase. Every report pairs objective measurement with practical, written next steps, drawing on an evaluation framework built by a multi-award-winning mix engineer with over 20 years behind the desk. You can check your work against real genre benchmarks too, so you're not just guessing whether your reverb tail sits where it should.
A single Mix Review is available; current prices are on the pricing page. For producers working through reverb issues regularly, a Professional plan is available to cover a set number of reviews each month, with pricing details on the site. Upload your track and see exactly where your reverb is helping the mix, and where it's quietly working against it.
Sources
For deeper reading on pre-delay, decay, and filtering, see iZotope's reverb pre-delay guide and Mix Protégé's reverb filtering advice. For AubioMix's own take on reverb fundamentals, read the producer's guide to reverb and check general sound design and space management tips from Voclify.
- Reverb pre-delay explained: how to avoid a muddy reverb sound — iZotope
- Reverb time guidance — tools4music
- How to add reverb to acoustic instruments without muddying your mix — Mix Protégé
- Reverb aux send vs insert — Mixing Lessons
FAQ
How do I fix muddy audio in general, not just reverb?
Start by identifying whether the mud comes from reverb, low-mid buildup between instruments, or both. High-pass your reverb returns around 150 to 300 Hz first, then check for overlapping low-mid frequencies between instruments like bass, guitar, and kick.
What is the best reverb pedal of all time?
There's no single agreed "best," since the right choice depends on genre and role, but plate-style units are widely favoured for vocals and snare because they tend to stay clearer through the mids than hall-style units.
What are the four types of reverb?
The four most commonly referenced types are hall, room, plate, and chamber, with convolution reverb often added as a fifth for modelling real physical spaces. Hall is the biggest and thickest, room is the most natural and easiest to tuck into a mix, plate stays clearest through the mids, and chamber sits between plate and hall in size and clarity.
Why does my guitar tone sound muddy?
Muddy guitar is usually a mix of too much low-end in the dry signal and an unfiltered reverb tail stacking on top of it. Try a modest low-cut on the guitar itself, then apply the same 150 to 300 Hz high-pass on the reverb return, with pre-delay around 10 to 30 ms to keep the pick attack defined.
Can AubioMix tell me if my reverb is causing the mud?
Yes. A Mix Review checks effects handling alongside EQ, compression, and stereo width, so you can see whether reverb, low-mid masking, or both are behind the muddiness in your track.