
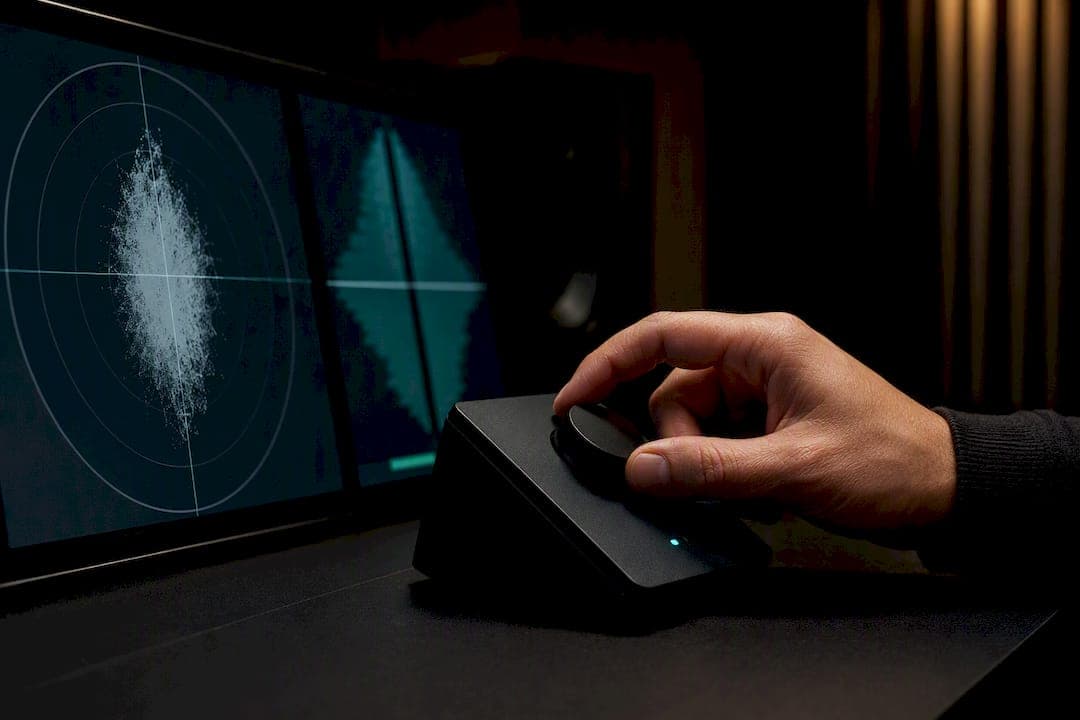
Stereo imaging analysis measures three things: width, position, and depth across your left-right field. The fastest way to start is simple: load a goniometer and correlation meter on your master bus, sum the mix to mono, and listen. If the mix collapses or thins out, you've got a translation problem. If it holds together, your imaging is doing its job.
TL;DR:
- Most mixes should be constantly checked by summing to mono and monitoring correlation to ensure proper stereo translation.
- Fix phase issues, unbalance, and low-end width problems by targeted EQ, panning adjustment, and limiting the use of stereo wideners.
- Use reference tracks in genre-specific tests such as mono-sum sweep and side high-pass filtering to identify stereo imaging flaws quickly.
- Visual tools like goniometers, correlation meters, and mid/side analyzers, combined with listening checks, provide reliable diagnostics.
- Automated analysis tools like AubioMix streamline the process by offering measurable reports and specific fix suggestions.
Table of Contents
- What is stereo imaging analysis and which meters do you need?
- How do you actually run a stereo imaging check step by step?
- Common stereo imaging problems and how to fix them
- Which reference tracks reveal stereo imaging problems fastest?
- What tools actually help with stereo imaging analysis?
- How does AubioMix support this kind of analysis?
- Does stereo imaging analysis change by genre?
- How should you interpret stereo imaging data and act on it?
- Why measurement beats guesswork in stereo imaging
- Get a measured read on your own mix
- Sources
What is stereo imaging analysis and which meters do you need?
Stereo imaging is the placement and spread of sound across your left-right space, and it's shaped by two things: level differences (your pan pots) and timing or tonal differences between channels, which is what gives true stereo recordings their sense of air and dimension, as Violet Recording explains. Width is how far things spread; position is where they sit; depth is the illusion of front-to-back distance created by reverb, level, and high-frequency content.
Three meters do most of the diagnostic work, and the PSP Stereo Analyser product family is a decent example of what a professional-grade version of each looks like:
- Goniometer (X-Y scope): shows the shape of your stereo field. A tight vertical line means mono. A neat, symmetrical blob leaning toward vertical means a stable, well-balanced image. A scattered, sideways-sprawling mess usually means phase trouble.
- Correlation meter: reads from +1 (perfectly mono) to -1 (fully out of phase). During loud sections, aim to keep it above +0.4, with a healthy modern mix typically sitting between +0.5 and +0.7.
- Mid/side analyser: splits your signal into the centre (mid) and the difference between channels (side), letting you see exactly how much energy lives outside the centre and at which frequencies.
Pro Tip: If your correlation meter dips below +0.4 only during the chorus, don't touch the whole mix. Solo that section and find which element is causing it. It's usually a widener on a lead vocal double or an overzealous reverb send.
Per-band width meters matter because a mix can look fine overall while hiding a mono-unsafe low end. Check width by frequency band, not just as one global number.
How do you actually run a stereo imaging check step by step?
Run this in order, every time, and you'll catch nearly every imaging fault before it reaches mastering.
- Listen first, meters off. Play the mix normally, then sum it to mono. Note anything that vanishes, thins, or changes tone. That's your problem list before you've even opened a plugin.
- Visualise on the master bus. Put your goniometer and correlation meter across the full mix and play through the loudest section. Watch for correlation drops and any lopsided lean in the X-Y display.
- Isolate and test stems. Solo groups (drums, bass, vocals, guitars) and run the same meters on each. This tells you whether a width problem originates at the source or gets introduced by a bus process.
- Apply corrective fixes. Depending on what you find: rebalance pans, apply mid/side EQ, high-pass the side channel around 80–120Hz, fix timing misalignment on spaced mics, or swap an aggressive widener for genuine doubles or a short stereo reverb.
- Re-verify. Sum to mono again, check correlation during the busiest sections, and listen on at least two playback systems, since headphones tend to exaggerate separation compared with monitors in a room.
That last step matters more than most producers admit. A mix that looks perfect on a goniometer can still fall apart on a phone speaker if you never checked it there. Room acoustics and monitor placement affect what you hear, but they don't affect what the meters show, which is exactly why the visual check and the listening check need to happen together, not as substitutes for each other.
Common stereo imaging problems and how to fix them
Most imaging complaints trace back to a handful of repeat offenders. Here's how to match the symptom to the fix without overcorrecting.
- Hollow centre in mono. Usually caused by a phase-based widener on a lead element. Remove or bypass it, apply a side-channel high-pass, and use mid/side EQ to rebuild presence in the centre rather than adding more width.
- Lopsided stereo field. One side feels heavier than the other. Fix this with gain and pan balance on the offending elements rather than stacking new material onto the quiet side, which just creates clutter.
- Wide, unstable low end. Bass and kick spreading across the stereo field is the fastest way to lose mono compatibility. Keep everything below roughly 80–120Hz mono, and route kick and bass through the mid channel specifically, a rule that holds regardless of genre, as MusicTech's guide on stereo width control points out.
- Masking and clutter. Two elements fighting for the same space usually isn't a level problem, it's a positioning one. Complementary panning plus targeted EQ carving on the conflicting frequency range clears this up faster than reaching for compression.
Haas-effect delays, typically 10 to 40 milliseconds, are a common culprit behind all four problems above. They sound wide on headphones and cause exactly the kind of mono cancellation these fixes are designed to catch. If you're relying on one, this is worth reading before you commit to it across a whole session.
Which reference tracks reveal stereo imaging problems fastest?
Good reference material has a defined centre, clear and distinct side content, and rock-solid mono translation. Commercial masters in your genre are the obvious starting point, since they've already been checked against exactly this problem.
- Mono-sum sweep: play the reference and your mix back to back in mono. Note what survives and what doesn't.
- Pan-balance sweep: listen across the stereo field for symmetry, left to right.
- Side high-pass test: solo the side channel and sweep a high-pass filter upward to hear what low-frequency content is lurking there.
- Reverb tail isolation: solo just the reverb returns to check they're not smearing the centre image.
Use choruses, double-tracked guitars, and overhead drum mics for these tests. They carry the most stereo information and expose problems that a sparse verse will hide. Level-match your reference and your mix before any A/B, or your ears will just follow the louder one.
What tools actually help with stereo imaging analysis?
You don't need a shelf full of plugins, you need one of each category, used correctly.
- Metering suites: a goniometer and correlation meter combination on the master bus, running continuously, not just checked occasionally.
- Mid/side EQs: for rebalancing tone between the centre and the sides without touching overall width, covered in more depth in our guide to mid/side mixing mistakes.
- Stereo aligners: for fixing timing and phase mismatches on spaced-mic recordings, which is often the real source of a "wide but weak" image.
- Wideners and creative processors: use sparingly. Genuine doubles or a short decorrelating reverb almost always sound better and translate more safely than an artificial widener, a point MusicTech's stereo width piece backs up directly.
- Free options: most modern DAWs now ship a native goniometer and correlation meter, which is plenty for the checks in this article, and a free online workspace like AmmarAI's Sound Studio is worth a look if you want a lightweight environment to test ideas in.
How does AubioMix support this kind of analysis?
AubioMix automates a good chunk of the routine above. Upload your mix and it flags mid/side balance issues, mono-compatibility risks, and stereo width problems as part of a wider report covering 15+ mixing and mastering areas. You get the visual reading (the equivalent of your goniometer and correlation check) alongside written, specific fixes, not just a number with no explanation.
That combination matters for iteration speed. Instead of guessing whether your fix actually improved translation, you get a measurable benchmark report you can compare before and after, and download as a PDF to track progress across a whole project. For anyone running the workflow described above by ear alone, it's a useful second opinion.
Does stereo imaging analysis change by genre?
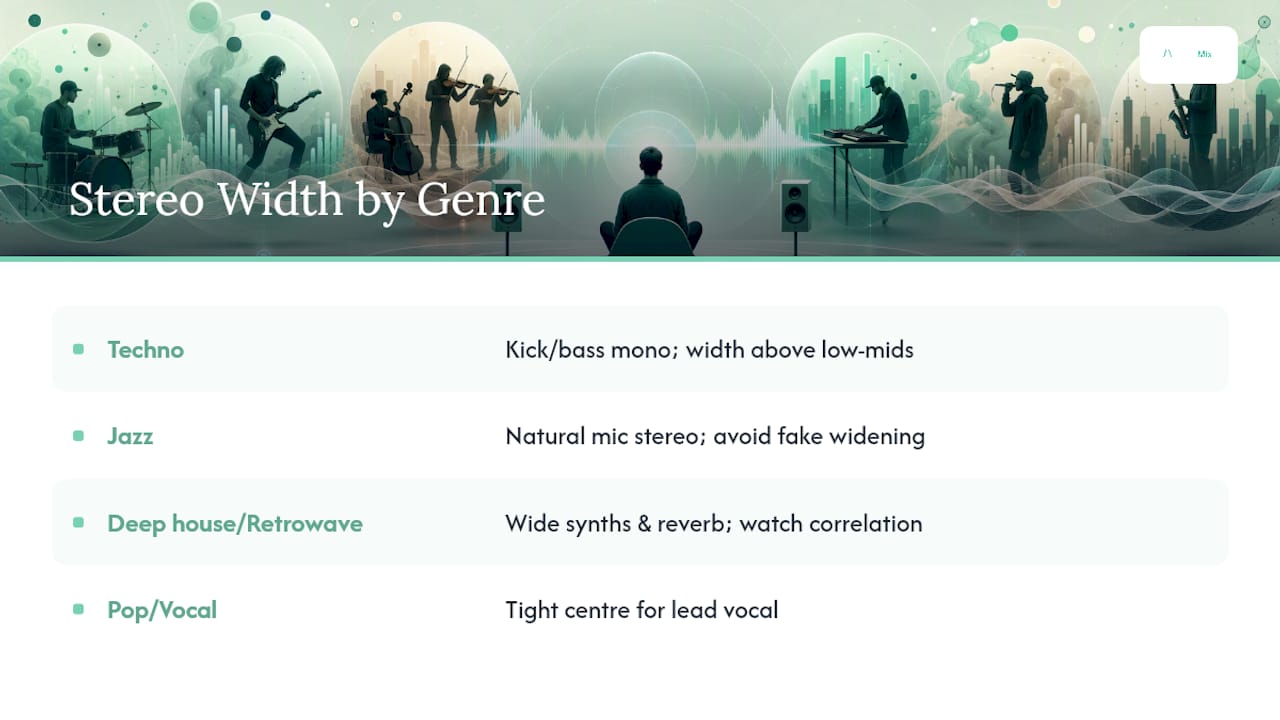
It does, and treating every mix by the same width target is one of the more common mistakes producers make. A techno kick and bass need to sit dead centre and mono, full stop, because club systems and mono-summing DJ setups have zero tolerance for phase instability down low. The width budget in that genre gets spent almost entirely on hi-hats, percussion, and synth pads sitting above the low-mid range.
Jazz and acoustic recordings work differently. Much of the stereo image there comes from genuine microphone placement, overheads capturing real spatial information rather than processed width. Analysing a jazz mix means checking that the natural stereo picture from the room hasn't been squashed or artificially inflated, not building width from nothing.
Deep house and retrowave-style productions tend to lean on wide synth layers and heavy reverb tails for atmosphere, which pushes side-channel energy higher across the whole frequency range. That's fine, provided the correlation meter still holds during the loudest sections and the low end stays disciplined. Pop and vocal-led mixes usually need the tightest centre image of all, since the lead vocal has to sit forward and stable across every playback system a listener might use.
The meters don't change between genres. What changes is where you expect to see width, and how much you tolerate before calling it a problem.
How should you interpret stereo imaging data and act on it?
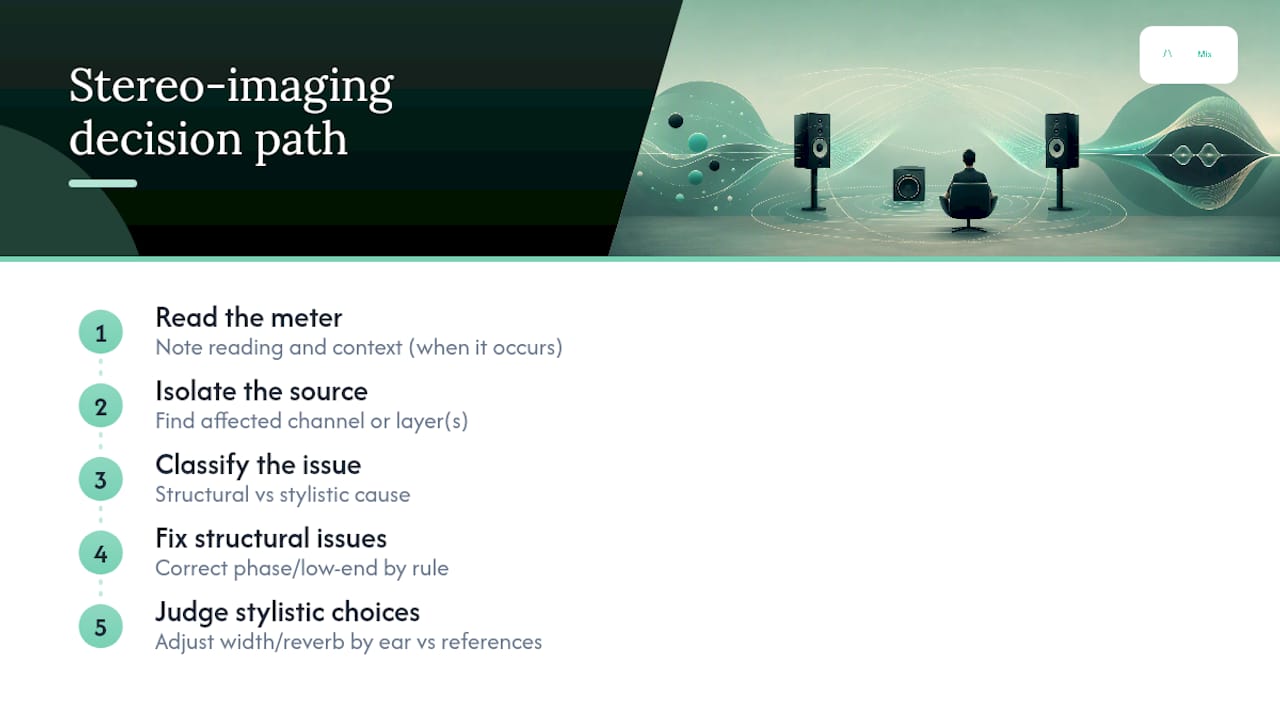
A correlation reading or a goniometer shape only means something once you connect it to what you're actually trying to achieve. A reading of +0.3 isn't automatically wrong, if it only happens for two seconds during a wide reverb tail on a ballad's outro. The same reading during a kick-heavy chorus is a real problem waiting to surface on a mono Bluetooth speaker.
Treat the numbers as a starting point for a question, not a verdict on their own. Ask what's causing the reading, not just whether it passes a threshold. A scattered goniometer shape might trace back to one over-processed synth layer rather than the whole mix, so isolate before you correct.
Decision-making gets easier once you separate two categories of problem. Structural issues, like a wide, unstable low end or genuine phase cancellation, need fixing regardless of genre or taste. Stylistic choices, like how wide your pads sit or how much reverb tail you allow, are judgement calls you make once the structural issues are cleared. Fix the first category by rule. Fix the second by ear, using your reference tracks as the sanity check.
The goal isn't a perfect number on a meter. It's a mix that holds its shape and its low end wherever someone plays it back.
Why measurement beats guesswork in stereo imaging
The conventional advice on stereo imaging still leans too heavily on "make it wide" as if width were the finish line. It isn't. Width without translation is a mix that sounds huge in the studio and falls apart the moment someone plays it through a laptop speaker or a mono PA. The producers who get this right treat width as a variable to control, not a target to maximise.
What's underrated is how much of this work is verification, not creation. Most imaging problems don't come from a bad decision, they come from a decision nobody checked. A widener gets added at 2am, sounds great on headphones, and nobody sums it to mono before the session ends. The fix isn't a better plugin, it's a habit: measure before you commit to a stereo effect, and measure again after.
If you take one thing from this guide, prioritise the mono check and the correlation reading above everything else, above chasing a wider image, above trying new plugins. Everything else in this workflow exists to serve that one verification step.
— AubioMix
Get a measured read on your own mix
You've now got the full workflow: goniometer, correlation meter, mono check, stem isolation, corrective EQ. Running it by ear every session takes real time, and it's easy to skip the verification step when a deadline is close. A service exists for exactly that gap. Upload your mix and get a measured report covering stereo width, mid/side balance, and mono compatibility, alongside written fixes for whatever the meters flag.

If you produce techno or four-on-the-floor material, the techno benchmark page shows how your low-end mono discipline and side-channel width compare against genre norms. Working in a jazz or acoustic style instead? The jazz benchmark is built around natural stereo recordings rather than synthetic width. Upload a mix now and see exactly where your imaging holds up, and where it doesn't.
Sources
- What Is Stereo Imaging? Panning & width explained
- Stereo imaging mixing guide: 7 proven techniques
- How to get more control over your mix’s stereo width (MusicTech)