
A narrow stereo image keeps most of the energy sitting close to centre, with little difference between the left and right channels. Producers reach for it to protect bass weight, add punch, and guarantee the mix still sounds right when it collapses to mono, on a phone speaker, a club system, or a Bluetooth stereo running a compatibility check. It comes with a catch: push it too far without watching a correlation meter and phase problems creep in fast.
TL;DR:
- Narrow stereo images enhance punch, bass weight, and mono compatibility, especially for low frequencies below 150 Hz, which are difficult to localize.
- Using mid/side EQ to reduce the side channel and forcing the subrange mono are reliable techniques for narrowing the stereo field without phase issues.
- Always verify stereo adjustments with correlation meters, vectorscopes, and mono summing across different systems before finalizing a mix.
- Avoid global width adjustment on the master bus; instead, target specific elements and frequency ranges to maintain clarity and prevent phase problems.
- AubioMix provides an automated analysis of stereo width, mono compatibility, and other mix parameters, offering clear, actionable feedback to optimize the stereo image.
Table of Contents
- What actually makes a stereo image narrow?
- When should you choose a narrow image?
- How do you technically narrow a mix or an element?
- What's a safe workflow to narrow an entire mix?
- Which meters actually tell you the truth about width?
- How does AubioMix check your stereo image for you?
- What producers get wrong about narrow stereo images
- Get an objective read on your mix's stereo image
- Sources
- FAQ
What actually makes a stereo image narrow?
There's a difference between where something sits and how wide it feels, and mixing engineers who mix these two up tend to chase the wrong fix. Panning moves a sound's position between left and right speakers. Width is something else entirely: it's the difference between what the left channel is doing and what the right channel is doing. A mono sound panned dead centre has zero width no matter how "big" it sounds. A stereo synth patch with two retuned oscillators, one hard left and one hard right, has enormous width even though its centre position never moves.
Mid/side (M/S) processing is the tool that separates these two ideas cleanly. Any stereo signal can be decoded into a Mid channel (everything common to both left and right, effectively L+R) and a Side channel (everything that differs between them, L minus R). Turn the Side channel down and the image narrows towards mono. Turn it up and the image widens. Most stereo imagers and modern EQs give you direct control over this balance, which is why M/S adjustments are one of the standard approaches alongside all-pass decorrelation and Haas-style delay tricks.
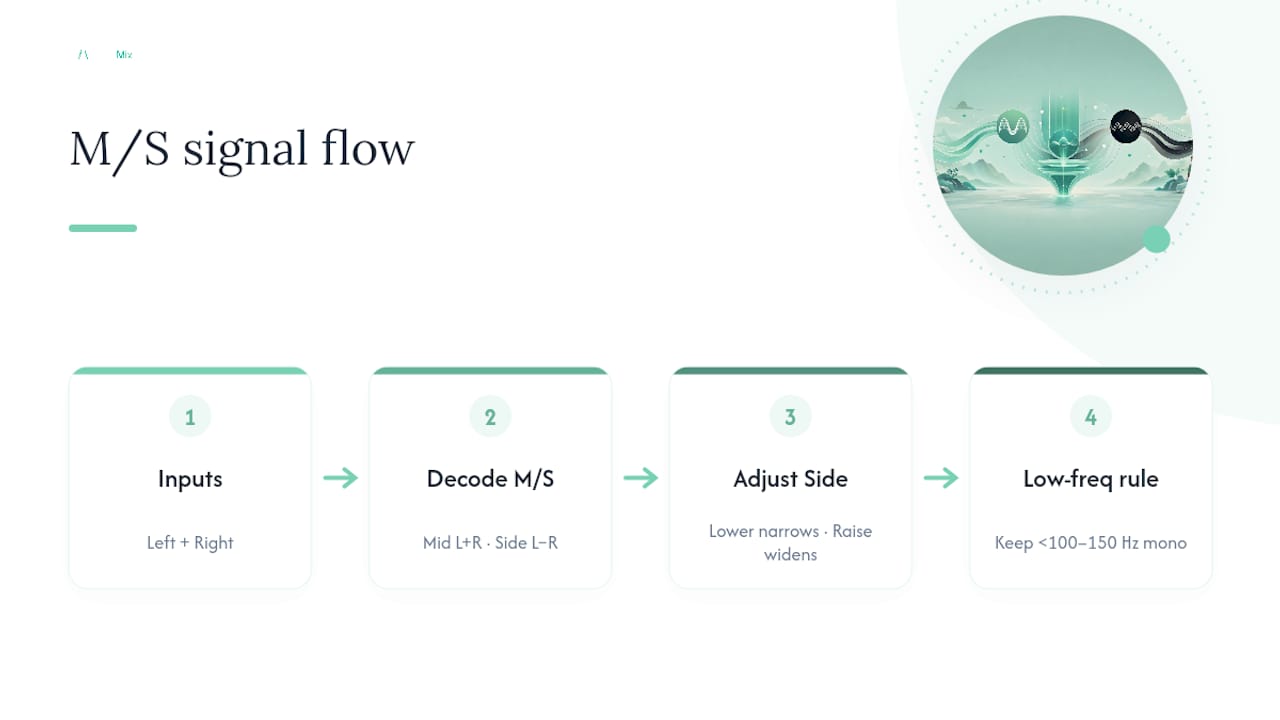
Low frequencies behave differently, and this matters more than most producers assume. Below roughly 100 to 150 Hz, our ears struggle to localise sound in space, and any phase difference between left and right at those wavelengths risks cancellation when a system sums the signal to mono. That's why keeping the low end in mono below that crossover is close to a universal rule in professional mixing and mastering, regardless of genre.
When should you choose a narrow image?
Narrowing isn't a compromise you make when you run out of ideas. It's a deliberate choice with real upside, and knowing when to reach for it saves you from over-correcting a mix that was never the problem in the first place.
The benefits show up quickly once you start comparing:
- Punch and perceived loudness. Centred, mono-heavy low end sums constructively, giving kicks and basslines more apparent weight than the same parts spread wide.
- Reliable mono translation. A narrow image barely changes when it collapses to mono, which matters for club systems, mono PA stacks, and voice-focused platforms.
- Clarity on small speakers. Phone speakers and cheap earbuds can't reproduce genuine stereo separation anyway, so narrow elements read as intended rather than thin.
The trade-offs are real too. A narrow mix can lose the sense of space and depth that makes a track feel expensive, and narrowing everything indiscriminately can mask arrangement problems rather than solve them; a cluttered mid-range doesn't get less cluttered just because it's centred. Techno, hip-hop, and anything built around a dominant low-end hook tend to favour narrower images by nature. Widescreen ambient work and pop choruses usually want more spread, at least above the bass.
How do you technically narrow a mix or an element?
Narrowing is rarely a single move. It's a set of targeted decisions, each with its own safety check, and the Reddit mixing community's consistent observation is that engineers who mono the low end and lean on M/S tools get louder, punchier masters without the phase headaches.
- Use Mid/Side EQ or gain to pull the Side channel down. Reducing Side level, or high-passing the Side channel below your chosen crossover, narrows the perceived width without touching the Mid signal's tonal balance.
- Apply a Mono Maker (or equivalent) to force the sub range mono. Most stereo imagers include a dedicated mono button with an adjustable frequency in the lower range, which is the single most reliable fix for flabby, phase-cancelling bass.
- Route your core elements, kick, bass, lead vocal, snare, through a shared centre bus. Keeping the load-bearing parts centred by routing, rather than by fighting a stereo effect afterwards, is more stable and easier to undo.
- Rein in reverb and delay sends rather than the dry signal. A shorter pre-delay on a reverb brings the reflections closer and narrows the perceived image, while a longer pre-delay pushes it wider. Adjust the wet signal's width, not the source.
- Avoid extreme width or narrowness on the master bus itself. Per-element correction almost always beats a blanket mix-bus imager pushed to its limits, because a single global setting can't account for how differently your kick, vocal, and pads behave in the side channel.
- Use decorrelation and Haas delay sparingly, and never on the full mix. A short delayed copy panned opposite the original genuinely widens a single element, but Haas-effect widening tends to cause comb filtering and poor mono translation when it's applied across an entire mix bus rather than one part.
Pro Tip: If a synth pad or guitar layer sounds thin once you narrow it, don't reach for a wider stereo setting straight away. Try doubling the part with a slightly different voicing or octave instead. Genuine harmonic content reads as "big" even in mono, whereas artificial width just falls apart the moment someone checks their phone speaker.
For a deeper look at where M/S processing commonly goes wrong, this guide to mid/side mistakes is worth a read before you commit to a workflow.
What's a safe workflow to narrow an entire mix?
Trying to narrow a finished mix in one pass, cranking a single width knob down and hoping, is how good low end turns into mush. A sequential process protects the parts that are already working.
- Reference and volume-match first. Load a professionally mixed track in the same genre at matched loudness before you touch anything spectral or spatial. Your ears recalibrate fast, and an unmatched reference will lie to you.
- Identify the offending elements individually. Solo suspicious parts, wide stereo bass patches, a chorus effect gone too far, a reverb tail that lingers, rather than assuming the whole mix is at fault.
- Fix each offender at the source. Narrow the specific synth, tighten the specific reverb, before reaching for a broad correction on the stereo bus.
- Apply frequency-dependent M/S EQ and force the sub to mono. Set your crossover, mono everything below it, and recheck how the low end feels on its own.
- Add gentle Side-channel compression if the width still feels unstable. A light compressor on the Side signal alone can tame stray peaks in the side image without dulling the Mid channel's punch.
- Verify before you commit.
The verification pass matters as much as any processing decision:
- Watch the correlation meter across the whole track, not just on a loud chorus.
- Sum to mono and listen for anything disappearing or thinning out.
- Play the mix on at least two systems, ideally a phone speaker and proper monitors, before calling it finished.
This staged approach mirrors what mono compatibility specialists recommend: incremental M/S adjustments checked against a reference, never a single radical move on the master.
Which meters actually tell you the truth about width?
Your ears adapt to a stereo image within seconds, which is exactly why meters exist. A correlation meter reads the phase relationship between left and right on a scale from negative one to positive one. A reading sitting close to +1 means the channels are largely in phase and will translate cleanly to mono. Long stretches near zero or dipping negative are a direct warning sign of phase cancellation, and that's the moment to go back and check what's happening in the side channel.
A vectorscope or goniometer shows you the same information visually, as a shape rather than a number. A narrow, vertical pattern means most energy sits near centre. A shape that balloons horizontally means a lot of side-only content, useful for spotting exactly which element is dragging your image wider than intended.
Neither meter replaces your ears, though. Pairing an objective meter with a quick mono-sum listen catches problems that either method alone would miss. A correlation reading can look fine while a specific frequency band still cancels badly on cheap speakers.
Plugin features worth knowing:
- Mono Maker / bass mono tools: force everything below a set frequency to mono automatically.
- Side high-shelf or high-pass: removes low-frequency content from the side channel specifically, leaving the Mid channel untouched.
- Per-band width controls: let you narrow the lows while widening the highs in one pass, rather than applying a single setting across the whole spectrum.
- M/S EQ and M/S compression: shape or control the Mid and Side channels independently for far more surgical results than a standard stereo processor.
A review of many uploaded mixes reflects common stereo-image issues reported anecdotally by engineers, such as correlation problems and unchecked side-channel bass before mastering.
How does AubioMix check your stereo image for you?
Running a correlation meter and a mono-sum check by ear takes discipline, and it's easy to skip that step when a deadline is close. AubioMix analyses an uploaded mix for exactly the indicators this article has walked through: stereo correlation behaviour, whether low frequencies are sitting safely in mono, and how the mix likely translates when summed down.
The report doesn't just flag a number and leave you guessing. It returns specific, actionable steps, for instance, narrowing a particular frequency band or tightening the Side channel below a given crossover, so you know exactly what to adjust rather than which plugin to buy. That makes it a useful second check alongside your own meters, particularly before a master goes out the door: upload before you commit to final width decisions, then upload again after adjustments to confirm the fix actually landed. Readers who want to see the format can look at a sample analysis report covering stereo width alongside compression, EQ, and loudness feedback.
What producers get wrong about narrow stereo images
The most reliable rule of thumb is also the simplest: keep the sub mono, keep the lead vocal narrow and centred, and save your width for backing layers, pads, and effects that can afford to spread out. Vocals and bass carry the emotional and rhythmic weight of most mixes, and a wandering, unstable image on either one undermines everything else.
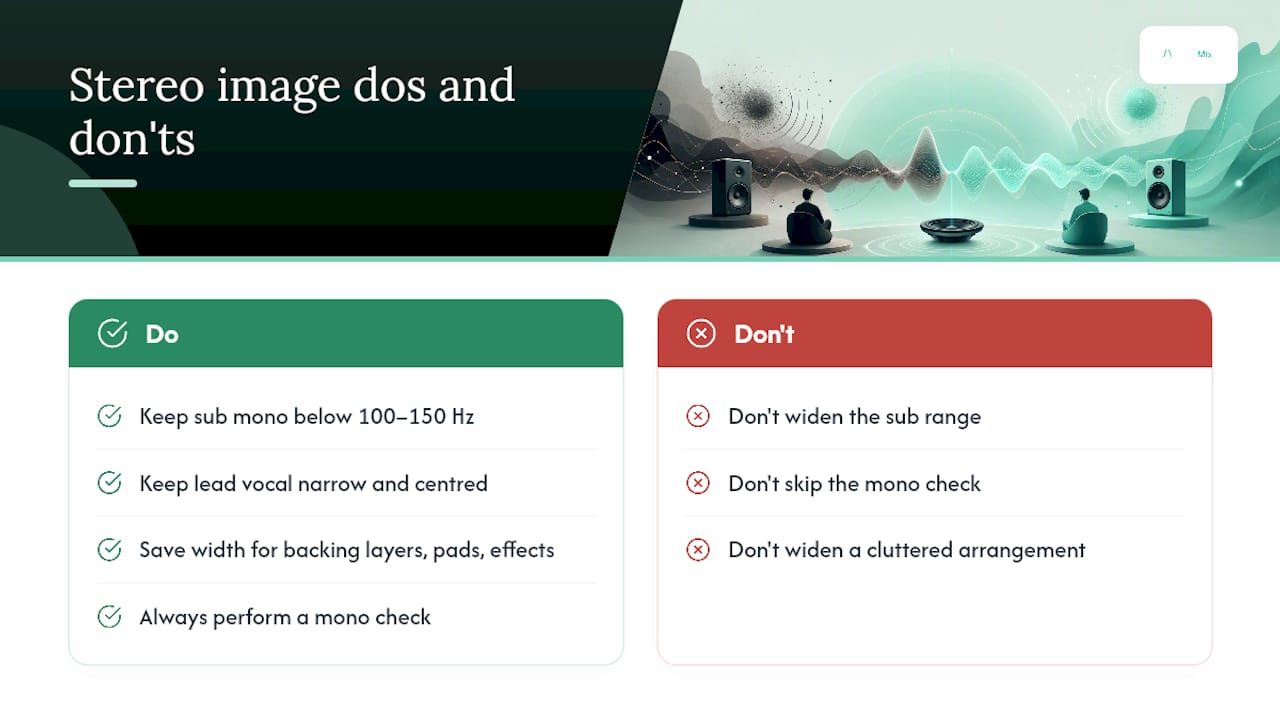
Three mistakes turn up again and again. Widening the sub range because a wide bass "feels" bigger on studio monitors, right up until it disappears on a mono system. Skipping the mono check altogether because the stereo mix sounds great in isolation. And widening a cluttered arrangement to create a false sense of space, when the real problem is too many elements fighting in the same frequency range.
A quick repair sketch: a mix with bass and kick both carrying stereo content below 120 Hz sounded loud on monitors but collapsed to a thin, phasey mess in mono. Forcing everything below 120 Hz to mono and nudging the Side EQ down on the bass alone restored the punch without touching a single fader.
— AubioMix
Get an objective read on your mix's stereo image
You've got the meters and the workflow. What you don't always have is a second, unbiased opinion when your ears have been staring at the same session for six hours. AubioMix gives you that second opinion instantly: upload a mix and get a report covering stereo width and mono compatibility alongside compression, EQ, frequency masking, and loudness, the same checks this article walked through, run automatically and returned as specific steps rather than vague warnings.

If you're unsure whether a section of your track is too wide, too narrow, or fine as it is, that uncertainty is exactly what a report resolves. Compare your results against the genre-specific loudness and spectral benchmarks to see how your stereo balance stacks up against professionally mastered references in your style. The most useful test is the smallest one: pick the chorus or drop that feels off, upload it, and see what the analysis actually flags before you touch another plugin.
Sources
- Stereo image processors: how to use them in mixing
- What is stereo width | KERN Audio guides
- Stereo Imaging: How to widen your mix and stereo image
- Stereo widening: what it is and 4 techniques for a wider mix - Splice
FAQ
What does stereo image mean?
Stereo image describes how a mix's sound is distributed across the left and right channels, covering both where individual elements sit (panning) and how wide or narrow the overall sound feels (width).
How do you get a wider stereo image?
Widening typically comes from raising the Mid/Side balance towards Side, using all-pass decorrelation, or adding a delayed copy of an element panned to the opposite side (the Haas effect), though Haas widening causes comb filtering and poor mono translation when it's overused on a full mix bus.
What does stereo width mean?
Stereo width is the audible difference between the left and right channels. Zero difference means mono, and the greater that difference, the wider the image feels, independent of where anything is panned.
What is the 83% rule for speaker placement?
That figure relates to monitor and listening-position setup, not stereo image processing in a mix, so it isn't something this guide can confirm; producers checking room acoustics should consult a dedicated speaker-placement resource rather than mixing tutorials.
Can AubioMix tell me if my mix is too narrow or too wide?
AubioMix's mix analysis includes stereo width and mono-compatibility checks alongside its other feedback categories, returning specific steps rather than a single pass-or-fail verdict on the sample report.